
Google API Manual Authentication – Complete Step-by-Step Setup
If you're using a GSheetConnector WordPress plugin to connect with Google Sheets or Google Drive, you'll need to connect Google API with manual authentication. This tutorial walks you through the entire process to create Google API Client ID and Secret Key, set up OAuth Consent Screen, and publish your app for verification.
Table of Contents
- Create a Google Cloud Project and Enable APIs
- Configure OAuth Consent Screen & Create Credentials
- Publish and Verify Your Google App
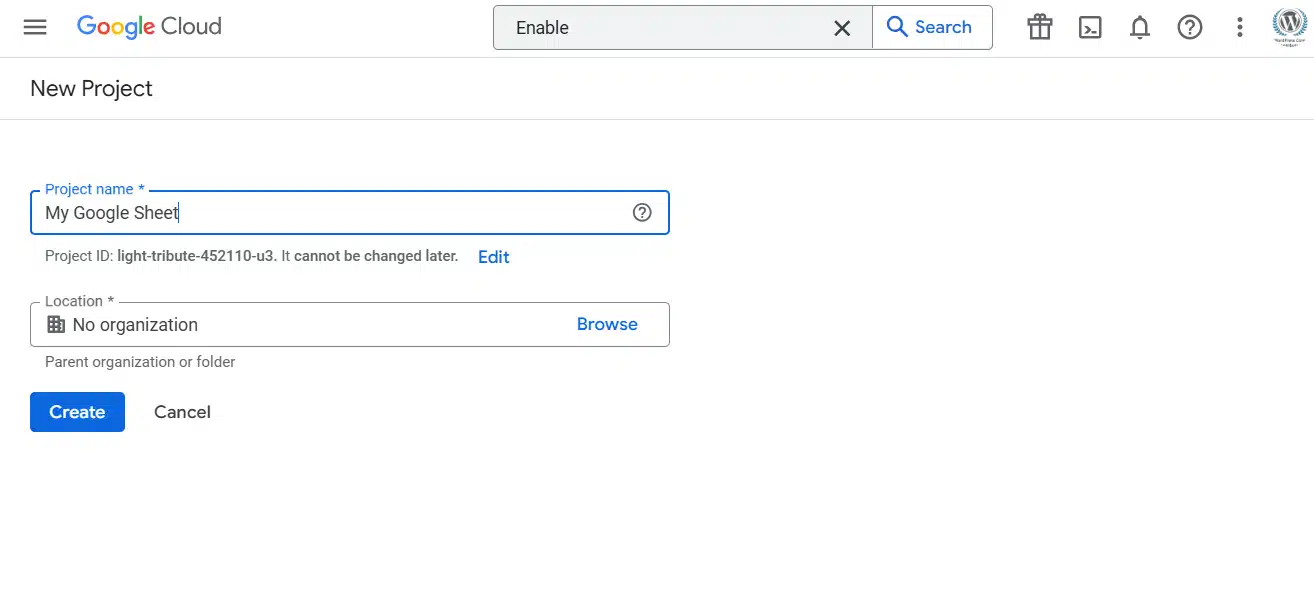
Step 1: Create a Google Cloud Project and Enable APIs
- Login to your Google Account and go to the Google Developer Console.
- Create a new project:
- Login to your Google Account and go to the Google Developer Console.
- Create a new project:
- Open the navigation menu (☰) and select your project.

- Click ENABLE APIS AND SERVICES
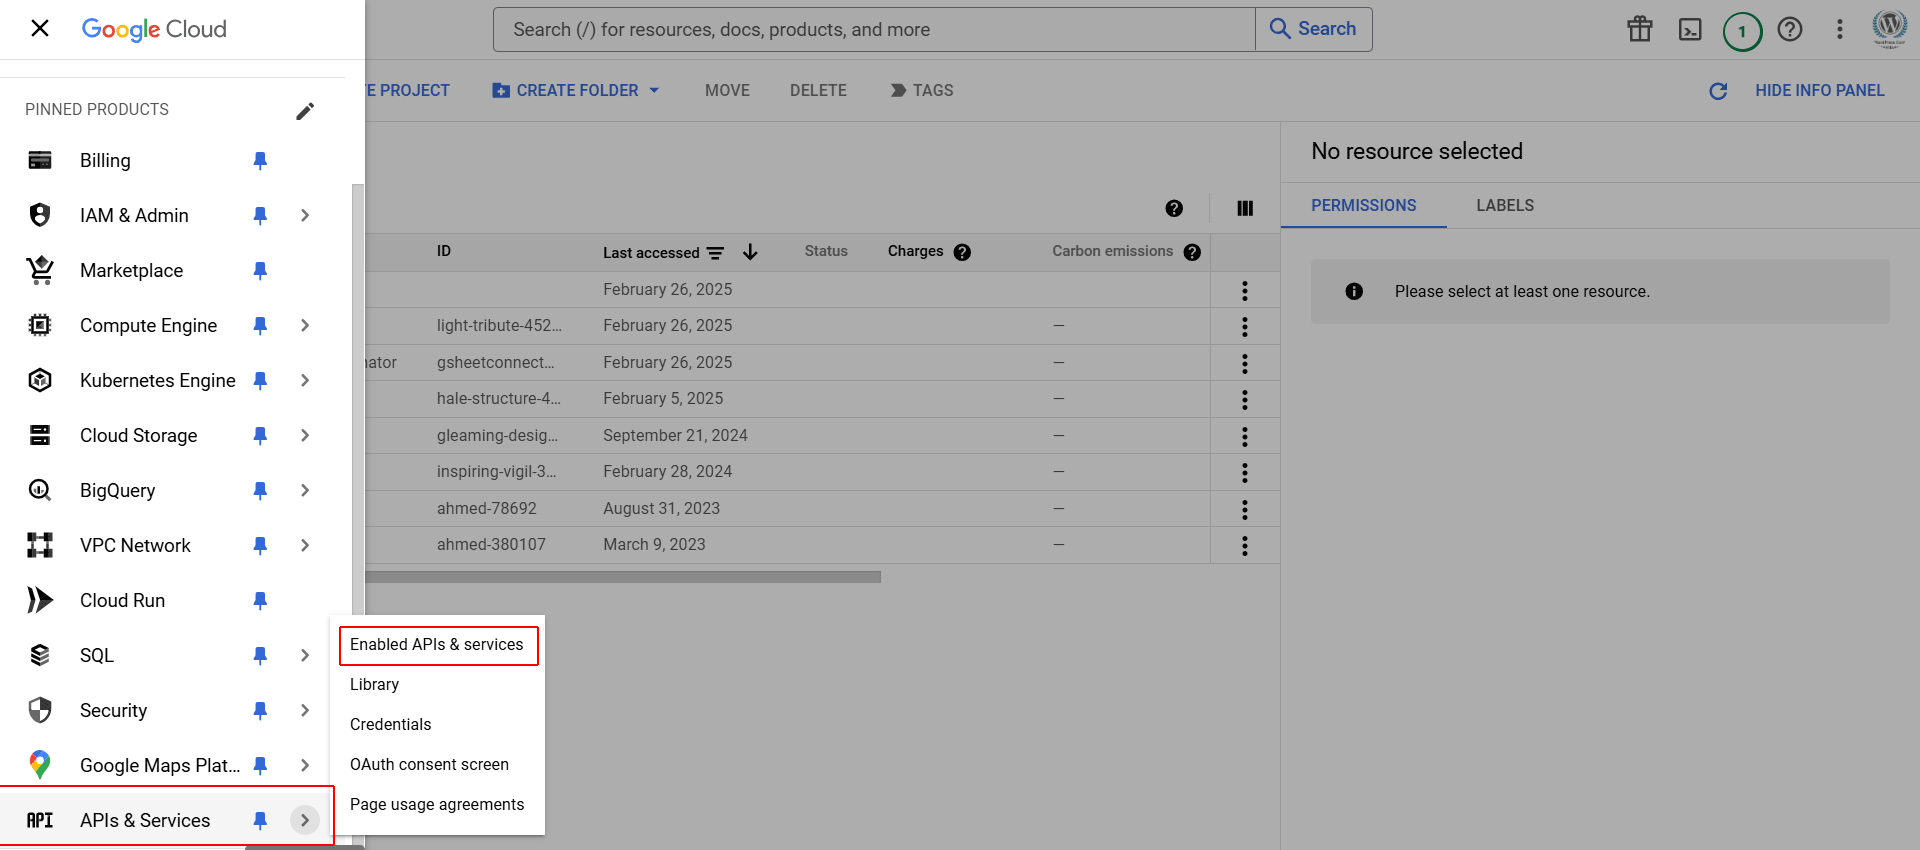
Search and enable the following APIs:
- Google Drive API


- Google Sheets API


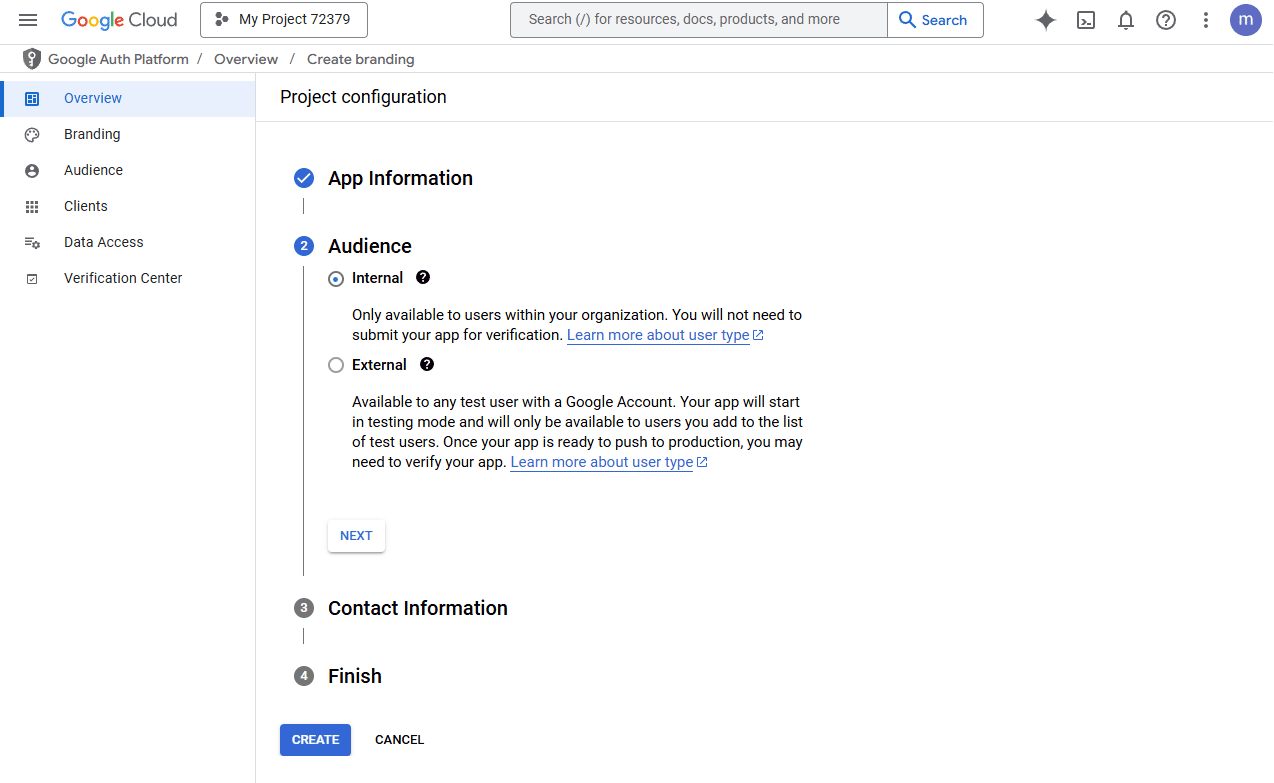
Step 2: Configure OAuth Consent Screen & Create Credentials
- Go to APIs & Services > OAuth consent screen.

- Select User Type (Internal or External), then click Create.
Note: Your app will not be subject to the unverified app screen or the 100-user cap if it's designated as internal-only. However, only users in the Workspace or Cloud Identity organization will be able to use the app.
You can update your project from public to internal by following these steps:
- Sign-in to Google Cloud Console
- Select the project ID
- Go to OAuth Consent Screen under APIs & Services
- Go to User Type
- Select Make Internal
- Click Save
- Create an Organization by following the Quickstart Using Organizations instructions.
- Migrate the project into the organization you created as shown in Migrating Existing Projects into the Organization.
User Type: Internal

What is “User Type: Internal” in Google Cloud?
When you set the User Type to Internal, it means only users within your Google Workspace organization can log in to your app using Google OAuth.
When can you use “Internal” user type?
You can only select Internal if:
- Your Google Cloud project is linked to a Google Workspace (formerly G Suite) account.
- You are logged in with a Google Workspace user (not a personal @gmail.com account).
- Your Google Cloud project is under an Organization, not a personal project.
When should you use an Internal app?
- For internal company tools
- Employee dashboards
- Automation using Google Sheets/Docs within the company
- Any app only your team or company will use
How to set the user type to “Internal”?
Step 1: Use a Google Workspace Account
Make sure you're logged in with a Google Workspace account (not @gmail.com).
Step 2: Go to Google Cloud Console
https://console.cloud.google.com/
Step 3: Select or create your project
Step 4: Go to
APIs & Services → OAuth Consent Screen
Step 5: Select User Type: Internal
If your project is under a Google Workspace organization, you will see the “Internal” option here.
Step 6: Fill out app details
- App Name
- Support Email
- App Logo (optional)
- App Domain, Privacy Policy URL, Terms of Service URL (if required)
Step 7: Configure Scopes
You do not need to add test users for an Internal app.
Why don’t you see the “Internal” option?
Common reasons:
| Reason | Solution |
|---|---|
| You're using a personal Gmail account | Use a Google Workspace account |
| Project is not linked to an organization | Create the project under your Workspace organization |
| You're not the owner/admin of the project | Get access from the organization admin |
To check if your project is under an organization:
Go to IAM & Admin → Settings, and check if there's an organization listed.
Summary:
User Type
Who Can Access
Internal
Only users within your Google Workspace
External
Any Google user (needs app verification for production use)
User Type: External
What is “User Type: External”?
-
External means any user with a Google account (Gmail or Workspace) can log in to your app using Google OAuth.
-
This is required when your app is public or used outside your organization (like customers, clients, or general users).
When to use External?
| User Type | Who Can Access |
|---|---|
| Internal | Only users within your Google Workspace |
| External | Any Google user (needs app verification for production use) |
What is “User Type: External”?
-
External means any user with a Google account (Gmail or Workspace) can log in to your app using Google OAuth.
-
This is required when your app is public or used outside your organization (like customers, clients, or general users).
When to use External?
External means any user with a Google account (Gmail or Workspace) can log in to your app using Google OAuth.
This is required when your app is public or used outside your organization (like customers, clients, or general users).
Use User Type: External when:
- Your app is public
- Your users are NOT limited to your Workspace organization
- You’re planning to publish the app on a website or SaaS product
- You want to allow any Google user to authenticate and access Google Sheets, Drive, etc.
How to Set User Type: External in Google Cloud
Step 1: Open Google Cloud Console
https://console.cloud.google.com
Step 2: Select or Create a Project
-
Make sure you are using the correct project for your app.
Step 3: Go to OAuth Consent Screen
-
In the left sidebar → Go to:
APIs & Services → OAuth consent screen
Step 4: Select User Type:
- Choose External
- Click Create
Step 5: Fill App Information
Make sure you are using the correct project for your app.
-
In the left sidebar → Go to:
APIs & Services → OAuth consent screen
Step 4: Select User Type:
- Choose External
- Click Create
Step 5: Fill App Information
You will need to provide the following:
| Field | Description |
|---|---|
| App Name | Name that users will see during OAuth |
| Support Email | Email where users can reach you |
| App Logo (optional) | For branding |
| App Domain | Your website domain |
| Authorized Domains | Add your domain(s), e.g., yourdomain.com |
| Privacy Policy URL | Publicly accessible URL (required) |
| Terms of Service URL | Publicly accessible URL (recommended) |
Step 6: Add Scopes
- Add only the minimum required scopes
- If you add Sensitive or Restricted scopes, you must go through verification
Step 7: Add Test Users (Optional During Development)
- Before verification, you must list the email addresses of users who can test the app (max 100 test users).
- After verification, anyone can use the app.
Step 8: Save and Submit for Verification
- Before verification, you must list the email addresses of users who can test the app (max 100 test users).
- After verification, anyone can use the app.
Step 8: Save and Submit for Verification
If you’re using Sensitive or Restricted scopes, you need to:
- Submit for OAuth verification
- Upload a YouTube video showing the login flow
- Provide a link to your app
- Have a verified domain
- Add a privacy policy
Scopes Warning
| Scope Type | Needs Verification? | External App Allowed? |
|---|---|---|
userinfo.email |
✅ Yes | ✅ Yes |
spreadsheets |
✅ Yes | ✅ Yes |
drive.file |
✅ Yes | ✅ Yes |
drive (full access) |
⚠️ Yes + security assessment | ❌ Not allowed unless verified with security audit |
Summary:
Step
Action
1
Open Cloud Console
2
Create or select project
3
Go to OAuth Consent Screen
4
Choose “External”
5
Fill required fields (App Info, Domain, URLs)
6
Add scopes
7
Add test users (optional pre-verification)
8
Submit for verification if needed
| Step | Action |
|---|---|
| 1 | Open Cloud Console |
| 2 | Create or select project |
| 3 | Go to OAuth Consent Screen |
| 4 | Choose “External” |
| 5 | Fill required fields (App Info, Domain, URLs) |
| 6 | Add scopes |
| 7 | Add test users (optional pre-verification) |
| 8 | Submit for verification if needed |

Watch this sample video for Google App Verification
- Add basic branding details and configure your project settings:


- Generate OAuth Client ID and set the Application Type to Web Application:

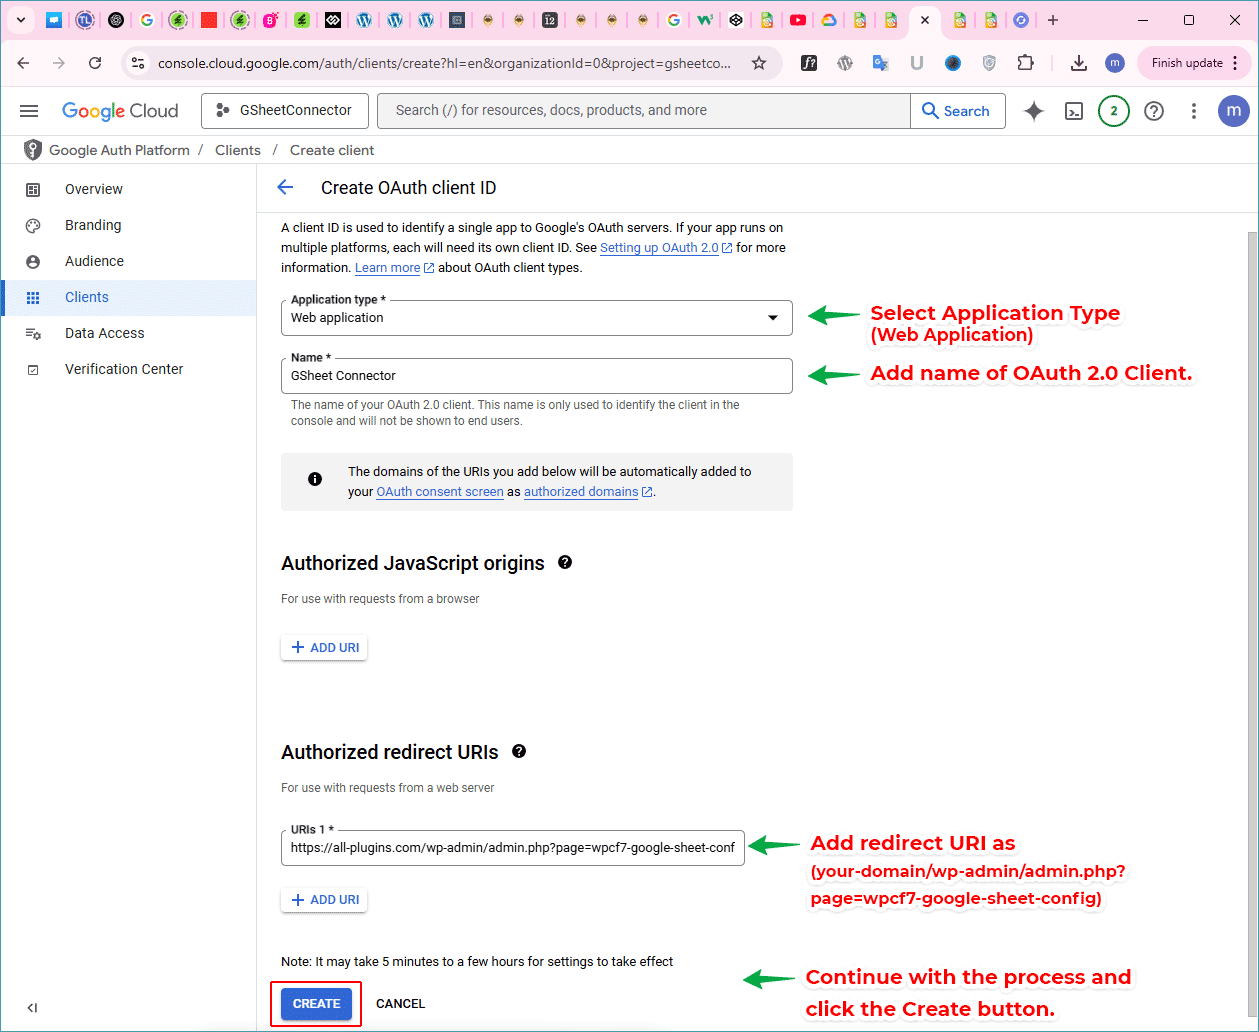
- Add your redirect URIs depending on the plugin:
The plugin’s redirect URL is given below. Please use the provided redirect URL based on the plugin you are using. Replace {your-domain.com} with your actual domain.
- CF7 GSheetConnector: https://
{your-domain.com}/wp-admin/admin.php?page=wpcf7-google-sheet-config - WP Forms GSheetConnector: https://
{your-domain.com}/wp-admin/admin.php?page=wpform-google-sheet-config - Gravity Forms GSheetConnector: https://
{your-domain.com}/wp-admin/admin.php?page=gf_googlesheet - Ninja Forms GSheetConnector: https://
{your-domain.com}/wp-admin/admin.php?page=njform-google-sheet-config - Formidable Forms GSheetConnector: https://
{your-domain.com}/wp-admin/admin.php?page=formidable-form-google-sheet-config - Forminator Forms GSheetConnector: https://
{your-domain.com}/wp-admin/admin.php?page=formntr-gsheet-config - WooCommerce GSheetConnector: https://
{your-domain.com}/wp-admin/admin.php?page=wc-gsheetconnector-config - Elementor Forms GSheetConnector: https://
{your-domain.com}/wp-admin/admin.php?page=gsheetconnector-elementor-config - Avada Forms GSheetConnector: https://
{your-domain.com}/wp-admin/admin.php?page=avada-gsheetconnector-config - DIVI Forms GSheetConnector: https://
{your-domain.com}/wp-admin/admin.php?page=divi-db-google-sheet-config - Easy Digital Downloads GSheetConnector: https://
{your-domain.com}/wp-admin/admin.php?page=edd-gsheet-config
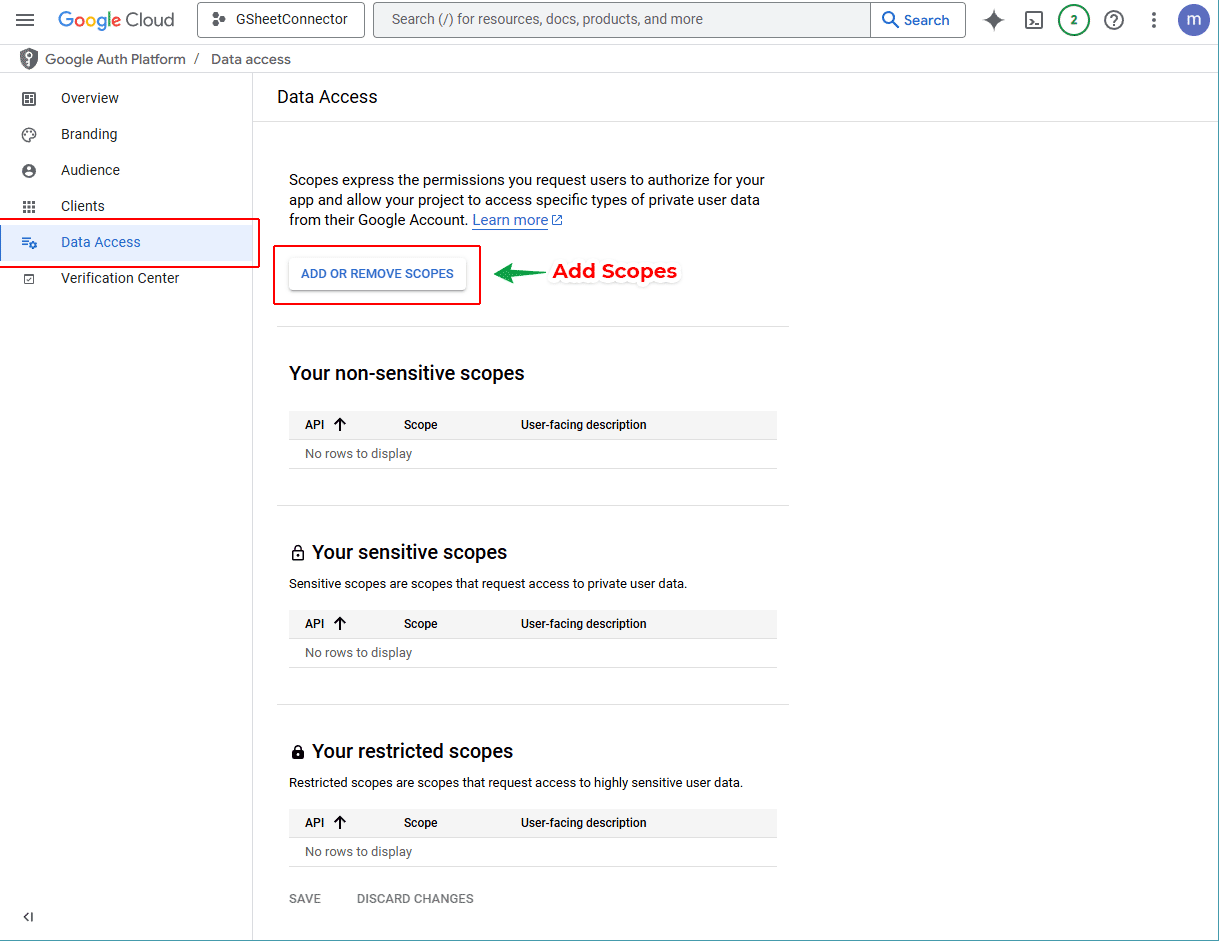
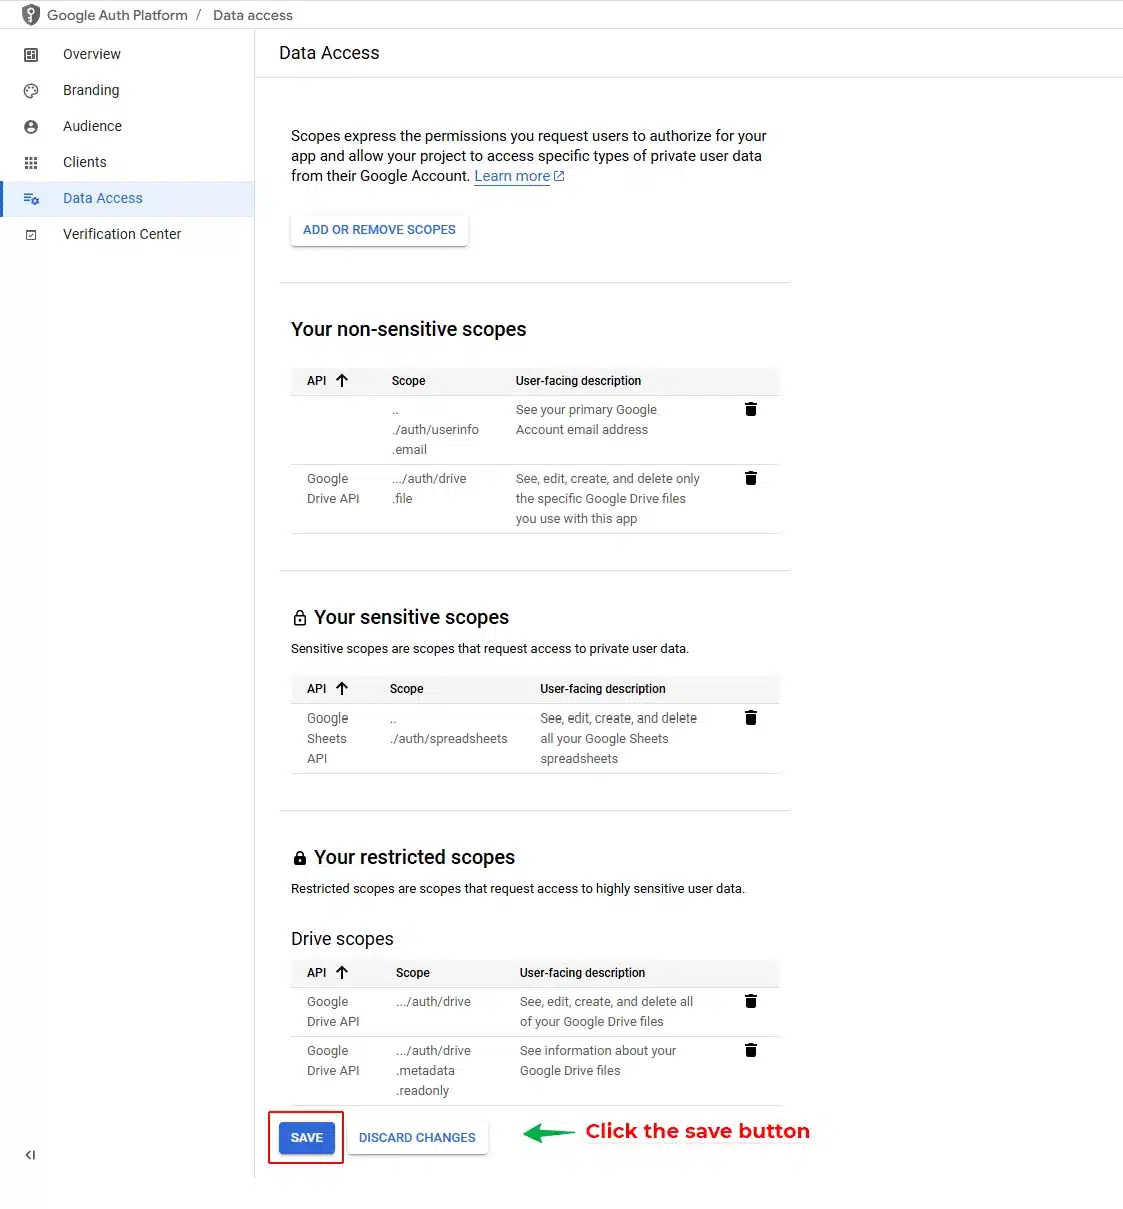
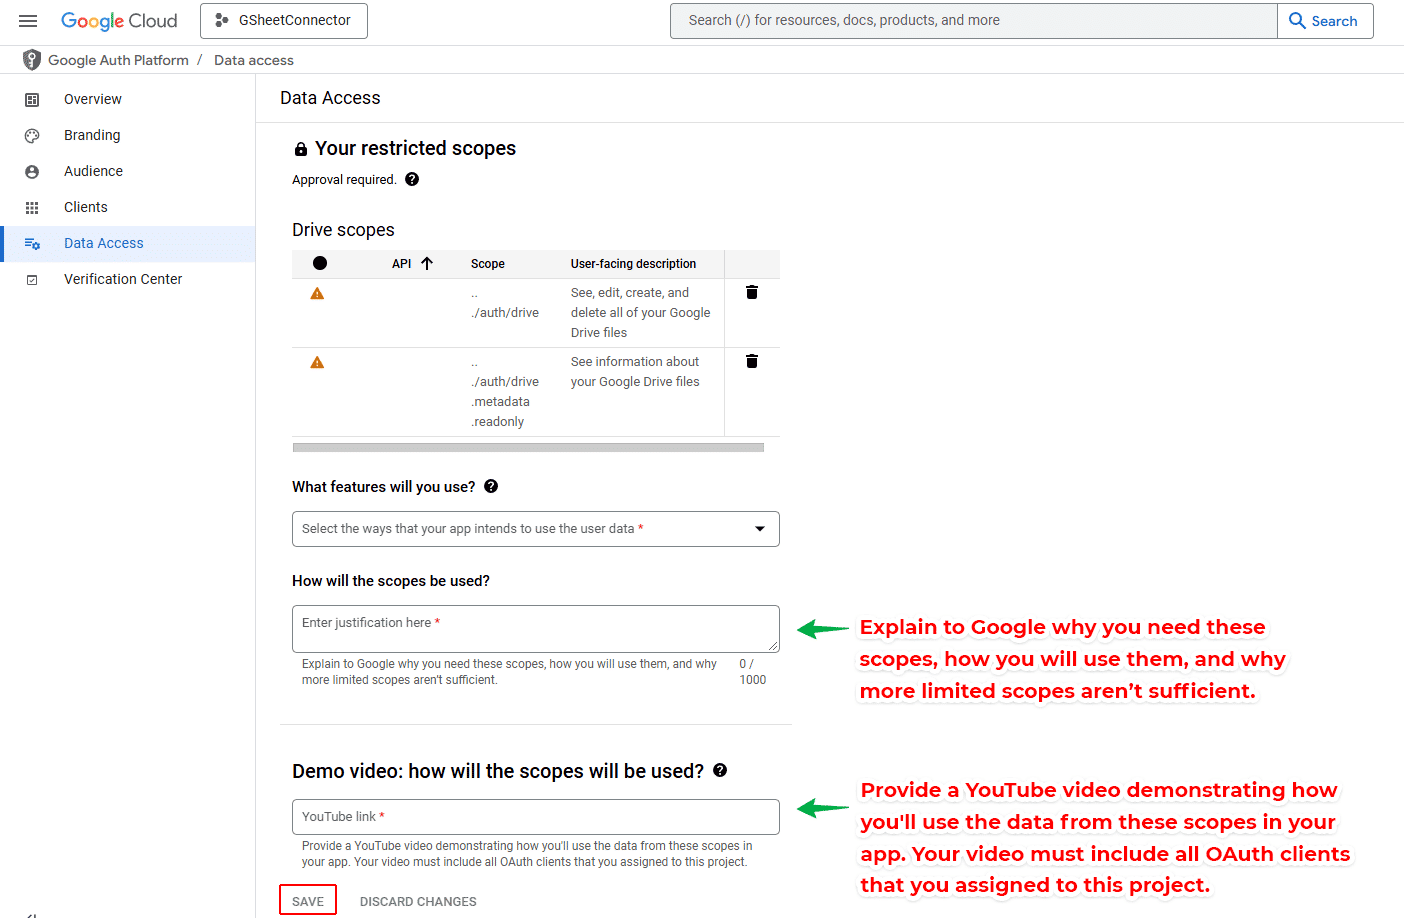
- Add OAuth Scopes:
- ../auth/drive
- ../auth/drive.metadata.readonly
- ../auth/drive.file
- ../auth/spreadsheets
- ../auth/userinfo.email
Google OAuth Scopes – Internal vs External, Sensitive vs Restricted
Scope
Description
Type
Internal App
External App
../auth/driveFull access to all
user Drive files
Restricted
✅ Allowed
❌ Not allowed (needs security assessment)
../auth/drive.metadata.readonlyView metadata for
files in user Drive
Sensitive
✅ Allowed
✅ Allowed (needs consent screen verification)
../auth/drive.fileAccess files
created/opened by app
Sensitive
✅ Allowed
✅ Allowed (recommended scope)
../auth/spreadsheetsFull access to
Google Sheets
Sensitive
✅ Allowed
✅ Allowed (needs consent screen verification)
../auth/userinfo.emailView user
email address
Sensitive
✅ Allowed
✅ Allowed (needs consent screen verification)
Legend
| Scope | Description | Type | Internal App | External App |
|---|---|---|---|---|
../auth/drive |
Full access to all user Drive files |
Restricted | ✅ Allowed | ❌ Not allowed (needs security assessment) |
../auth/drive.metadata.readonly |
View metadata for files in user Drive |
Sensitive | ✅ Allowed | ✅ Allowed (needs consent screen verification) |
../auth/drive.file |
Access files created/opened by app |
Sensitive | ✅ Allowed | ✅ Allowed (recommended scope) |
../auth/spreadsheets |
Full access to Google Sheets |
Sensitive | ✅ Allowed | ✅ Allowed (needs consent screen verification) |
../auth/userinfo.email |
View user email address |
Sensitive | ✅ Allowed | ✅ Allowed (needs consent screen verification) |
✅ Allowed – You can use this scope
❌ Not allowed – Not usable without Google’s security assessment
Restricted – Needs security review and Google approval for External apps
Sensitive – Needs OAuth consent screen verification, privacy policy, and domain verification
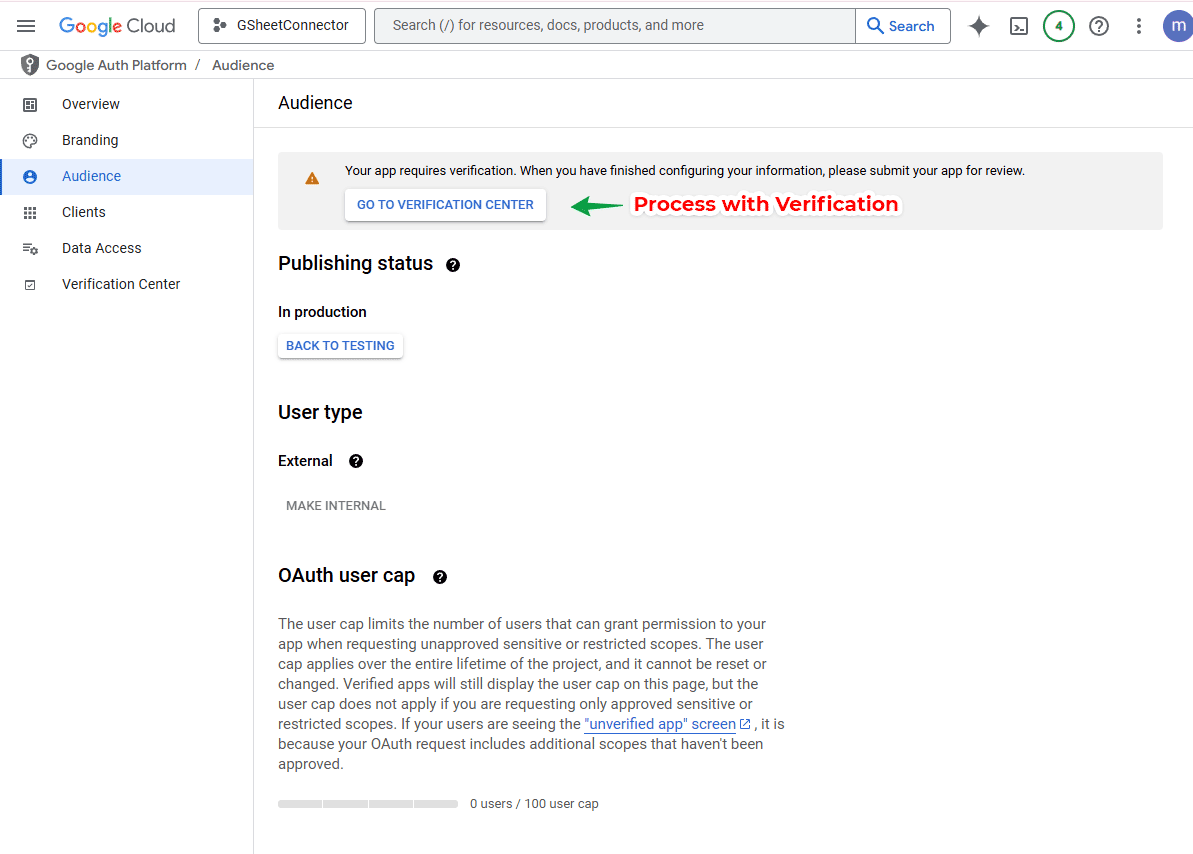
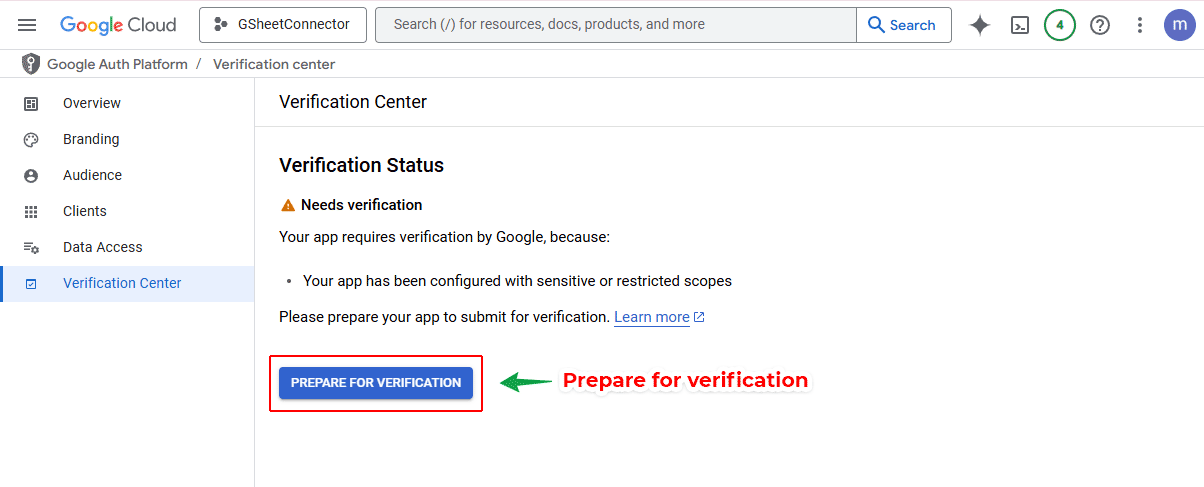
Step 3: Publish and Verify Your Google App
- Navigate to the Publishing Status section and click Publish App.

- Submit for verification with Google.
Also Refer to Domain Verification Guide Read Google's domain verification guide

Need help with GSheetConnector integration?
Check out our full guide on Google Sheet API Settings and Configuration.
✅ You’ve now completed the Google API Manual Authentication setup. You can now connect your plugin securely with Google Sheets and Drive using OAuth.


