- What Is Elementor Atomic Forms?
- Why Connect Elementor Atomic Forms to Google Sheets?
- Free vs PRO for Elementor Atomic Forms
- Steps to Connect Atomic Forms to Google Sheets (Elementor Editor Method)
- Through In Plugin Settings (Form Feeds Method)
- Who Should Use Elementor Atomic Forms with Google Sheets?
- When a Ready Made Connector Makes Sense vs. Custom Approaches
- Conclusion
- FAQs
How to Connect Elementor Atomic Forms to Google Sheets Using GSheetConnector

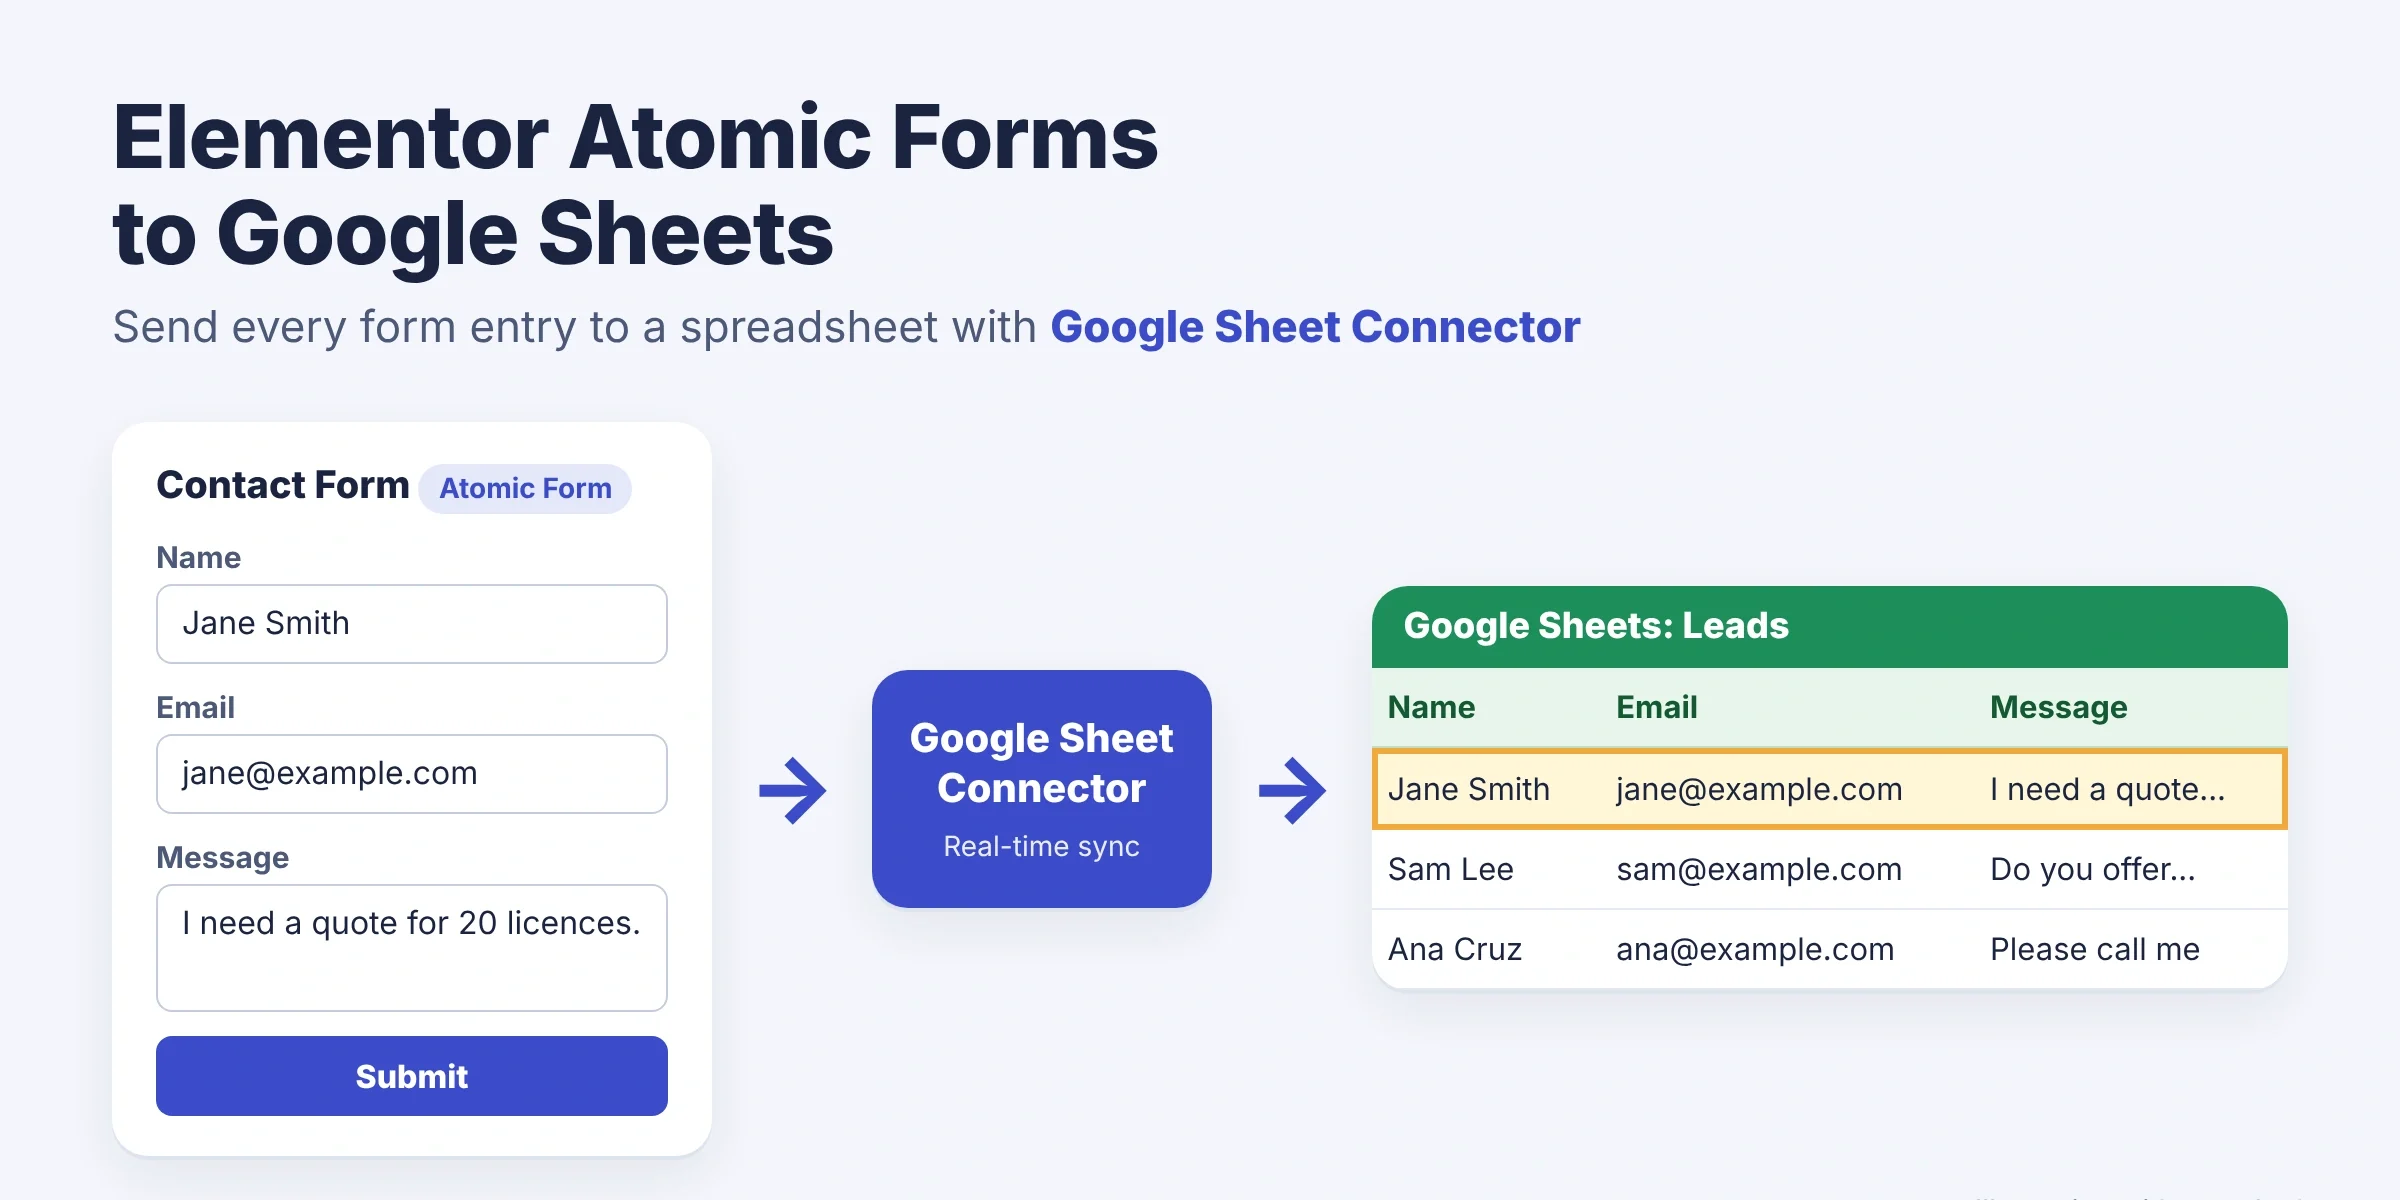
Want to send Elementor Atomic Form submissions directly to Google Sheets? With Google Sheet Connector for Elementor Forms, you can connect your WordPress form to a Google spreadsheet and organize submitted information without manually copying entries.
This guide explains how to connect Elementor Atomic Forms to Google Sheets using two methods: configuring the integration inside the Elementor editor or creating a Sheet Sync Feed through the Google Sheet Connector plugin settings.
You’ll also learn how to select form fields, verify the Google account connection, test submissions, and troubleshoot common syncing issues when you connect Elementor Atomic Forms to Google Sheets.
Quick answer: Install Elementor Pro and Google Sheet Connector for Elementor Forms, then sign in with Google under Elementor → Google Sheet → Integration. Next, add Collect Submissions and GSheetConnector under Actions After Submit in the Elementor editor, or create a feed under Form Feeds. Add your spreadsheet details, and every new entry becomes a new row in Google Sheets.
What Is Elementor Atomic Forms?
Elementor Atomic Forms is the composable form system in Elementor Pro. Instead of a single form widget with fields configured in a sidebar list, Atomic Forms treat each field Label, Input, Textarea, Checkbox, Radio, Select, Date Picker, File Upload, and Submit Button as an independent atomic element inside a Form container.
This modular approach gives designers greater layout flexibility, cleaner markup, and the ability to nest other elements inside the form structure. It is designed primarily for lead capture and contact forms in its first phase, with more advanced capabilities planned for later releases.
When a site receives multiple submissions, managing that information only inside the WordPress dashboard quickly becomes inefficient. Connecting the form to Google Sheets creates a living spreadsheet where teams can filter, sort, share, and analyze data without exporting CSVs or copying rows by hand.
Google Sheet Connector for Elementor Forms supports both classic Elementor Pro Forms and the newer Atomic Forms, along with MetForm. Full documentation is available in the Google Sheet Connector for Elementor Forms documentation.
Why Connect Elementor Atomic Forms to Google Sheets?
Connecting Elementor Atomic Forms to Google Sheets moves form data into a familiar, collaborative environment instead of leaving it locked inside WordPress.
- Organize form submissions: Keep selected form data in a structured spreadsheet with clear column headers.
- Eliminate manual data entry: Avoid repeatedly exporting or copying information from the WordPress dashboard.
- Manage leads more easily: Review names, email addresses, inquiries, and other submitted details in one place.
- Collaborate with your team: Share the spreadsheet with authorized team members who do not need WordPress access.
- Filter and analyze data: Use Google Sheets sorting, filters, pivot tables, and formulas.
- Choose relevant fields (PRO): Configure exactly which form fields and submission metadata should be sent to the spreadsheet.
Free vs PRO for Elementor Atomic Forms
Both versions send Atomic Form entries to Google Sheets in real time. The difference is how much control you get.
| Feature | Free | PRO |
|---|---|---|
| Send Atomic Form entries to Google Sheets | Yes | Yes |
| Sign in with Google (Existing Method) | Yes | Yes |
| Manual Client/Secret Key and Service Account sign-in | No | Yes |
| Add Sheet Name, Sheet ID, Tab Name and Tab ID by hand | Yes | Yes |
| Pick the sheet and tab from dropdowns (Fetch Sheets) | No | Yes |
| Create headers for you | No. Add headers to row 1 yourself. | Yes |
| Choose, rename and reorder the fields to send | No | Yes |
| Freeze header, header and row colours | No | Yes |
| Send old entries by date range | No | Yes |
Steps to Connect Atomic Forms to Google Sheets (Elementor Editor Method)
Follow these steps to configure the integration directly inside the Elementor editor. For the complete installation walkthrough, see the official free-version installation guide.
1. Install Google Sheet Connector for Elementor Forms
Install and activate Elementor Pro (required for Atomic Forms) and Google Sheet Connector for Elementor Forms on your WordPress site. The free version is available on WordPress.org; advanced features are in the PRO version.
After activation, a new Google Sheet item appears under the Elementor menu.

Go to Pages, locate the page containing your form, and click Edit with Elementor.
2. Add the Atomic Form
In the Elementor editor, locate the Atomic Form element in the widget panel and drag it into the desired section. Add or rearrange the individual atomic field elements (Input, Label, Textarea, etc.) according to your requirements Name, Email, Message, and any other fields you need. Each field label becomes a column name in Google Sheets, so keep the labels short and clear. Official details on the Atomic Form element are available in the Elementor Help Center.
3. Open the Form Settings
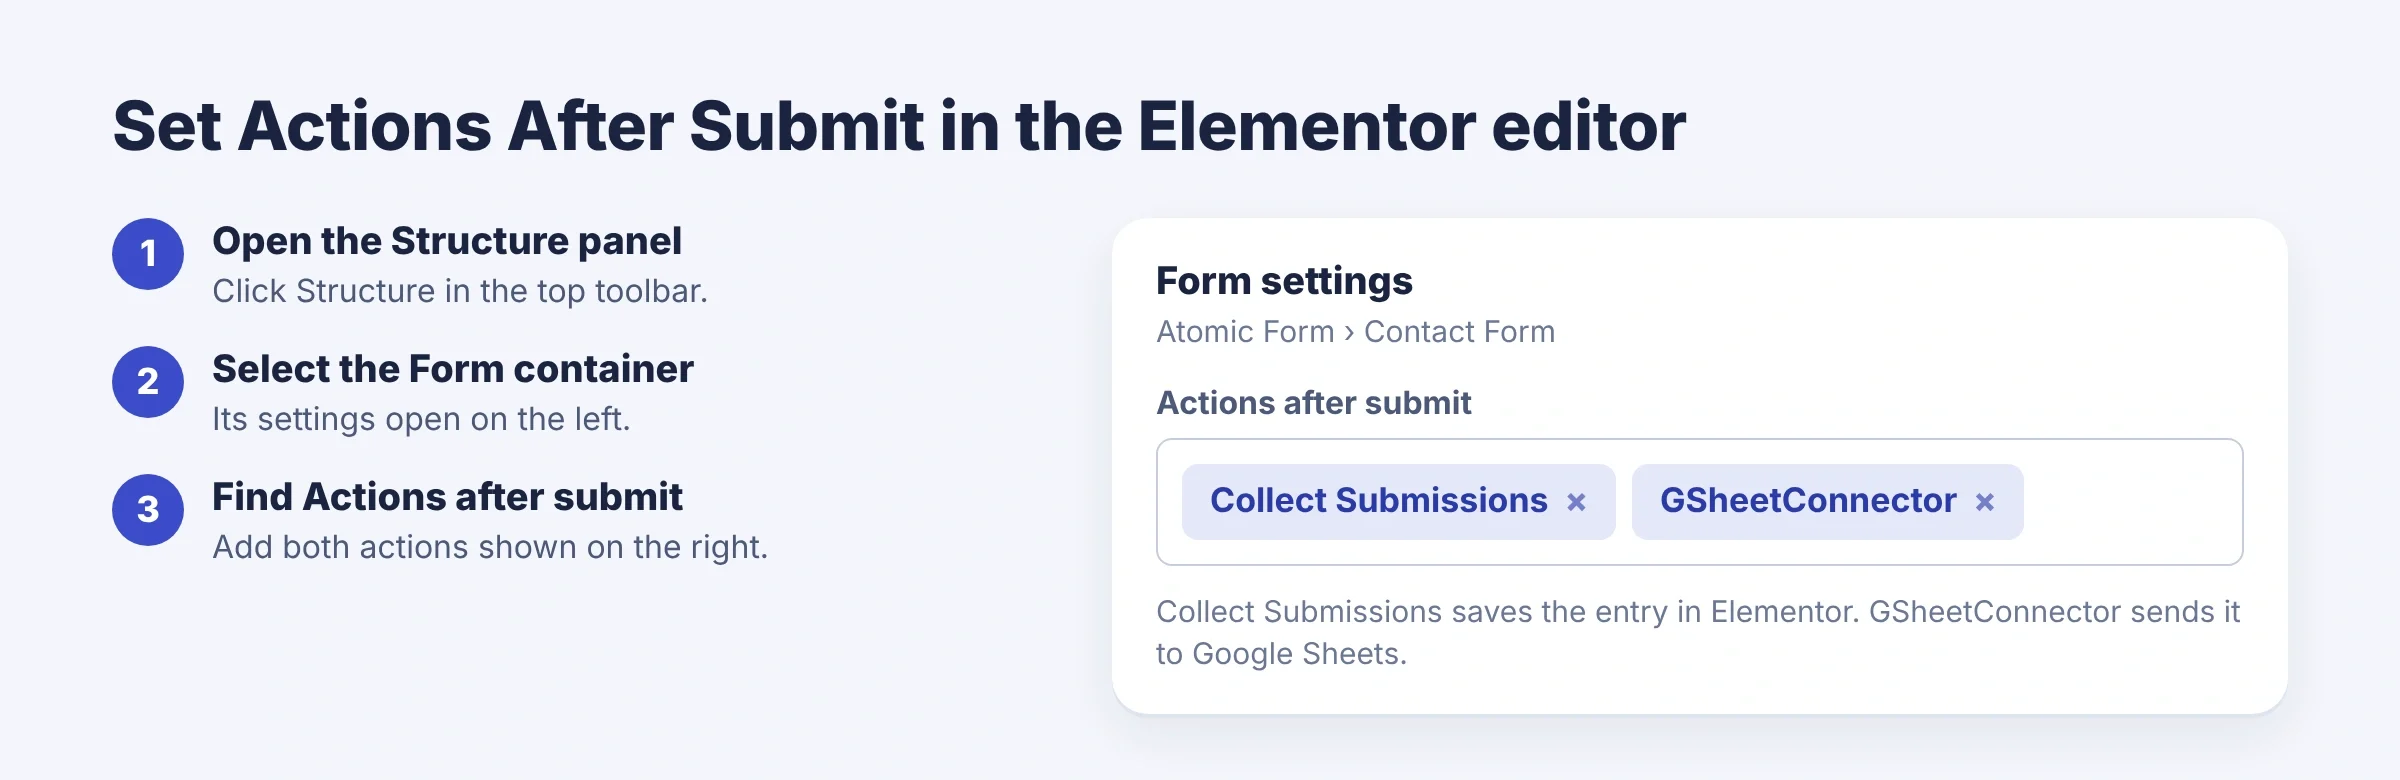
Click the Structure icon in the Elementor editor’s top toolbar. Locate and select the Form container in the Structure panel. The Edit Form settings appear on the left, where you manage content and submission actions.
4. Configure Actions After Submit
In the Edit Form panel, scroll to Actions After Submit and add both of these actions:
- Collect Submissions
- GSheetConnector
Collect Submissions stores entries inside Elementor; Google Sheet Connector handles the Google Sheets integration. Both should be present for a complete workflow when you connect Elementor Atomic Forms to Google Sheets.
5. Verify Google Sheet Connector Authentication
Scroll to the Google Sheet Connector section and confirm the connected Google account. If authentication is incomplete, open the Google Sheet Connector plugin settings (Elementor → Google Sheet), go to the Integration tab, keep Existing Client / Secret Key (Auto Setup) selected and click Sign in with Google. Detailed steps for the one click (Existing Method) authentication are in the Integration with Google guide.

PRO only: you can also choose Manual Client/Secret Key (use your own Google API project) or Service Account (Recommended). For a service account, paste or upload your JSON credentials, then share your Google Sheet with the service account email.
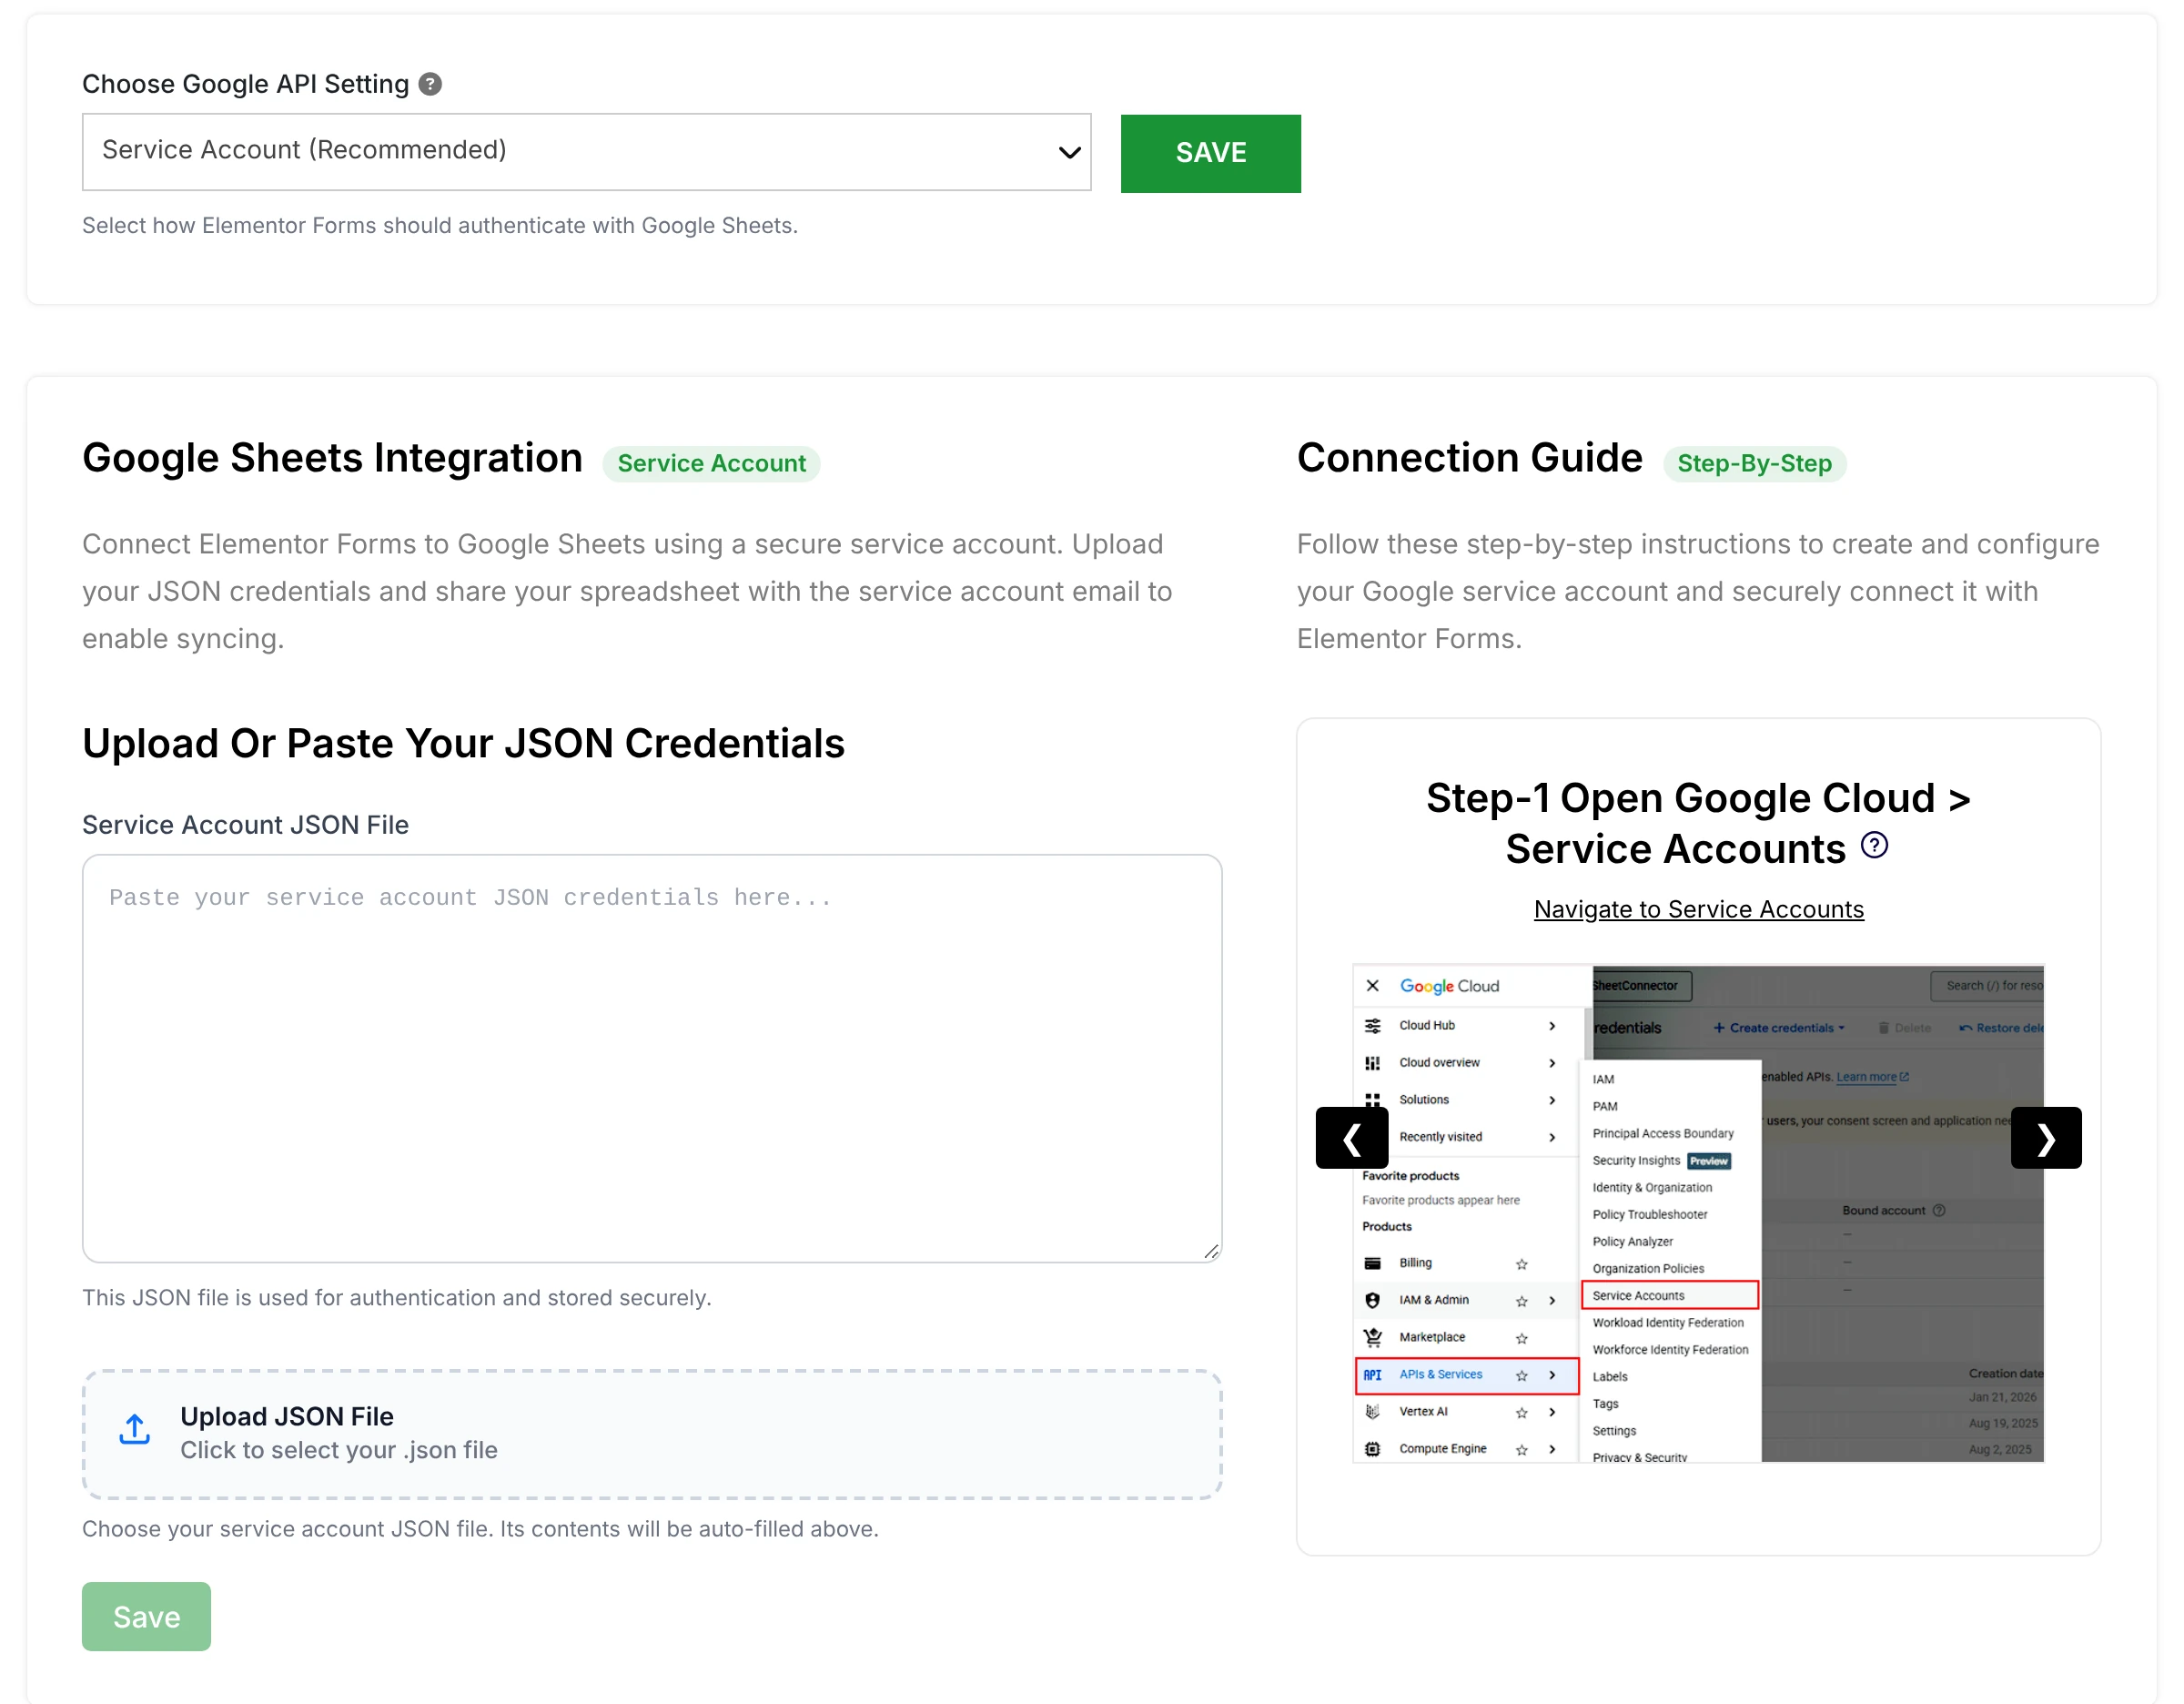
Ensure the account has edit access to the destination spreadsheet before continuing.
6. Configure Your Google Sheets Connection
Choose how you want to link the form to a spreadsheet. First, create or open a Google Sheet and note its Sheet Name, Sheet ID (the long code in the URL between /d/ and /edit), Tab Name, and Tab ID (the number after gid=).
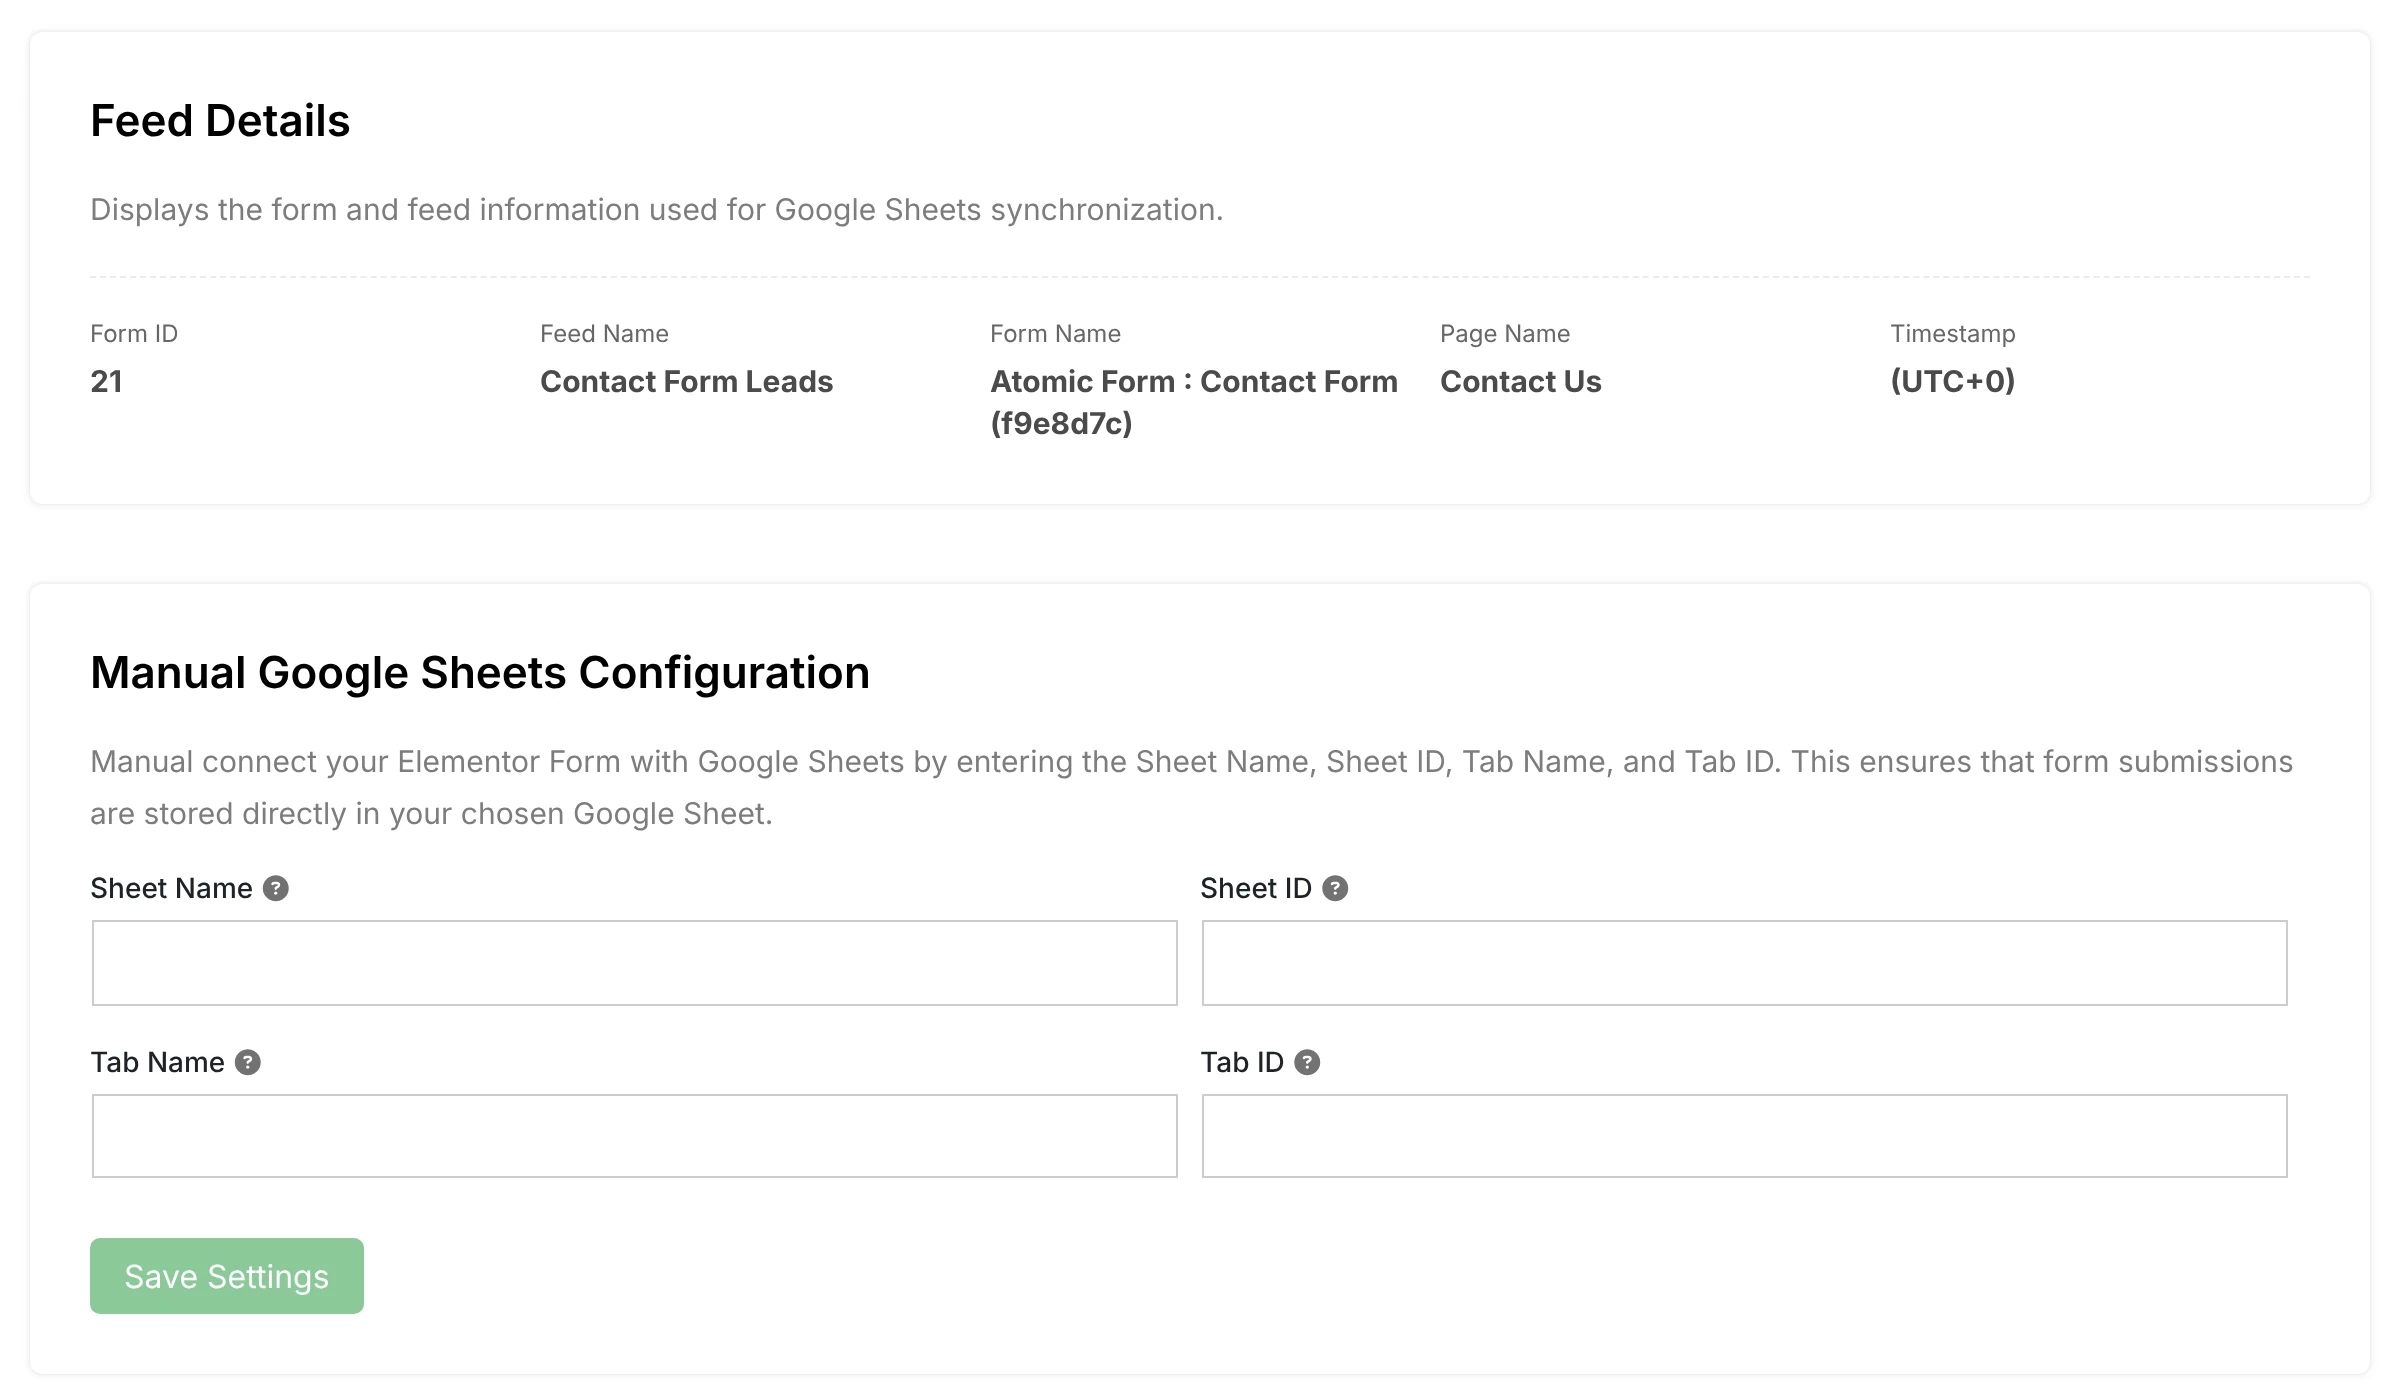
Option A: Manual Google Sheets Configuration (free and PRO)
Enable Manual Google Sheets Configuration and enter:
- Sheet Name
- Sheet ID
- Tab Name
- Tab ID
Use the View Spreadsheet option to confirm the selection. Free plugin: type your column headers in row 1 of the sheet. They must match your Atomic Form field labels, for example Name, Email and Message.
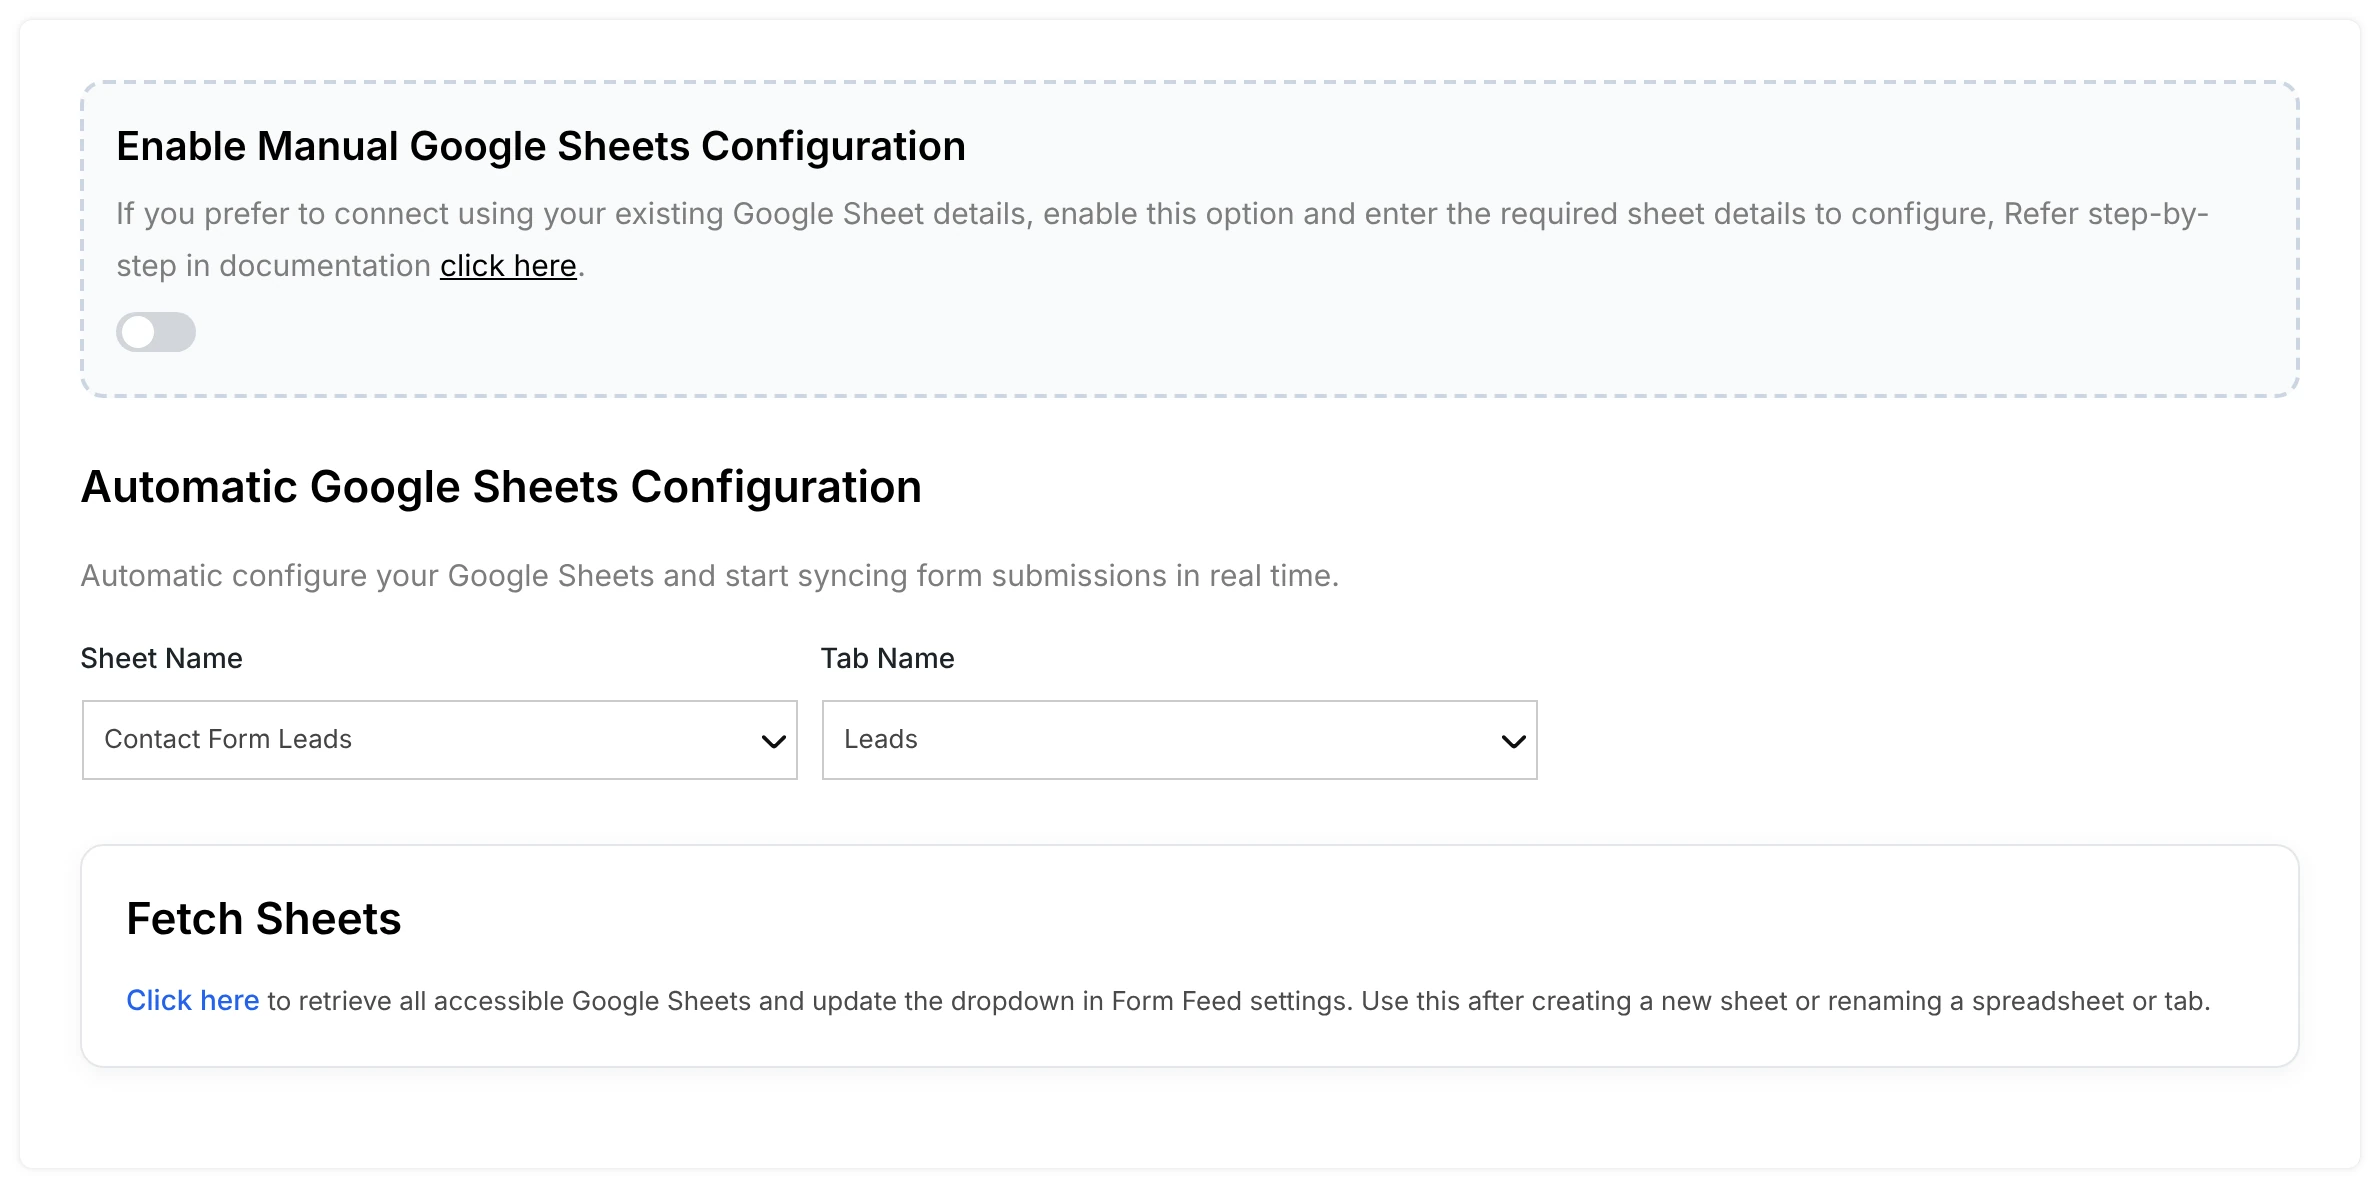
Option B: Select a Spreadsheet Using the Dropdowns (PRO)
- Disable Manual Google Sheets Configuration.
- Select the spreadsheet from the Sheet Name dropdown.
- Select the worksheet from the Tab Name dropdown.
- If the list is outdated after recent changes, click Fetch Sheets → Click here to refresh.
- Click View Spreadsheet to verify.
Confirm the correct spreadsheet and worksheet before proceeding.
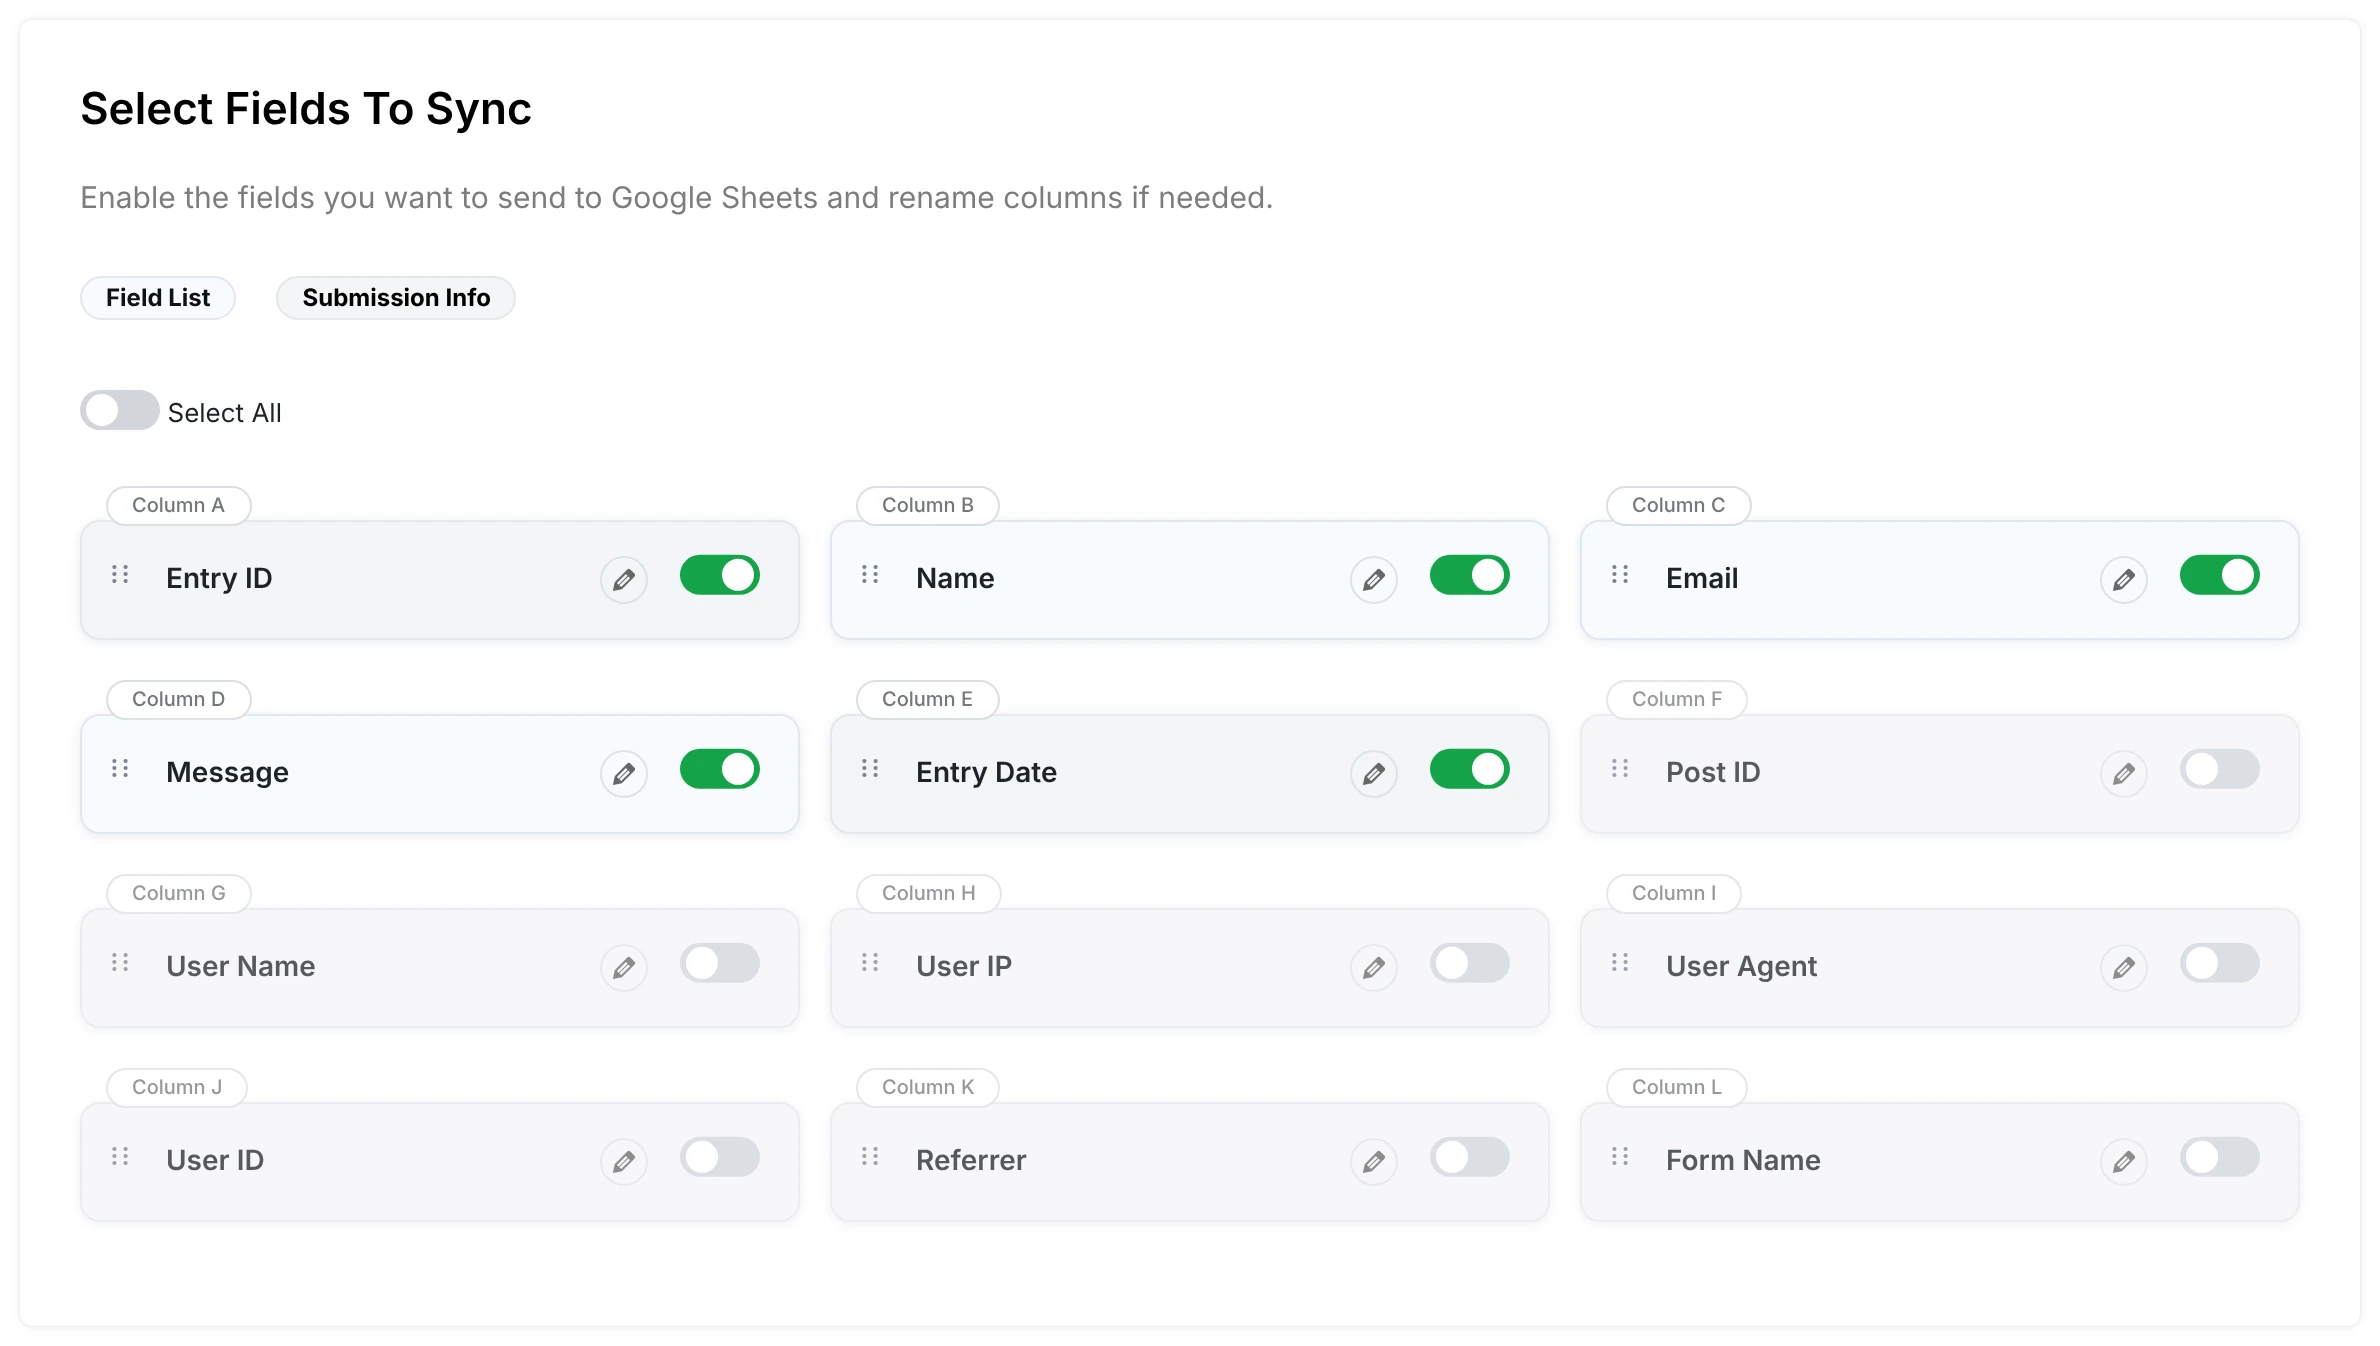
7. Select Fields to Sync (PRO)
Under Select Fields To Sync, review the available options under Field List and Submission Info. Enable the fields you want sent to Google Sheets (Name, Email, Message, and any other form fields or metadata such as Entry ID, Entry Date and Form Name). Click the pencil icon to rename a column header, drag a field to change the column order, or use Select All if you want every displayed field. Checkbox fields can send more than one selected value to the same cell.
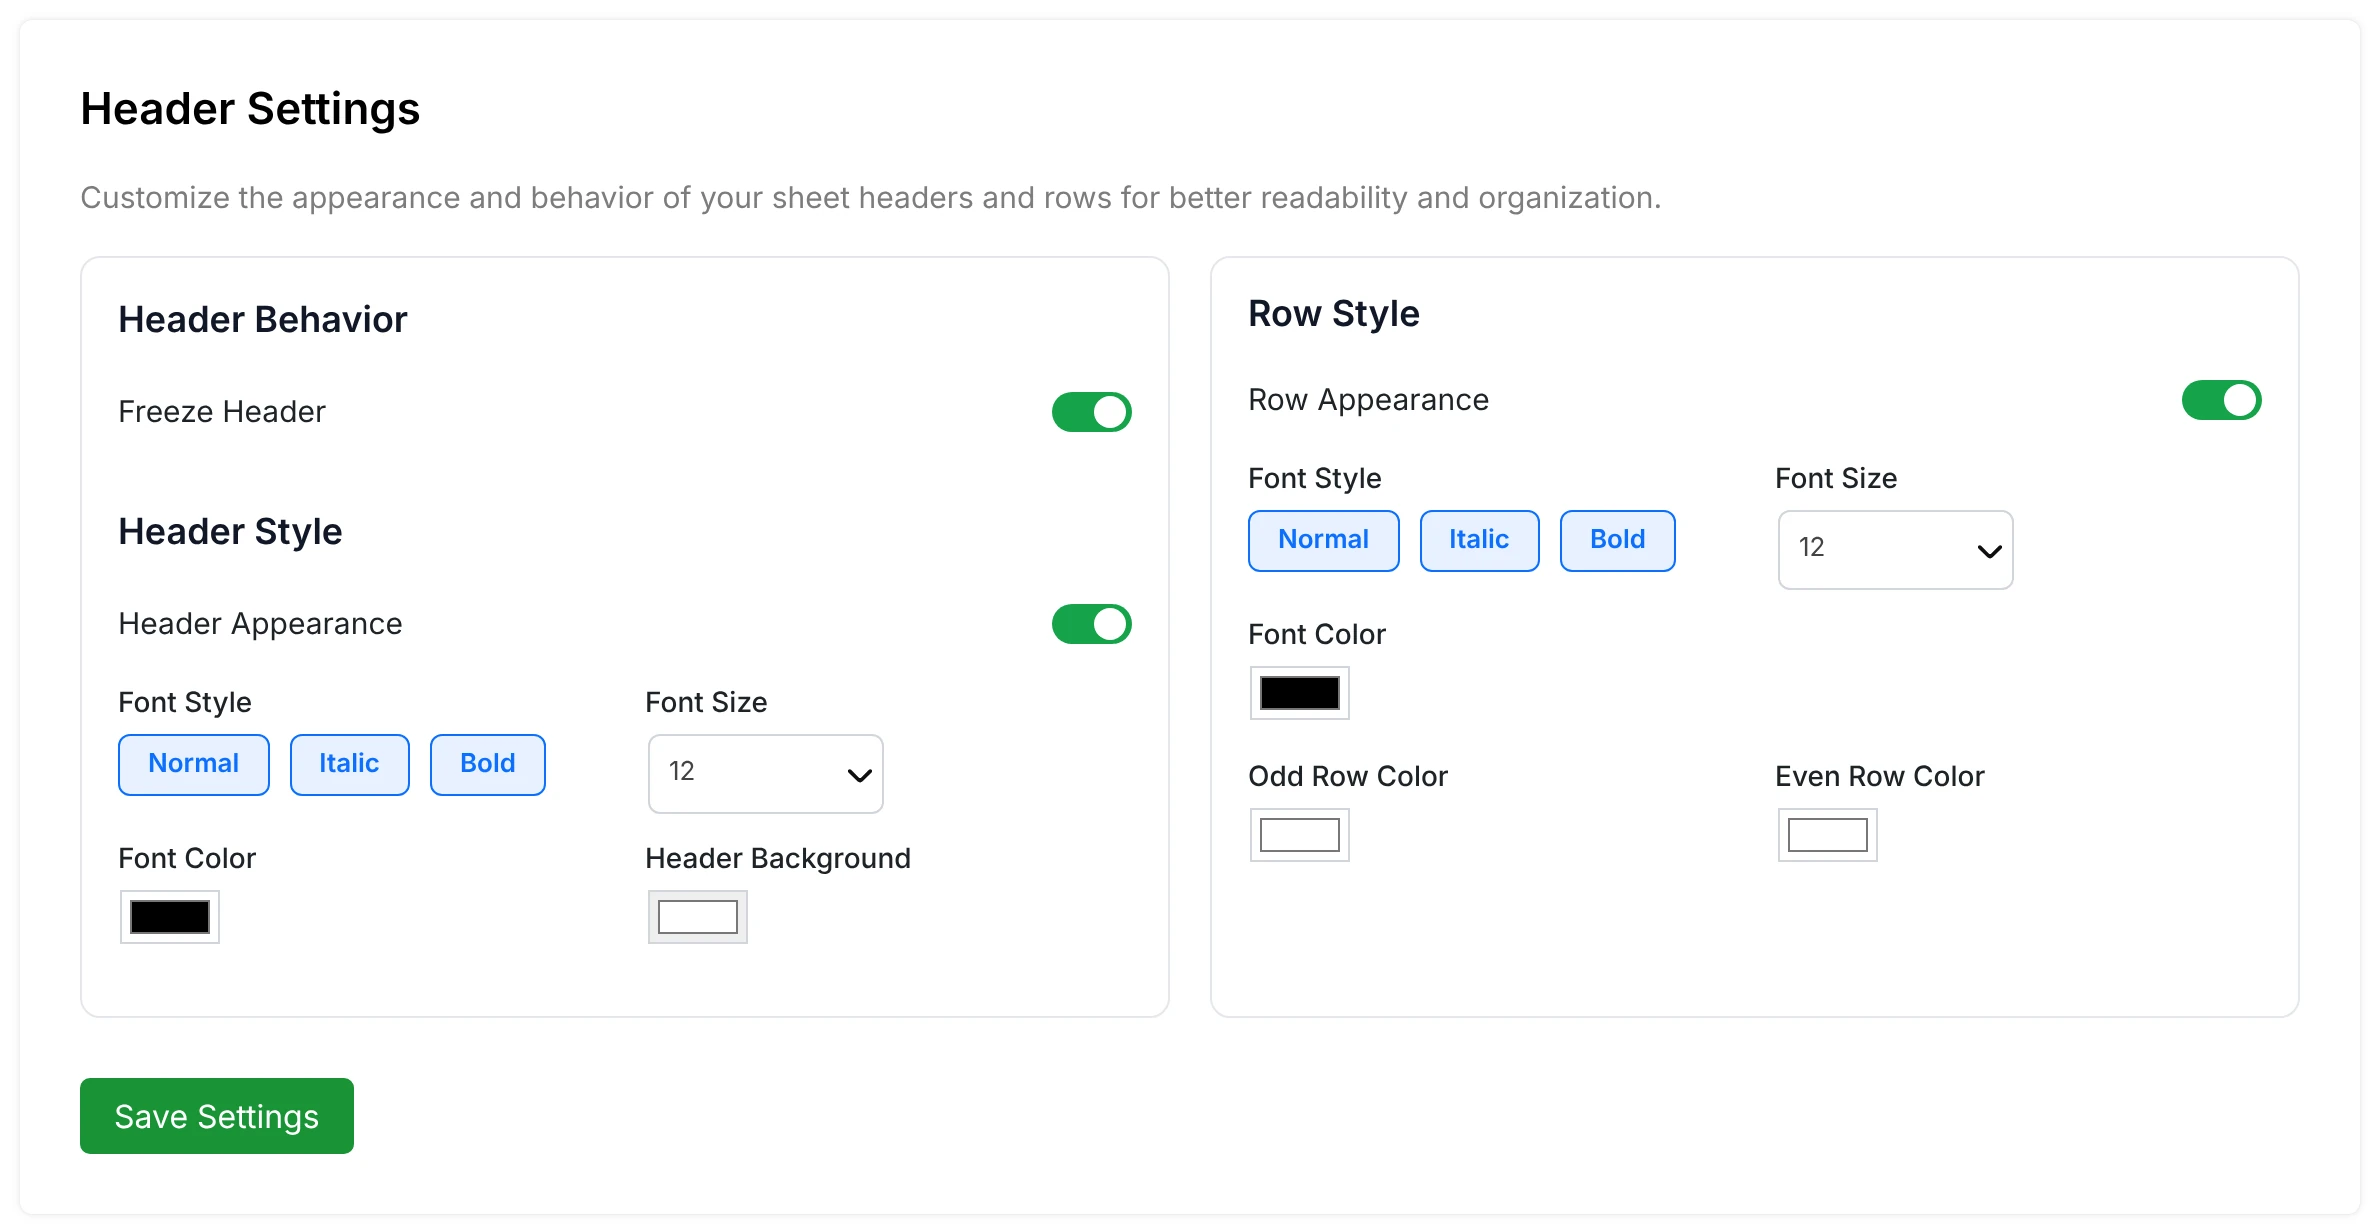
Review Header Settings if you want to style the sheet (Freeze Header, Header Appearance, Row Appearance with font style, size and colors for odd and even rows). Click Save Settings when you finish.
Save Settings the page, submit a test entry through the Atomic Form, and check the Google Sheet to confirm the expected data appears in the correct columns. You can also try the live demo at demo.gsheetconnector.com.

Through In Plugin Settings (Form Feeds Method)
You can also configure the integration from the Google Sheet Connector for Elementor Forms plugin settings using Form Feeds. This approach is useful when you prefer managing connections outside the page editor or need to associate multiple forms with different sheets. Full plugin documentation is available at gsheetconnector.com/docs.
1. Authenticate Your Google Account
In the WordPress dashboard, open the Google Sheet Connector for Elementor Forms settings. Click the Integration tab and complete the authentication process to connect your Google account. Follow the Existing Method authentication steps for the simplest setup.
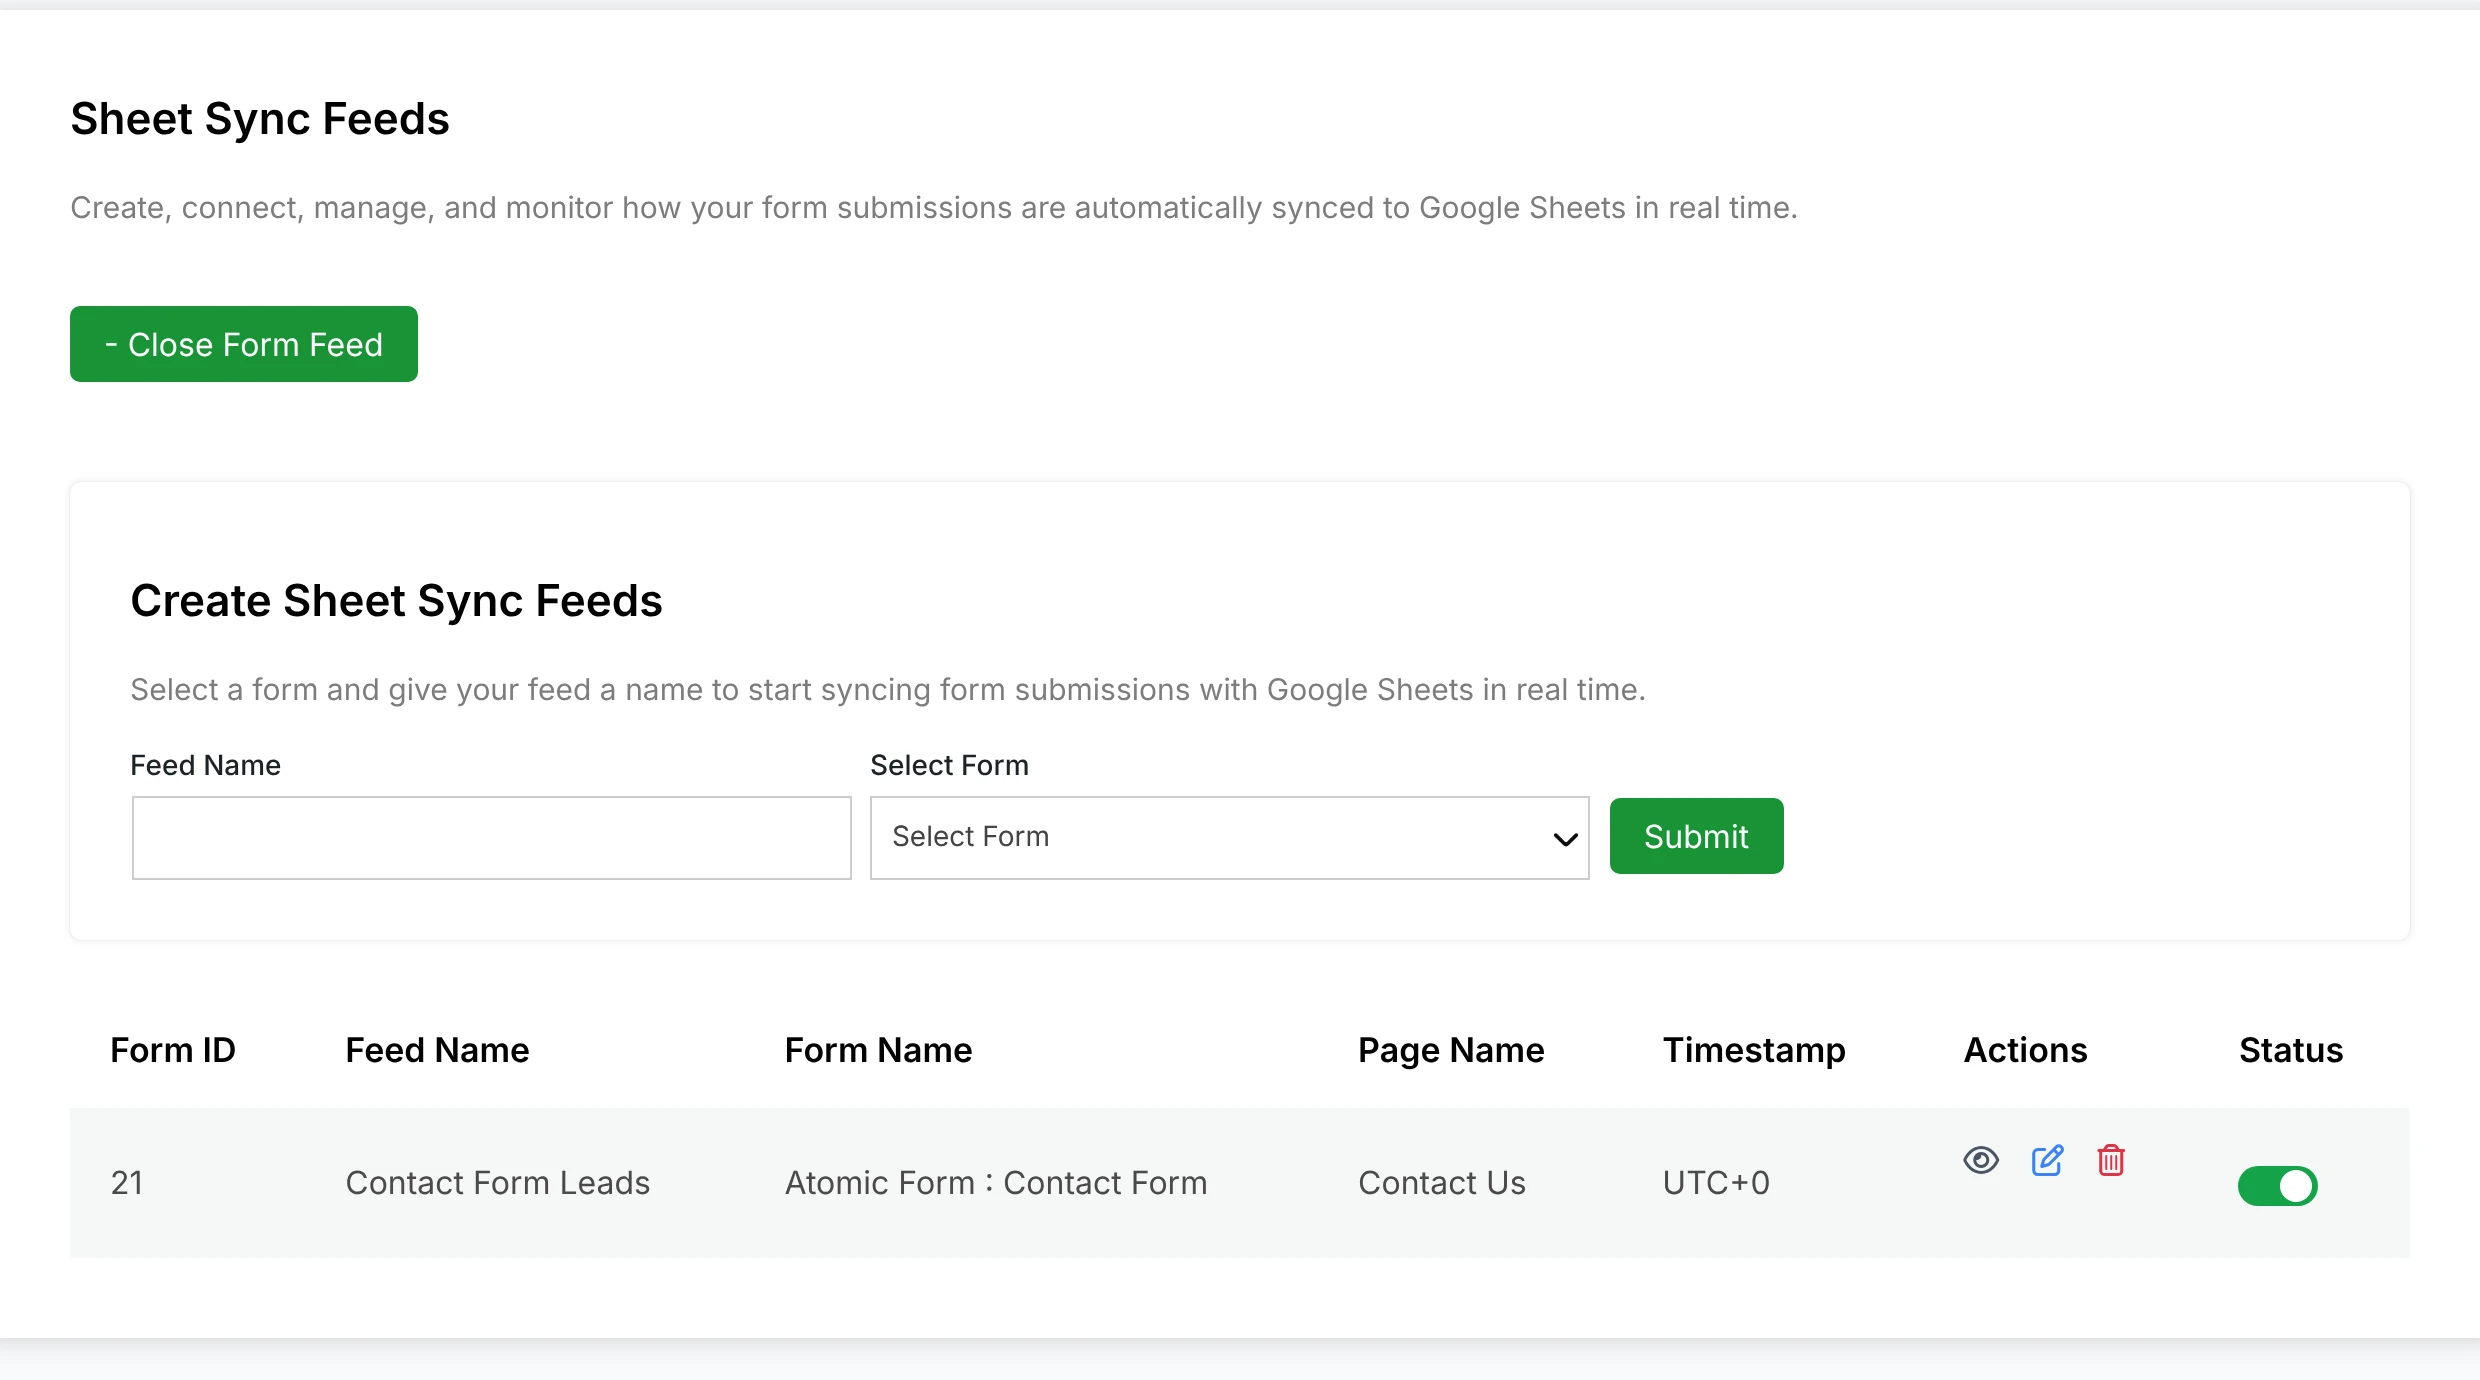
2. Create a Sheet Sync Feed
- Open the Form Feeds tab.
- Click + Add Form Feed.
- Enter a descriptive name in the Feed Name field.
- Under Select Form, choose the Elementor Atomic Form you want to connect (Atomic Forms are shown as Atomic Form : your form name).
- Click Submit to create the feed.
The new feed appears in the Form Feeds list. Use the switch under Status to turn it on or off.
3. Edit and Configure the Sheet Sync Feed
Locate the feed and click the Edit icon under Actions. The top box, Feed Details, shows the form, feed name and page name, so you can confirm it is the right form. Then configure the Google Sheets connection (spreadsheet and worksheet selection or manual entry), choose the fields to synchronize (PRO), and save the settings.
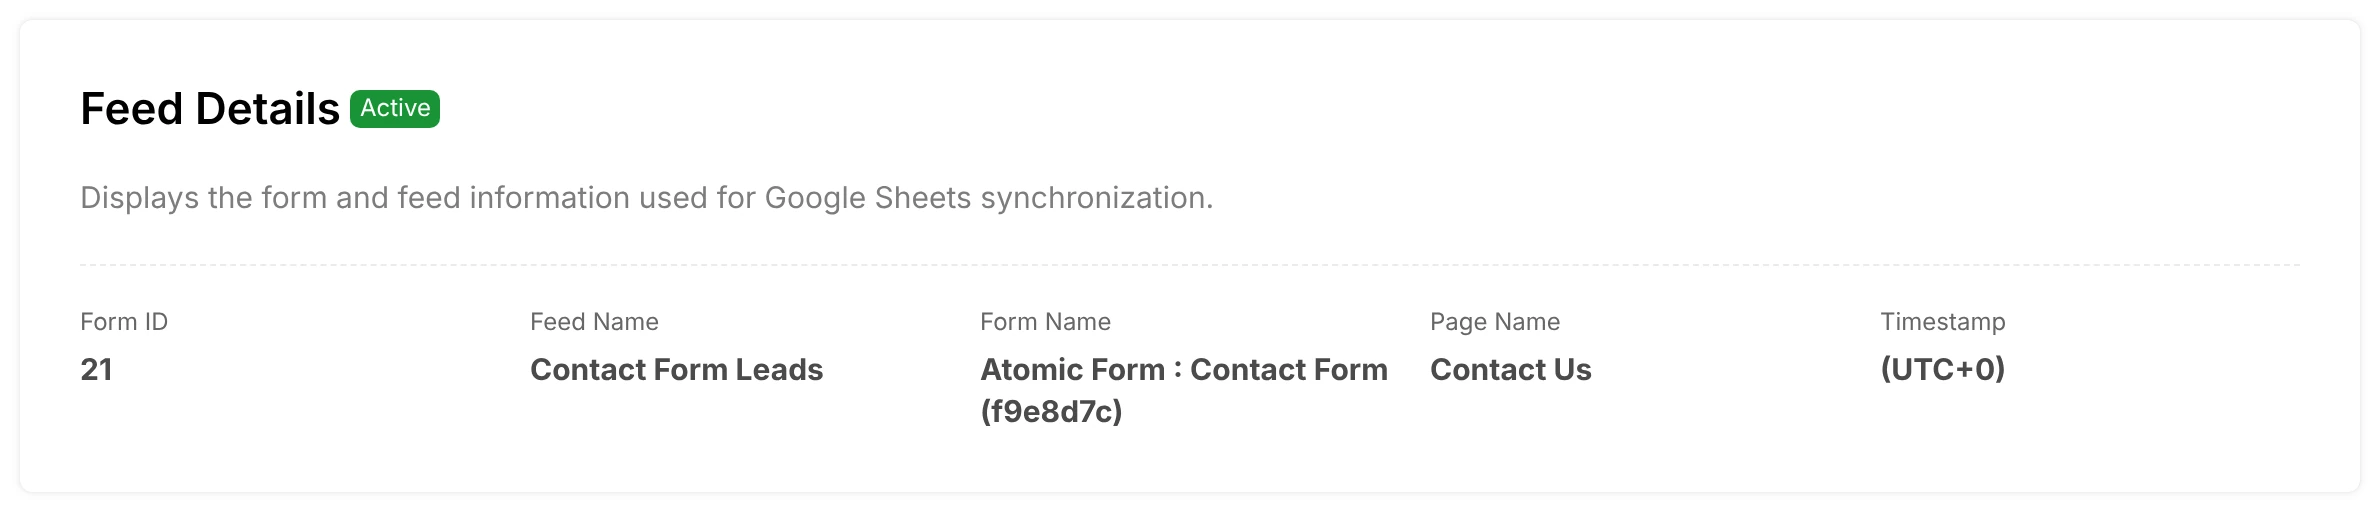
The spreadsheet and field selection process follows the same principles as the Elementor editor method. After saving, submit a test entry through the associated Atomic Form and verify the data appears in the selected spreadsheet.
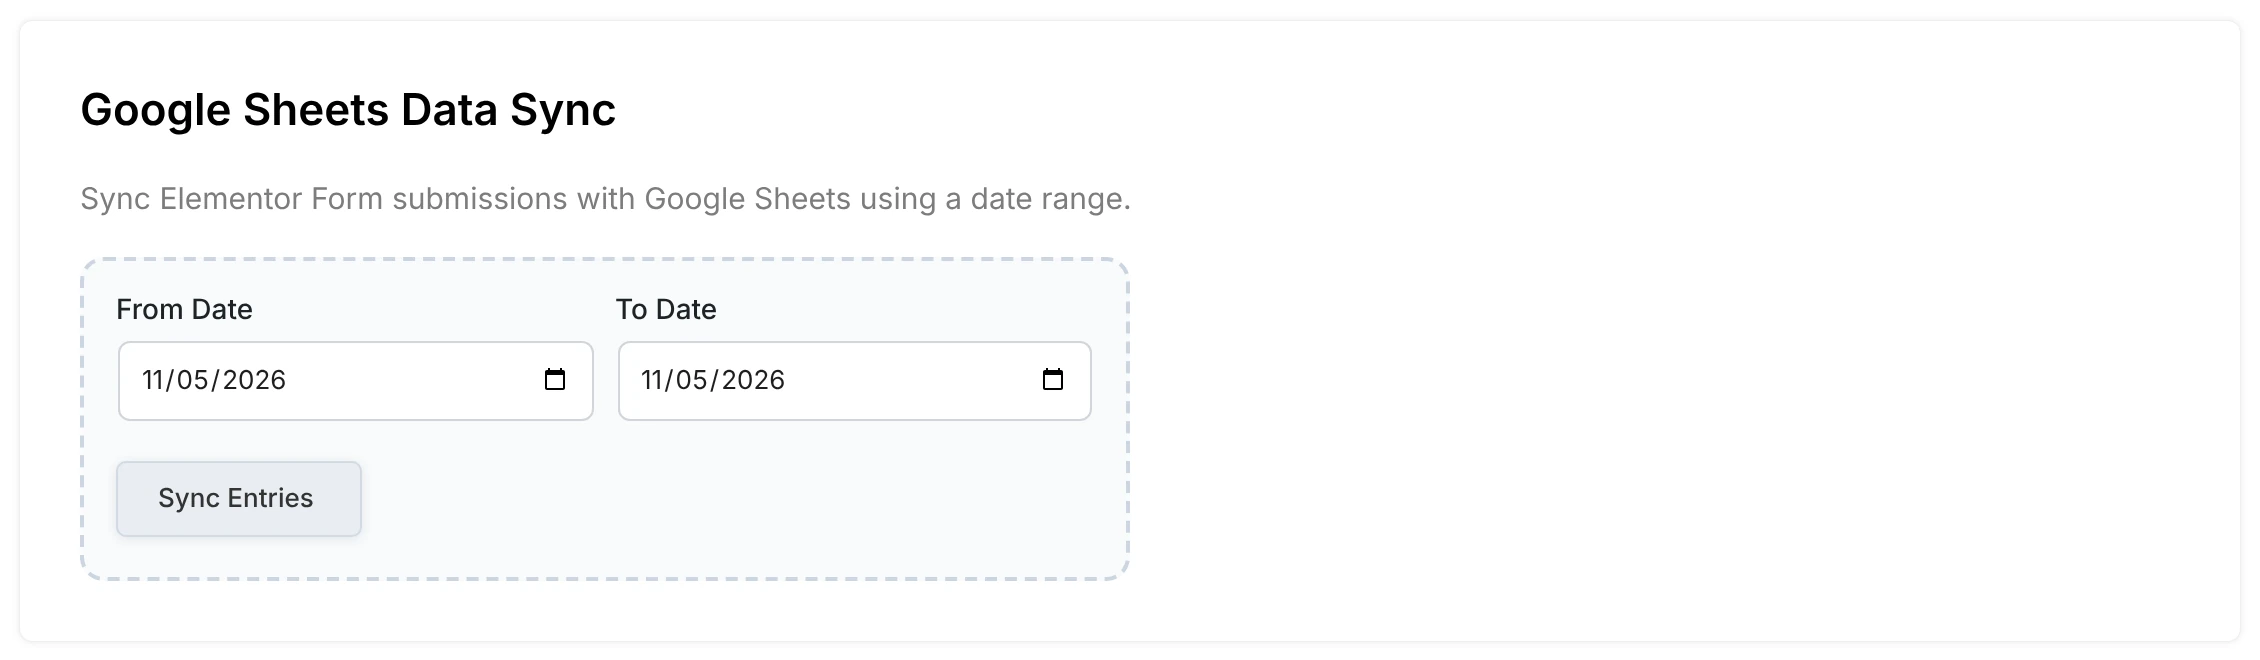
4. Sync Old Entries (PRO)
Did your form get entries before you set up the feed? In PRO, open the feed and find Google Sheets Data Sync. Pick a From Date and a To Date, then click Sync Entries. PRO sends the entries from that period to your sheet.
Who Should Use Elementor Atomic Forms with Google Sheets?
This integration is useful for WordPress site owners who collect information through Elementor Atomic Forms and want that data in a spreadsheet:
- Small business owners: Organize customer inquiries and contact requests.
- Marketing teams: Review leads from landing pages and campaign forms.
- Agencies and freelancers: Manage submissions from client sites.
- Service providers: Track project inquiries, service requests, and feedback.
- Website administrators: Keep selected form data accessible for reporting and internal workflows.
- Customer support teams: Organize incoming questions and feedback for follow up.
When a Ready Made Connector Makes Sense vs. Custom Approaches
You can also send form data through a webhook to a Google Apps Script web app or an automation platform such as Zapier or Make. Those routes work, but they introduce ongoing maintenance:
- Apps Script solutions require you to manage the script, deployment, permissions, and column mapping yourself. Field changes often mean editing the script again.
- Zapier/Make add per task costs and an extra service in the chain.
Google Sheet Connector handles authentication, field mapping, and real time row creation inside WordPress, and PRO also creates and styles the headers. For most site owners and agencies who simply need reliable form to Sheets delivery without writing or maintaining code, the dedicated connector is the lower friction path. Custom webhooks or Apps Script remain reasonable when you need highly specialized transformations, multi app orchestration beyond Sheets, or a fully self hosted solution with no additional plugin.
Conclusion
Connecting Elementor Atomic Forms to Google Sheets with Google Sheet Connector gives you a straightforward way to organize form submissions without manually transferring each entry.
You can configure the integration inside the Elementor editor or through Form Feeds in the Google Sheet Connector settings. Both approaches let you associate the form with a destination spreadsheet. With PRO you can also choose the exact fields to synchronize.
Verify the Google account, select the correct spreadsheet and worksheet, review field settings, and test a submission before relying on the connection for live data. Once configured, form data becomes easier to access, share, and manage in Google Sheets.
Start with the free version on WordPress.org or explore the full feature set on the PRO product page. Following this guide makes it simple to connect Elementor Atomic Forms to Google Sheets and keep your data organized.
FAQs
1. How do I connect Elementor Atomic Forms to Google Sheets?
Install and activate Google Sheet Connector for Elementor Forms and Elementor Pro. Sign in with Google under Elementor → Google Sheet → Integration. Then add the Google Sheet Connector action to your Atomic Form (or create a Form Feed), select your spreadsheet and worksheet, choose the fields to sync (PRO), and submit a test entry. See the official documentation for screenshots and detailed steps.
2. Do I need Google Sheet Connector to connect Atomic Forms to Google Sheets?
Google Sheet Connector provides a dedicated, no code integration for Elementor Atomic Forms (and classic Elementor Forms / MetForm). Alternatives exist via a webhook plus Apps Script or an automation tool, but they require more setup and ongoing maintenance.
3. Can I use the free plugin with Atomic Forms?
Yes. The free plugin supports Atomic Forms. You type the Sheet Name, Sheet ID, Tab Name and Tab ID yourself, and the first row of your sheet must hold headers that match your form field labels.
4. Can I choose which Atomic Form fields sync with Google Sheets?
Yes, with PRO. The Select Fields to Sync section lets you enable or disable available form fields and submission information, rename column headers and drag fields into order.
5. Can I configure the Google Sheets connection manually?
Yes, in both the free and PRO plugins. Enable Manual Google Sheets Configuration and enter the Sheet Name, Sheet ID, Tab Name, and Tab ID. The authentication and configuration guides cover both automatic and manual options.
6. Can I connect multiple Elementor forms to Google Sheets?
Yes. The Form Feeds workflow lets you create separate feeds for different forms and associate each with its own spreadsheet configuration.
7. Can I send old Atomic Form entries to Google Sheets?
Yes, with PRO. Open the feed, choose a From Date and a To Date under Google Sheets Data Sync, and click Sync Entries.
8. Why are my Elementor Atomic Form submissions not appearing in Google Sheets?
Confirm Google Sheet Connector is enabled under Actions After Submit, the Google account is authenticated, the feed is turned on, the correct spreadsheet and worksheet are selected, and (for PRO) Collect Submissions is on. Test again after checking permissions. If needed, contact Google Sheet Connector support.
9. Can I configure the integration from the Google Sheet Connector plugin settings?
Yes. Authenticate under the Integration tab, then create and edit a Sheet Sync Feed under Form Feeds. Select the Atomic Form, configure the sheet connection and fields, and save. Full steps are in the plugin documentation.