
Table of Contents- Why You Should Hide Contact Form 7 After Submission
- Why Contact Form 7 Doesn’t Hide the Form Automatically
- The Correct Way to Detect a Successful Submission
- Method 1: CSS-Only Solution (Recommended)
- Method 2: JavaScript Solution (More Flexible)
- Method 3: Redirect After Submission (Best for Conversions)
- Where to Add This Code
- Which Method Should You Use?
- Common Mistakes to Avoid
- Why This Method Works Reliably
- Bonus: Store Contact Form 7 Entries in Google Sheets
- Final Result
- Frequently Asked Questions
If you want to hide Contact Form 7 after submission, this guide covers the most effective methods (CSS, JavaScript, and redirect) to improve user experience and show a clear success message.
By default, Contact Form 7 (CF7) displays a success message but keeps the form visible. This often confuses users and can lead to duplicate submissions.
If you're new to CF7, you can also follow this
Contact Form 7 setup guide to get started.
Why You Should Hide Contact Form 7 After Submission
Leaving the form visible after submission creates a poor user experience.
- Users may think the form was not submitted
- Duplicate submissions increase
- Confusion when switching tabs
- No clear confirmation of success
Hiding the form provides clarity and improves conversions.
Why Contact Form 7 Doesn’t Hide the Form Automatically
Contact Form 7 uses AJAX, meaning the page does not reload after submission. Because of this, the form remains visible unless manually hidden.
The Correct Way to Detect a Successful Submission
After submission, CF7 updates the form markup like this:
<form class="wpcf7-form sent" data-status="sent">
The data-status=”sent” attribute is the most reliable way to detect success.
You can also explore
official CF7 DOM events documentation for advanced usage.
Method 1: CSS-Only Solution (Recommended)
This is the simplest and most reliable method. No JavaScript required.
Step 1: Add Custom Success Message
</pre>
<pre class="brush: plain; title: ; notranslate" title="">[contact-form-7 id="8XXa7ee" title="Case Studies Form"]
<!-- Replace the Contact Form 7 shortcode above with your own CF7 form ID and title -->
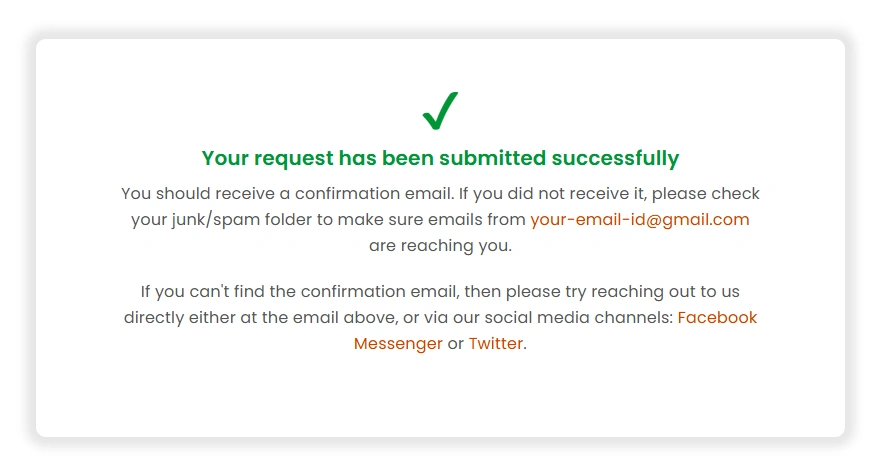
<div class="cf7-custom-success">
<p style="font-size: 50px; color: #039436;">✔</p>
<h3>Your request has been submitted successfully</h3>
You should receive a confirmation email shortly. If you do not see it, please check your spam folder or ensure emails from
<a href="mailto:helpdesk@gsheetconnector.com">helpdesk@gsheetconnector.com</a> are allowed.
If you still cannot find the confirmation email, feel free to contact us via
<a href="https://m.me/gsheetconnectorofficial" rel="nofollow">Facebook Messenger</a>
or
<a href="https://twitter.com/intent/follow?screen_name=GSheetConnector" rel="nofollow">Twitter</a>.
</div></pre>
<pre>
Step 2: Add CSS
</pre><pre class="brush: plain; title: ; notranslate" title="">/* Hide default Contact Form 7 success message */
.wpcf7-response-output {
    display: none !important;
}

/* Hide custom success message initially */
.cf7-custom-success {
    display: none;
    text-align: center;
    padding: 30px;
}

.cf7-custom-success h3 {
    color: #039436;
    margin-bottom: 10px;
}

.cf7-custom-success p {
    font-size: 16px;
}

/* Hide the form after successful submission */
.wpcf7 form[data-status="sent"] {
    display: none;
}

/* Show custom success message after submission */
body:has(.wpcf7 form[data-status="sent"]) .cf7-custom-success {
    display: block !important;
}</pre><pre>

Hide Contact Form 7 After Submission & Show Custom Success Message
Method 2: JavaScript Solution (More Flexible)
</pre><pre class="brush: plain; title: ; notranslate" title="">/* Hide default Contact Form 7 success message */
.wpcf7-response-output {
display: none !important;
}
/* Hide custom success message initially */
.cf7-custom-success {
display: none;
text-align: center;
padding: 30px;
}
.cf7-custom-success h3 {
color: #039436;
margin-bottom: 10px;
}
.cf7-custom-success p {
font-size: 16px;
}
/* Hide the form after successful submission */
.wpcf7 form[data-status="sent"] {
display: none;
}
/* Show custom success message after submission */
body:has(.wpcf7 form[data-status="sent"]) .cf7-custom-success {
display: block !important;
}</pre><pre>
Hide Contact Form 7 After Submission & Show Custom Success Message
Method 2: JavaScript Solution (More Flexible)
Use this method if you need more control like animations or tracking.
Code Example
document.addEventListener('wpcf7mailsent', function(event) {
    document.querySelector('.wpcf7 form').style.display = 'none';
    document.querySelector('.cf7-custom-success').style.display = 'block';
}, false);
Method 3: Redirect After Submission (Best for Conversions)
This method redirects users to a thank-you page after submission.
document.addEventListener('wpcf7mailsent', function(event) {
    window.location.href = "/thank-you/";
}, false);
This is ideal for tracking conversions using analytics tools.
Where to Add This Code
- CSS: Appearance → Customize → Additional CSS
- JavaScript: Footer, theme JS file, or WPCode plugin
- Advanced users: functions.php or custom JS file
For most users, the CSS method is easiest and safest.
Which Method Should You Use?
- CSS method: Best for simplicity and stability
- JavaScript method: Use for tracking or custom behavior
- Redirect method: Best for lead generation and analytics
Common Mistakes to Avoid
- Using deprecated on_sent_ok
- Hiding entire form including success message
- Not clearing cache after adding CSS
- Incorrect selectors
Why This Method Works Reliably
- Uses native CF7 attributes
- No plugin dependency
- Works with caching plugins
- Future-proof solution
Bonus: Store Contact Form 7 Entries in Google Sheets
You can automatically save submissions to Google Sheets using:
CF7 Google Sheet Connector
This helps you manage and track leads easily.
Final Result
- Form hides after submission
- Custom success message is shown
- Better user experience
- Reduced duplicate submissions
Frequently Asked Questions
How do I hide Contact Form 7 after submission?
Use CSS targeting data-status=”sent” or JavaScript with wpcf7mailsent.
Does Contact Form 7 hide the form automatically?
No, it only shows a success message.
Which method is best?
The CSS method is best for most users.
Can I redirect users after submission?
Yes, using JavaScript redirect.


 CF7 Google Sheet Connector
 WPForms Google Sheet Connector
 Ninja Forms Google Sheet Connector
 Gravity Forms Google Sheet Connector
 Formidable Forms Google Sheet Connector
 Forminator Forms Google Sheet Connector
 Fluent Forms Google Sheet Connector
 JetFormBuilder Google Sheet Connector
 Elementor Forms Google Sheet Connector
 Avada Forms Google Sheet Connector
 Divi Forms Google Sheet Connector
 WooCommerce Google Sheet Connector
 Easy Digital Downloads Google Sheet Connector
 WordPress Google Sheet Connector