In the fast-paced digital world of 2025, website speed isn't just a nice-to-have; it's a critical factor determining user experience, search engine rankings, and ultimately, your website's success. A slow website can lead to higher bounce rates, lost conversions, and frustrated visitors. Fortunately, with the right tools and techniques, you can transform your WordPress site into a speed demon.This comprehensive guide will walk you through the essential steps to speed up your WordPress website using WP Rocket, the industry-leading performance optimization plugin. We'll cover everything from basic cache settings to advanced features like Core Web Vitals optimization, JavaScript execution reduction, CDN integration, and heartbeat control.
Why Website Speed is Paramount in 2025
User Experience (UX): Visitors expect pages to load almost instantly. Slow loading times lead to immediate frustration and a higher chance of them leaving your site.
Search Engine Optimization (SEO): Google and other search engines use page speed as a ranking factor. Core Web Vitals (LCP, FID, CLS) are particularly important metrics that directly influence your site's position in search results.
Mobile-First Indexing: With the majority of web traffic coming from mobile devices, Google primarily uses the mobile version of your site for ranking. Mobile speed is therefore non-negotiable.
Introducing WP Rocket: Your All-in-One Speed Solution
WP Rocket is a premium WordPress plugin renowned for its ease of use and powerful performance optimization features. It's designed to be effective straight out of the box, but it also offers granular control for those who want to fine-tune their website's speed.
Key features that help us speed up your WordPress website:
Page Caching: Creates static HTML files of your pages, reducing server load and speeding up delivery.
File Optimization: Minifies and combines CSS and JavaScript files, and optimizes their delivery.
Lazy Loading: Delays the loading of images and iframes until they are visible in the user's viewport.
Database Optimization: Cleans up and optimizes your WordPress database.
CDN Integration: Easily integrates with Content Delivery Networks to serve assets faster.
Heartbeat Control: Manages the WordPress Heartbeat API to reduce server requests.
Preloading: Automatically preloads the cache for faster access.
Step-by-Step Guide to Speeding Up Your WordPress Website with WP Rocket
Let's get started with configuring WP Rocket to achieve maximum performance.
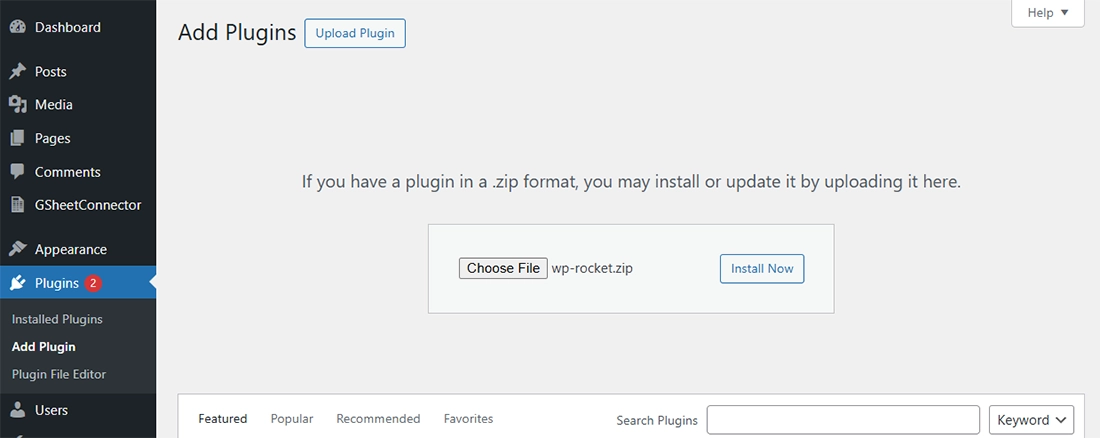
Download: After purchase, you'll receive a .zip file.
Install Plugin:
Log in to your WordPress dashboard.
Navigate to Plugins > Add New > Upload Plugin.
Choose the WP Rocket .zip file and click Install Now.
Once installed, click Activate Plugin.
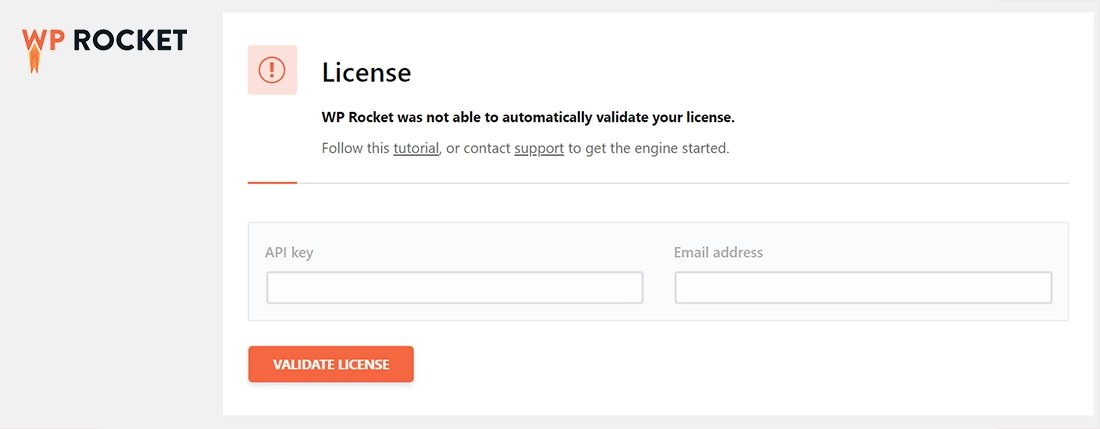
Enter License Key: After activation, you'll be prompted to enter your license key. Go to Settings > WP Rocket and paste your key. This enables automatic updates and access to support.
Step 2: Cache Settings for Faster Page Delivery
The caching tab is fundamental. Proper cache configuration ensures that your site's pages are served quickly to visitors.
Mobile Cache:
Enable Cache for mobile devices:Turn this ON. This creates separate cached files for mobile users, ensuring a fast experience on their devices.
User Cache:
Enable Cache Lifespan: This is the most crucial setting. It determines how long cached files are stored before being cleared.
Recommended Setting: Start with 10 hours or 24 hours. WP Rocket's default is usually a good starting point.
Explanation: A shorter lifespan means the cache is cleared and refreshed more frequently, ensuring visitors see the latest content. A longer lifespan reduces server load but might mean a slight delay in showing the absolute newest changes.
Dynamic Content: If your site has highly dynamic content that changes by the minute (e.g., live stock prices), you might need a shorter lifespan. For most sites, a few hours to a day is perfect.
Clear cache files whenever a Post, Page or a Custom Post Type is published or updated:Leave this ON. This is essential for ensuring that when you make changes, the cache is cleared for that specific content.
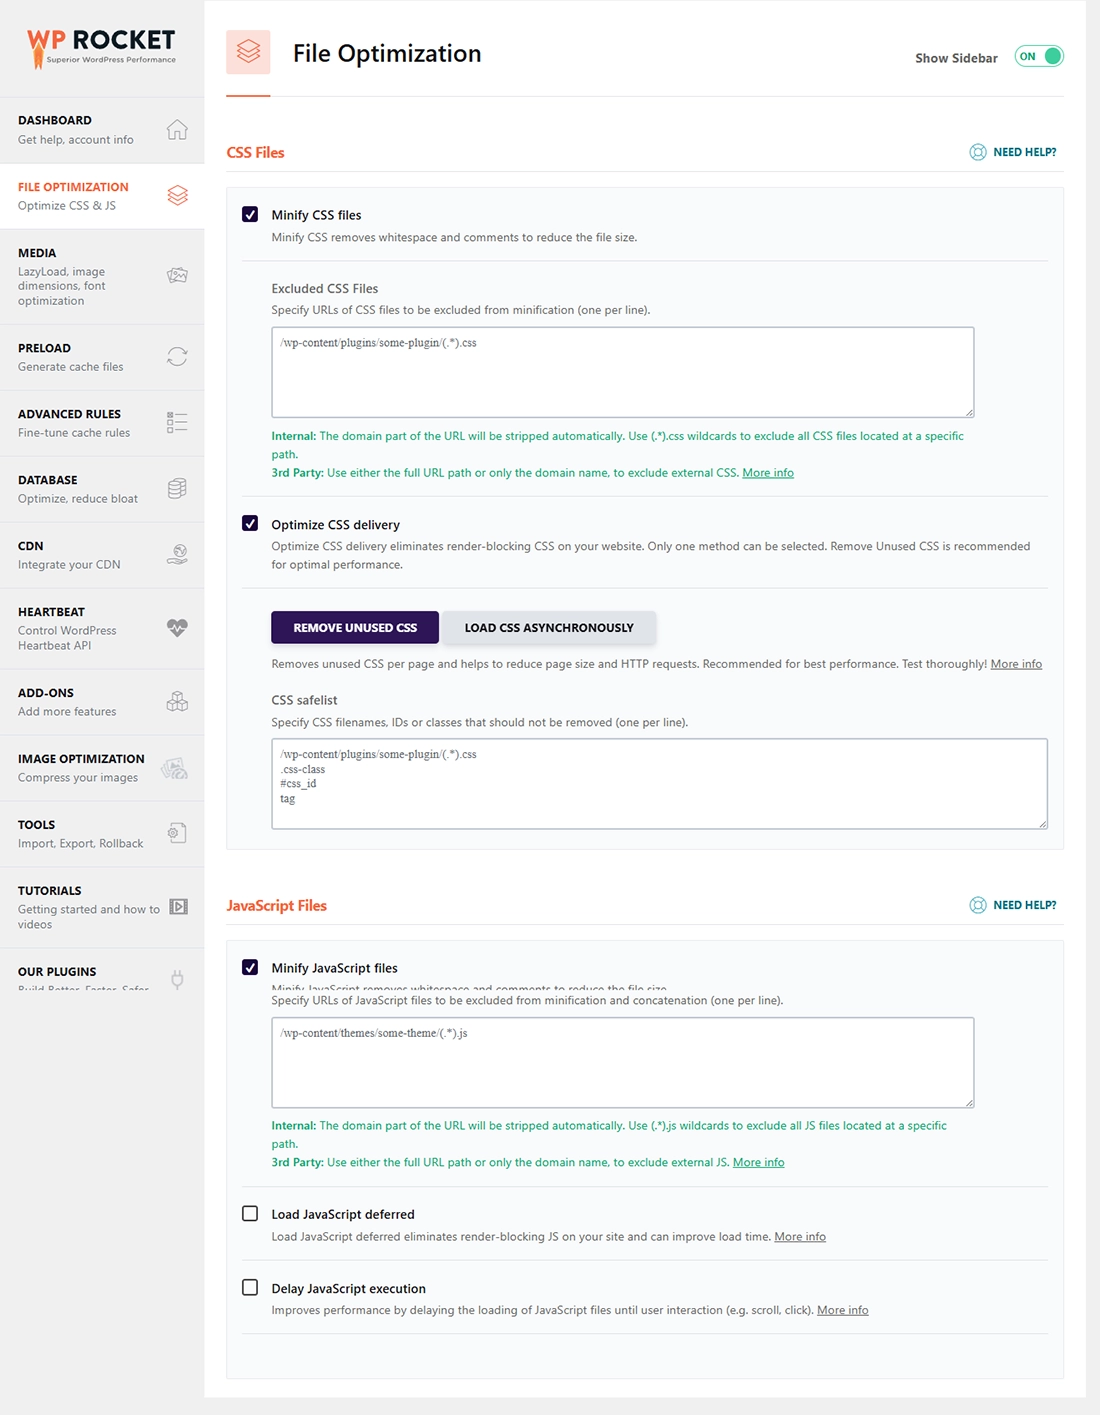
Step 3: File Optimization for Leaner Code
This section is vital for reducing the size of your CSS and JavaScript files and optimizing how they are loaded.
CSS Files:
Minify CSS Files:Check this box. Minification removes unnecessary characters (spaces, comments, line breaks) from your CSS code, making files smaller.
Optimize CSS Delivery:Check this box. This is a powerful feature that moves CSS loading to after the initial HTML content has loaded, preventing render-blocking.
Explanation: Instead of CSS blocking the rendering of your page's content, the basic HTML loads first, then the essential CSS is applied. This drastically improves perceived load time and helps with Core Web Vitals.
Caution: Occasionally, this feature can cause minor display issues. If you encounter problems, try the “Load CSS safely” option or disable it for specific pages.
JavaScript Files:
Minify JavaScript Files:Check this box. Similar to CSS, this removes extra characters from JavaScript files.
Combine JavaScript Files:Check this box. This merges multiple JavaScript files into one, reducing the number of HTTP requests your browser needs to make.
Caution: This is where reducing JavaScript execution time comes into play. Combining files can sometimes lead to conflicts or errors. Always test thoroughly after enabling this. If you experience issues (e.g., sliders not working, forms breaking), you may need to disable this for specific files or pages.
Load JavaScript deferred:Check this box. This is another crucial setting for reducing JavaScript execution time. It tells the browser to download JavaScript files but defer their execution until after the HTML content has been fully parsed.
Explanation: This is a major performance booster as it prevents JavaScript from blocking the rendering of your page.
Note: You might see options for “All” or “After DOM processing.” “All” is generally more aggressive. If you notice issues, try “After DOM processing.”
Delay JavaScript Execution:Check this box. This is WP Rocket's most advanced JavaScript optimization. It delays the execution of all JavaScript (except for specified exclusions) until a user interaction occurs (e.g., scrolling, clicking). This is incredibly effective for improving your site's initial load time and scores for Core Web Vitals (especially LCP and TBT).
How to Use: Enable it, then test your site. If critical functionality breaks, you'll need to add exclusions for the specific JavaScript files that are essential for immediate page rendering. WP Rocket provides an interface to manage these exclusions.
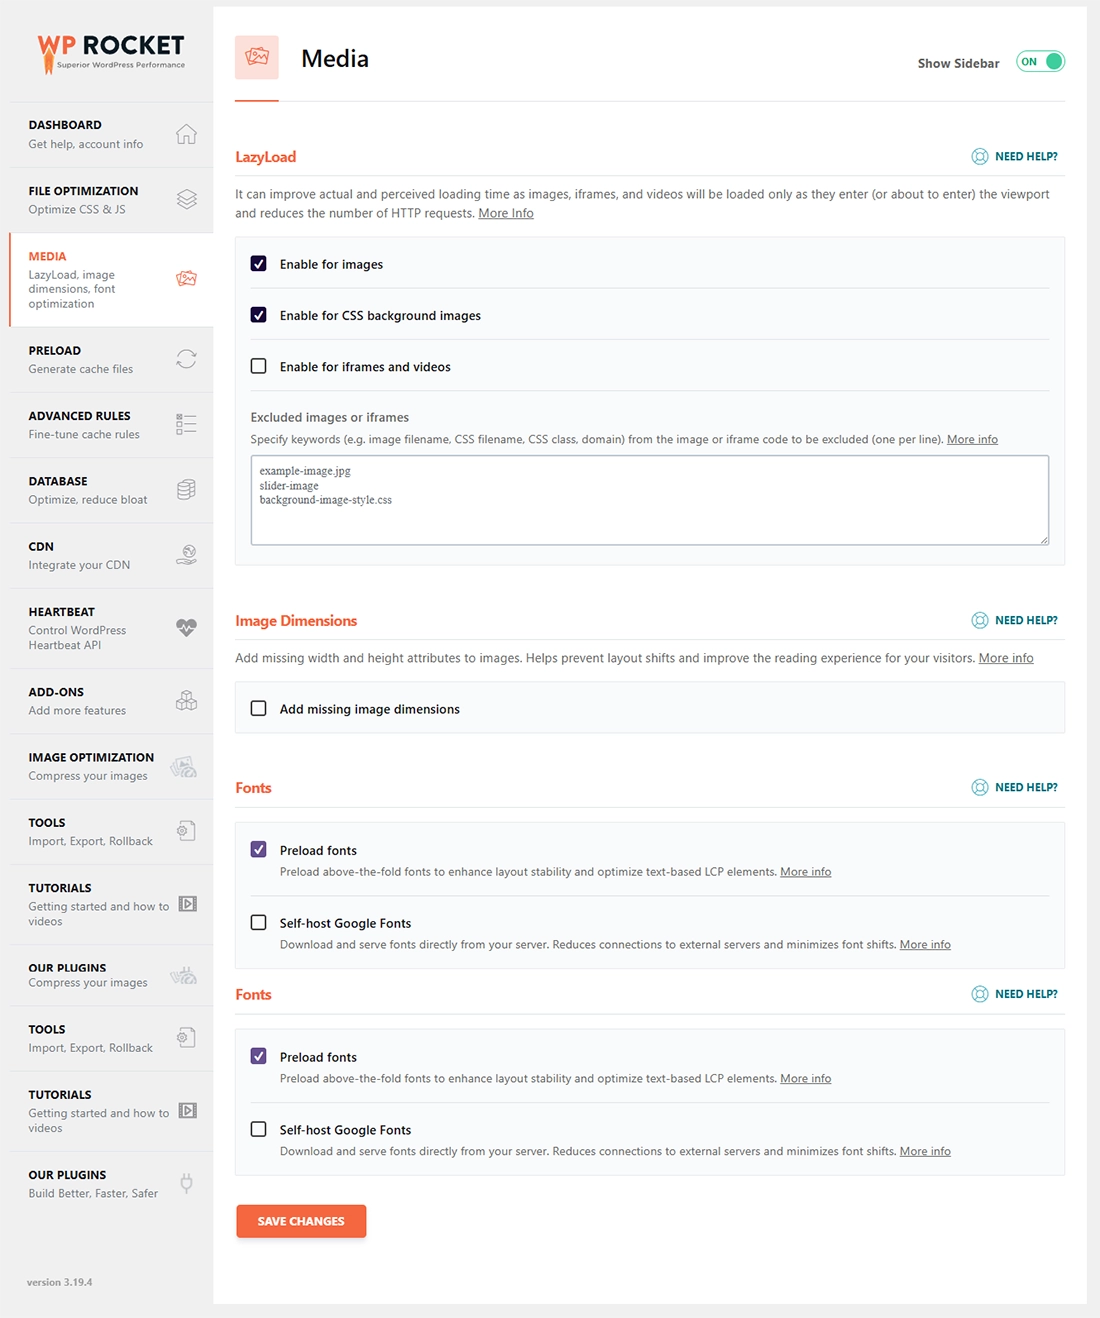
Step 4: Media Settings: Lazy Loading Images and More
Lazy loading significantly improves initial page load times by deferring the loading of off-screen media.
Enable Lazy Loading:
Images:Check this box. This is highly recommended for all sites. Images will only load when the user scrolls down to them.
Iframes and Videos:Check this box. This applies lazy loading to embedded videos (like YouTube) and iframes, further speeding up the initial load.
Add Missing Image Dimensions:Check this box. This helps the browser reserve space for images before they load, reducing layout shifts (CLS) and improving Core Web Vitals.
WebP Compatible: If you are using the WebP image format (which is highly recommended for its smaller file sizes), ensure this is enabled. WP Rocket can optimize WebP delivery.
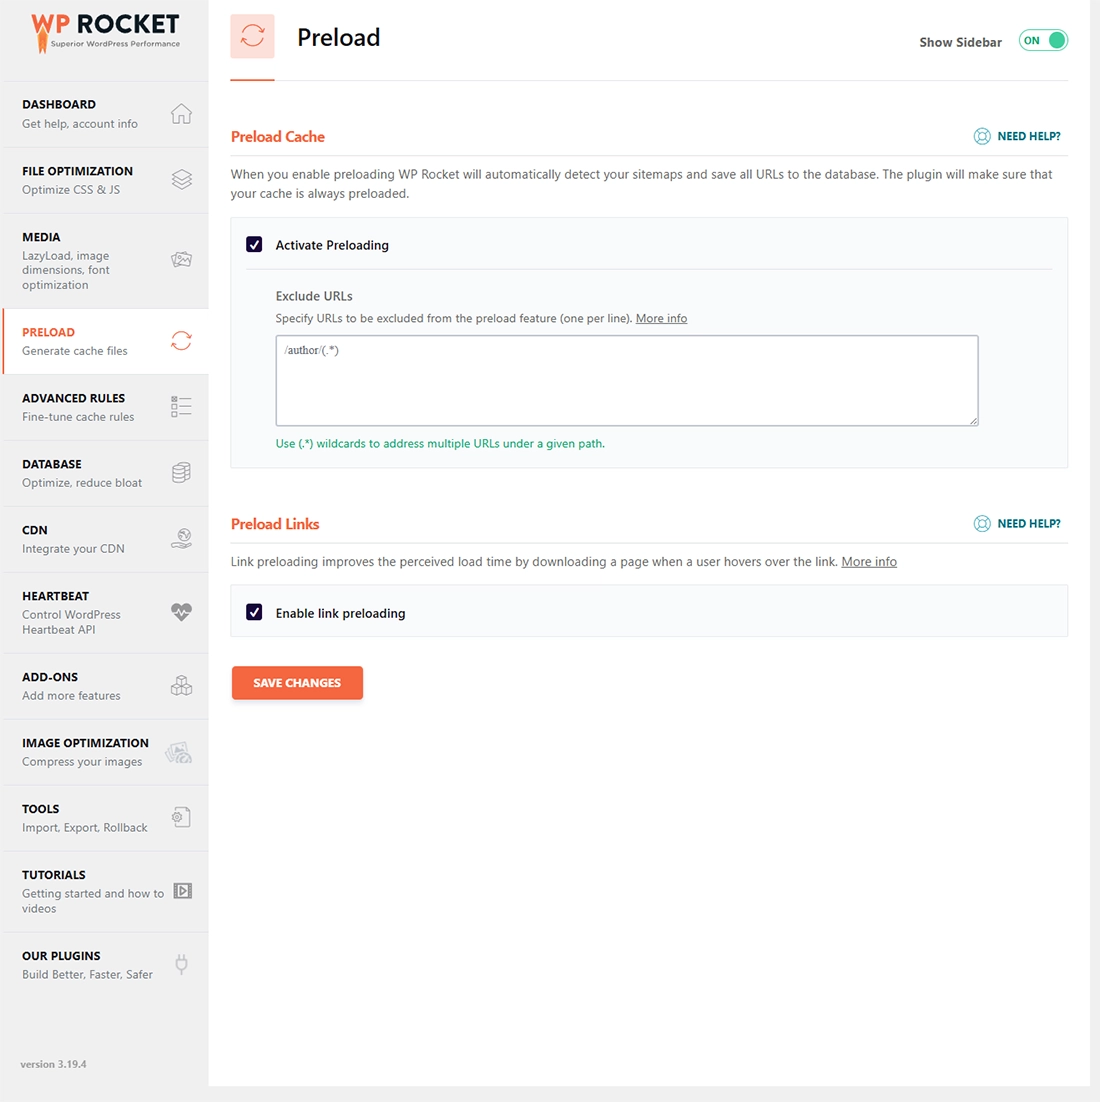
Step 5: Preload Settings for Faster Cache Access
Preloading helps ensure that your cache is always warm and ready to serve content quickly.
Cache Preloading:
Enable Cache Preloading:Check this box. This tells WP Rocket to automatically crawl your site and generate the cache for your pages.
Cache Lifespan: This should align with your general cache lifespan settings.
Sitemap-based cache clearing:Check this box. This is the most effective way to ensure WP Rocket knows exactly which pages to preload. Enter the URL of your XML sitemap (e.g., yourwebsite.com/sitemap.xml). This is crucial for keeping your cache up-to-date.
Step 6: Database Optimization for a Leaner Backend
A bloated database can slow down your entire site. WP Rocket offers easy tools to clean it up.
Posts:
Post Revisions:Check this box. WordPress automatically saves revisions of your posts. Over time, these can accumulate and bloat your database. WP Rocket can clean them up.
Auto Drafts:Check this box. Cleans up automatically saved drafts.
Trashed Posts:Check this box. Cleans up posts that have been moved to the trash.
Schedules:
Transients:Check this box. Transients are temporary data stored in the database. They can sometimes be left behind by plugins and themes.
Comments:
Spam Comments:Check this box. Cleans up identified spam comments.
Trashed Comments:Check this box. Cleans up comments moved to trash.
Database Cleanup Schedule:
Frequency: Choose Daily or Weekly. This automates the database optimization process, keeping your database lean without manual intervention.
Important: Always back up your database before performing major optimizations, though WP Rocket's features are generally safe.
Step 7: Advanced Features for Peak Performance
Here we cover other key settings that significantly impact speed and Core Web Vitals.
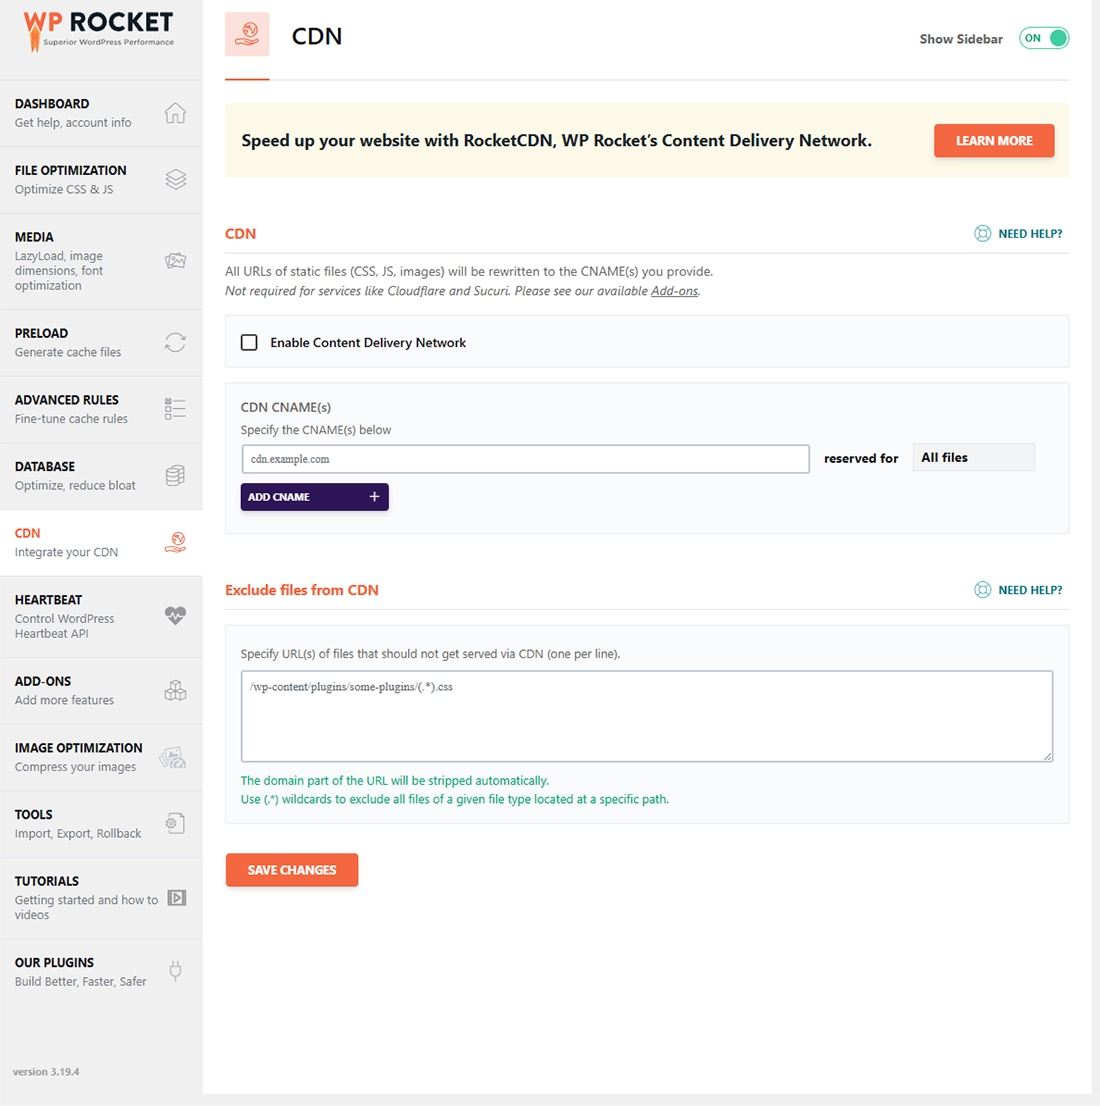
CDN Integration (Content Delivery Network)
Enable Content Delivery Network:Check this box.
CDN CNAME(s): Enter your CDN’s CNAME (e.g., cdn.yourwebsite.com).
Explanation: A CDN stores copies of your website's static assets (images, CSS, JavaScript) on servers located geographically closer to your users. This drastically reduces load times by serving these assets from the nearest server, offloading traffic from your main web server.
Popular CDNs: Cloudflare (which also offers security and DNS), KeyCDN, StackPath, Amazon CloudFront.
How it Works: WP Rocket rewrites the URLs of your static assets to point to your CDN.
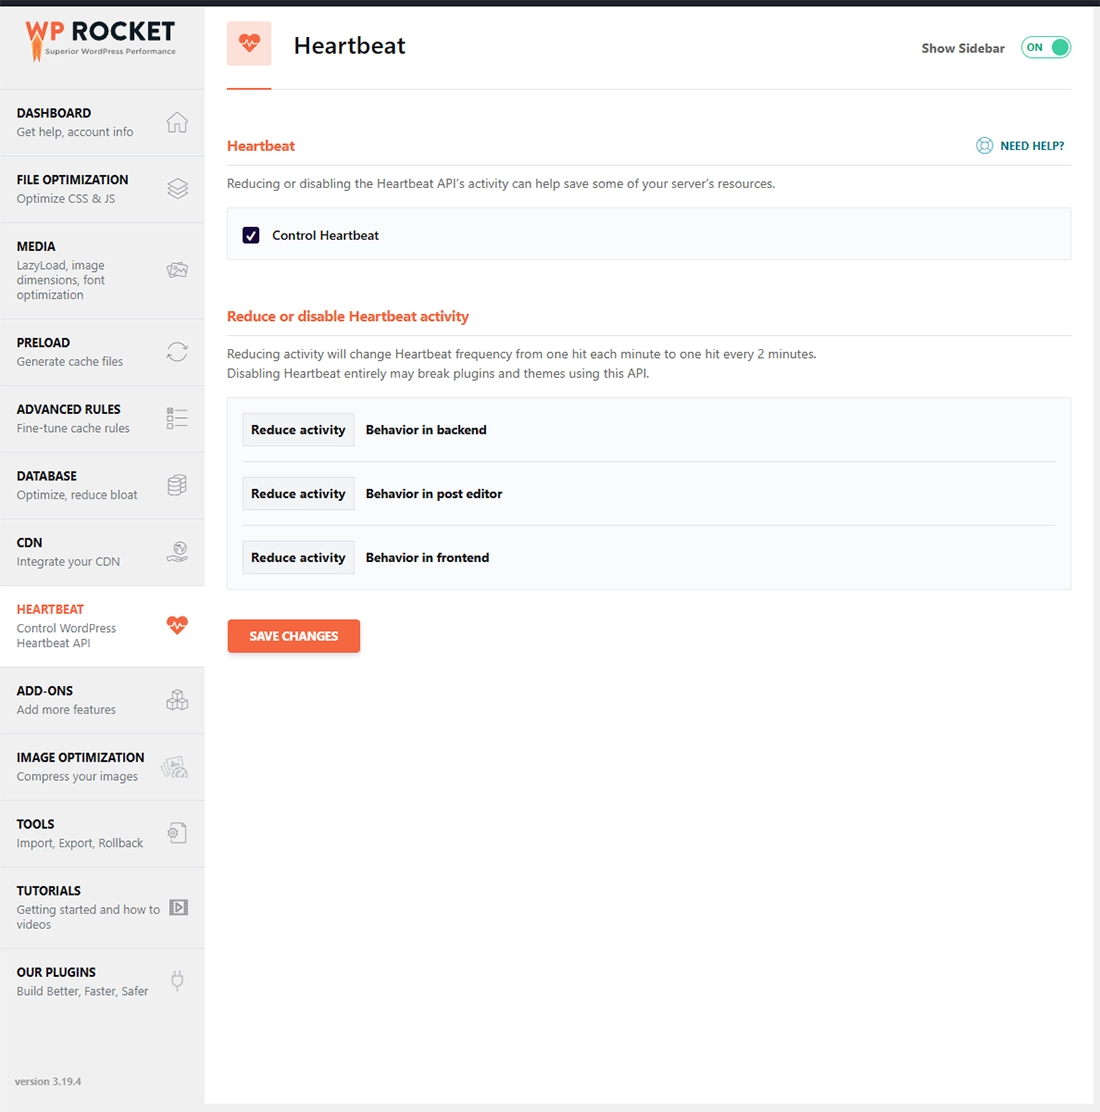
Heartbeat Control
Enable WordPress Heartbeat API:Check this box.
Reduce Activity: Set this to Reduce Activity or Disable Activity.
Explanation: The WordPress Heartbeat API allows real-time communication between the browser and server, enabling features like auto-saving posts and login expiry notifications. However, it constantly sends requests, which can increase server load and impact performance, especially on shared hosting.
Recommended: Setting it to Reduce Activity is usually sufficient for most sites, maintaining essential features while lessening the request frequency. Disable Activity can be used if you don't need these real-time features, but test carefully.
Add & Remove Unused CSS
This is a powerful, albeit more advanced, feature. It scans your pages and removes CSS that is not being used on that specific page. This can significantly reduce CSS file sizes.
How to Use: Activate it, and WP Rocket will generate the optimized CSS. It's crucial to test your site thoroughly afterward, as incorrectly removed CSS can break your site's styling.
External Services
WP Rocket can optimize the loading of external scripts like Google Fonts, Google Analytics, and Facebook Pixel. Explore these options to ensure they are loaded efficiently, often by deferring them or hosting them locally.
Testing Your Speed & Achieving Core Web Vitals
After implementing WP Rocket’s settings, it's crucial to test your website's performance.
Clear Cache: After making significant changes, always clear WP Rocket's cache (Settings > WP Rocket > Clear Cache).
Use Speed Testing Tools:
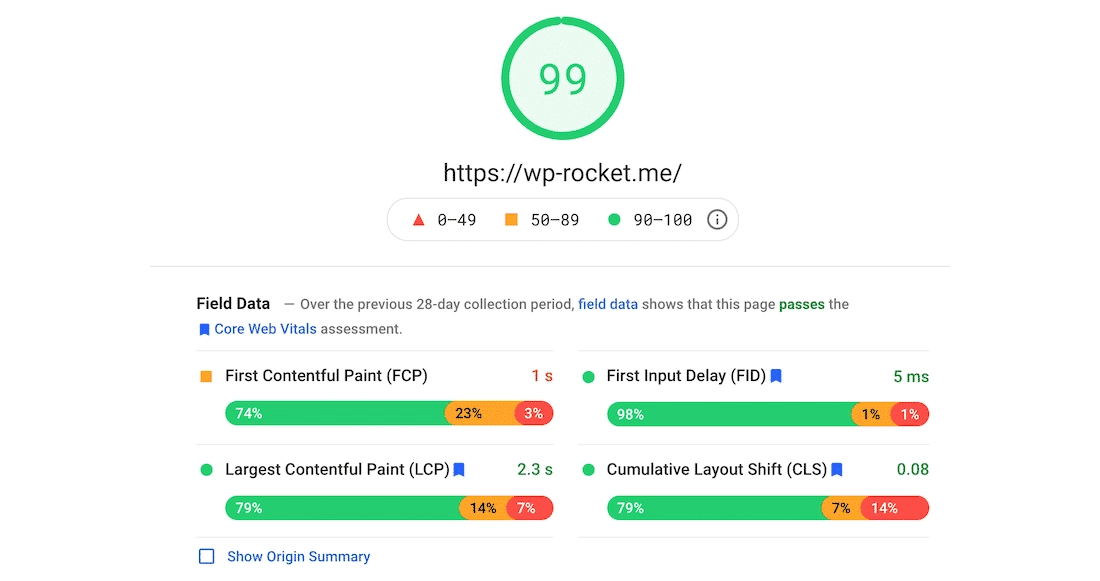
Google PageSpeed Insights: (https://pagespeed.web.dev/) Focuses heavily on Core Web Vitals (LCP, FID, CLS). Aim for scores above 90 for both mobile and desktop.
GTmetrix: (https://gtmetrix.com/) Provides detailed performance reports, including LCP, CLS, and recommendations.
Pingdom Tools: (https://tools.pingdom.com/) Another reliable tool for measuring load times from various locations.
Analyze Results:
Largest Contentful Paint (LCP): Should be under 2.5 seconds. WP Rocket’s caching, file optimization, and lazy loading are key here.
First Input Delay (FID) / Interaction to Next Paint (INP – replacing FID): Should be under 100ms for FID / under 200ms for INP. Reducing JavaScript execution time and minifying files are critical.
Cumulative Layout Shift (CLS): Should be below 0.1. Lazy loading images with dimensions, optimizing CSS delivery, and ensuring responsive design are important.
Iterate: If you're not seeing the desired results, review WP Rocket's settings. You may need to:
Experiment with deferring JavaScript vs. delaying JavaScript execution.
Adjust CSS optimization settings.
Ensure your CDN is correctly configured.
Check for plugin or theme conflicts.
Common Conflicts and Troubleshooting
Broken Site: If your site breaks after enabling an optimization, the most common culprits are CSS/JavaScript minification/combination or CSS/JS delivery optimization.
Solution: Go to Settings > WP Rocket > File Optimization. Start by disabling the last setting you enabled (e.g., if you enabled “Load JavaScript Deferred,” disable that first). Clear cache and re-test. If the issue persists, work backward through the settings. You can also use the “Exclude Files” option to prevent specific CSS or JS files from being optimized.
Plugin Conflicts: Some plugins (especially caching or optimization plugins, or those that heavily rely on JavaScript) might conflict.
Solution: Temporarily deactivate other optimization plugins. If the problem resolves, you’ll need to configure WP Rocket carefully or choose one primary optimization plugin.
Theme Compatibility: While WP Rocket is highly compatible, complex themes with heavy JavaScript might require specific exclusions.
Conclusion: Your Fast WordPress Website Awaits!
By systematically following this step-by-step guide and leveraging the powerful features of WP Rocket, you can dramatically speed up your WordPress website in 2025. Achieving excellent scores for Core Web Vitals, reducing JavaScript execution time, and ensuring efficient asset delivery will not only delight your visitors but also boost your search engine rankings and conversion rates.
Don't just install WP Rocket; configure it thoughtfully. Regularly test your site's speed, and be prepared to iterate your settings. A faster website is a more effective website, and with WP Rocket, that goal is within reach.
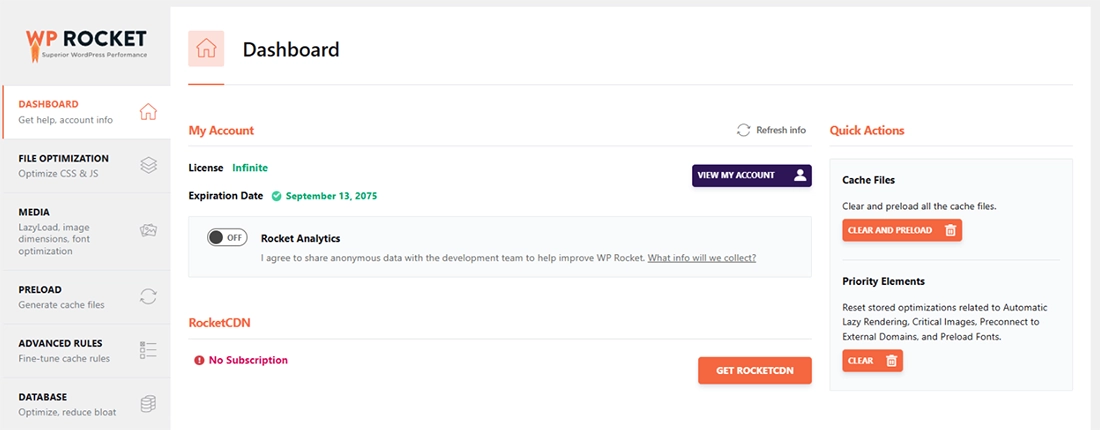
WP Rocket dashboard providing tools to optimize your WordPress site's speed.
About the Author: Abdullah Kaludi
Abdullah Kaludi is a WordPress developer and founder of WesternDeal Web Solution, a web development company established in 2009. He is also the creator of GSheetConnector, a popular plugin suite that connects WordPress with Google Sheets in real time.
With extensive experience in WordPress, Abdullah builds reliable tools for automating workflows, syncing data, and improving productivity for WooCommerce stores, agencies, and business websites. He actively shares tutorials and updates to help the WordPress community work smarter and automate more.