Introducing an Improved Google Sheet to WooCommerce Sync – Now Smarter in Version 2.1.0
We’re excited to share that the Google Sheet to WooCommerce Sync feature has been enhanced in version 2.1.0 to make it easier and more efficient for users to manage products directly from Google Sheets.
This functionality already existed in earlier versions, but we’ve now improved the way it works to ensure it’s more user-friendly and seamless. With just a few simple steps, you can now add or update single or bulk products from your connected sheet directly into your WooCommerce store.
In this article, we’ll guide you step by step on how to configure and use this updated feature effectively.
???? Important Note for 2-Way Sync (v2.1.0)
The 2-Way Sync feature works only with default WooCommerce product fields.
If you update fields that are added by third-party plugins, those changes will not reflect on your WooCommerce store. While these third-party plugin fields may appear in your Google Sheet feed, updating them via 2-Way Sync will not update the actual store data.
Only fields supported by WooCommerce itself are eligible for syncing back to the store.
Please keep this in mind while using 2-Way Sync to avoid any confusion or data mismatch.
Step 1: Enable Product Feed Settings
-
Go to Feed Settings in your WordPress dashboard.
-
Open the Product Feed section.
-
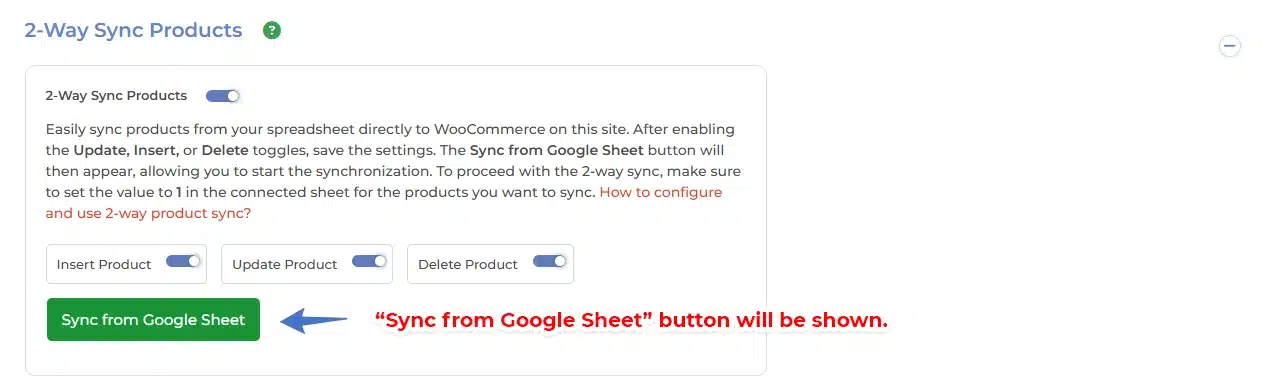
Enable the option “2-Way Sync Products”.
-
Click the “Submit Data” button to save your settings.
Go to Feed Settings in your WordPress dashboard.
Open the Product Feed section.
Enable the option “2-Way Sync Products”.
Click the “Submit Data” button to save your settings.

Step 2: Display “Sync from Google Sheet” Button
-
After submitting, scroll back up to the “2-Way Sync Products” section.
-
You will now see a “Sync from Google Sheet” button.
After submitting, scroll back up to the “2-Way Sync Products” section.
You will now see a “Sync from Google Sheet” button.
Step 3: Perform Initial Sync
-
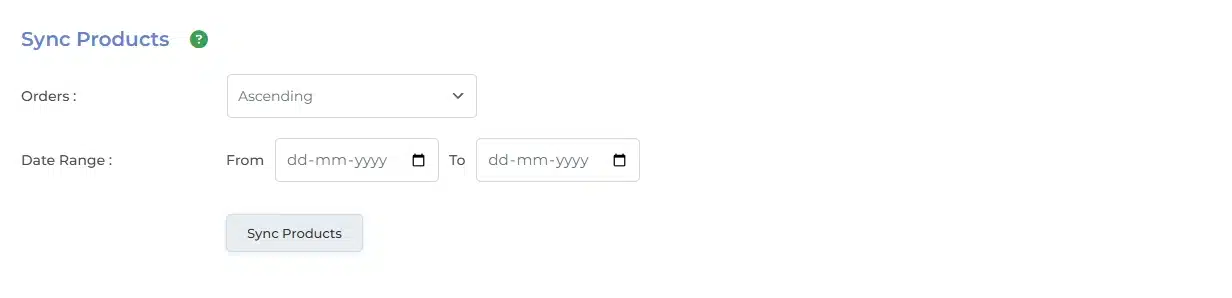
Before using the sync from Google Sheet, go to the “Sync Products” section.
-
Perform a full sync to make sure your WooCommerce product data is up to date in the Google Sheet.
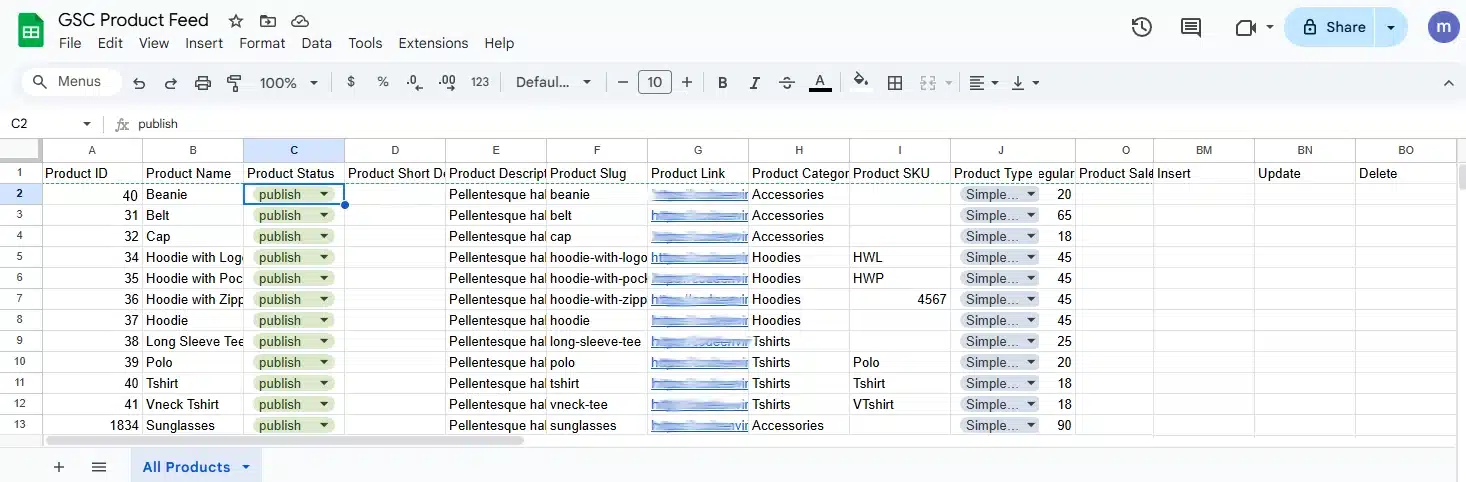
Step 4: Understanding Google Sheet Columns
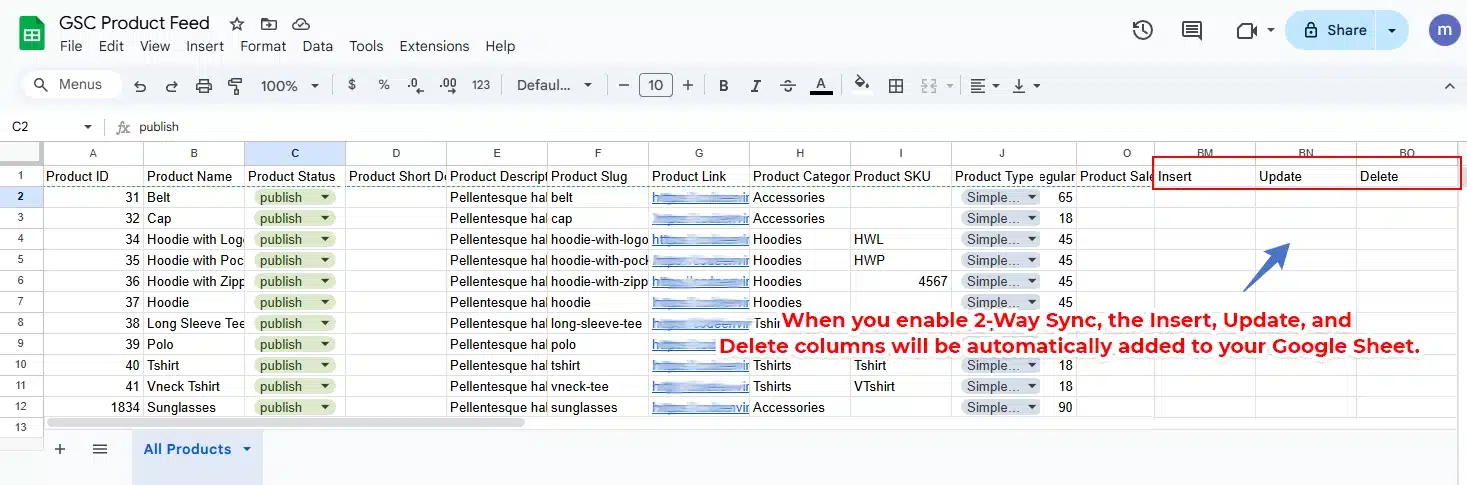
Open your connected Google Sheet named “GSC Products Feed”. At the end of the sheet, you’ll see three additional columns:
-
Insert -
Update -
Delete
These same headers will also appear under the “Google Sheet Headers” section in the Product Feed settings.
Step 5: Modify Product Data in Google Sheet
Depending on what you want to do, follow the instructions below:
-
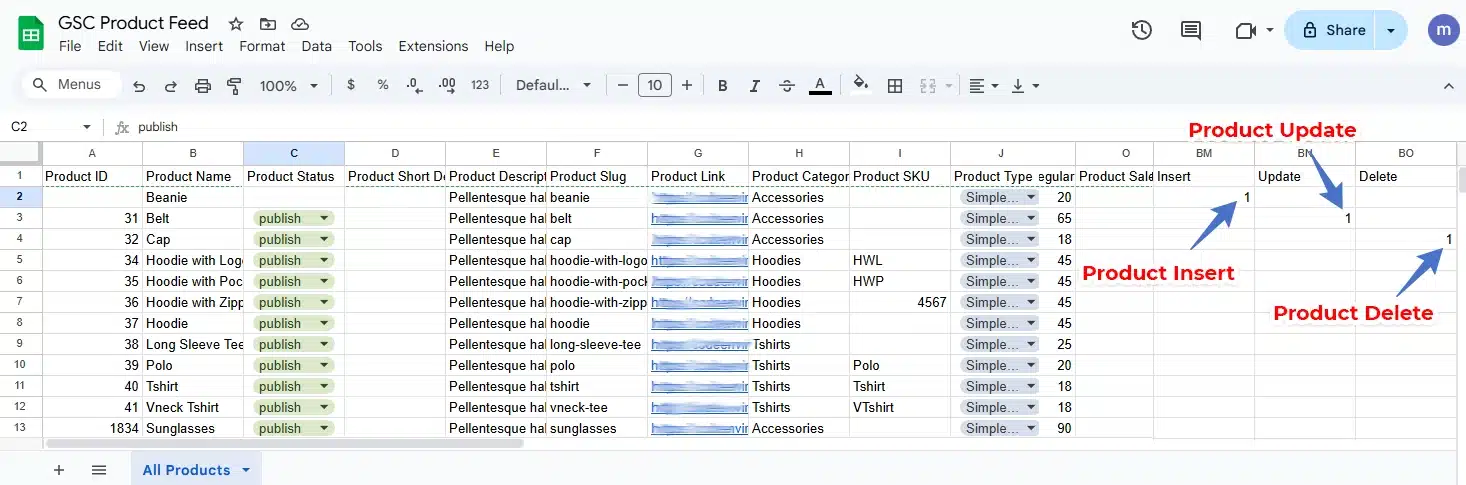
To Update a Product:
-
Enter
1in theUpdatecolumn for the corresponding product row. -
Make your changes in the respective columns.
-
-
To Delete a Product:
-
Enter
1in theDeletecolumn for the corresponding product row.
-
-
To Insert a New Product:
-
Add a new row with product details (e.g., title, price, etc.) excluding Product ID.
-
Enter
1in theInsertcolumn.
-
Step 6: Sync Changes Back to WooCommerce
-
Go back to Feed Settings > Product Feed > 2-Way Sync Products.
-
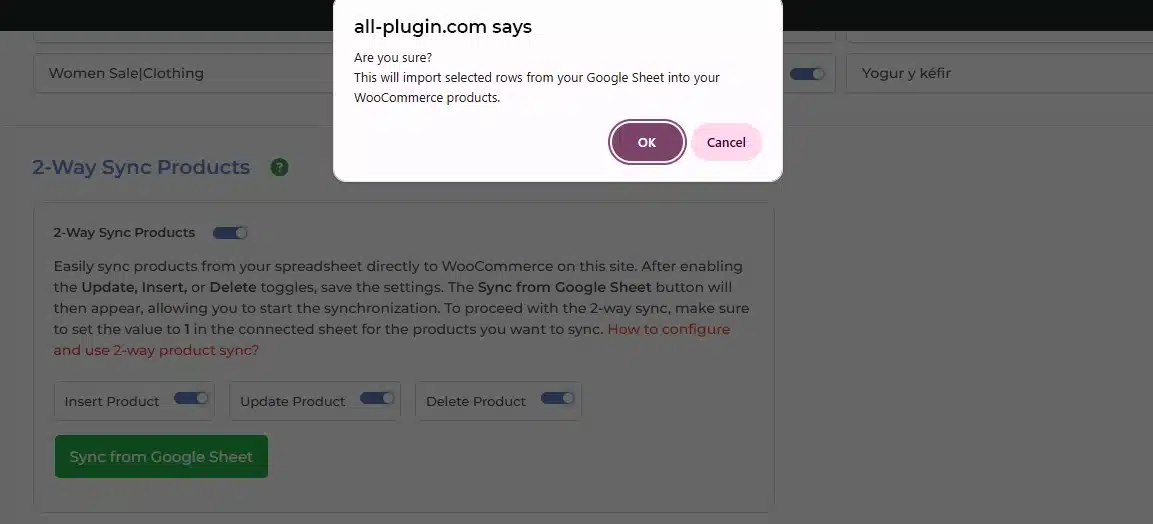
Click the “Sync from Google Sheet” button.
-
A confirmation popup will appear asking if you’re sure about syncing changes.
-
Click OK to proceed.
Go back to Feed Settings > Product Feed > 2-Way Sync Products.
Click the “Sync from Google Sheet” button.
A confirmation popup will appear asking if you’re sure about syncing changes.
Click OK to proceed.
You will now see a summary like:
-
1 Product Inserted -
1 Product Updated -
1 Product Deleted -
Click the “Process” button to apply these changes to your WooCommerce store.
-
If you don’t want to apply the changes, click the “Cancel” button.

You’re Done!
Now your WooCommerce store and Google Sheet are successfully synced both ways.
2-Way Sync Orders Configuration: Sheet to WooCommerce
Step 1: Enable Order Feed Settings
-
Go to GSheetConnector > Feed Settings in your WordPress dashboard.
-
Open the Order Feed section.
-
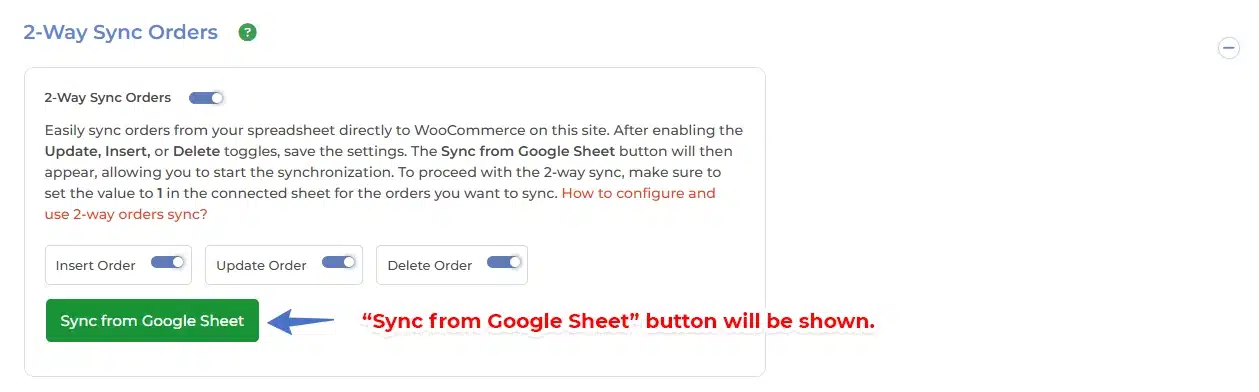
Enable the option “2-Way Sync Orders”.
-
Click the “Submit Data” button to save your settings.
Go to GSheetConnector > Feed Settings in your WordPress dashboard.
Open the Order Feed section.
Enable the option “2-Way Sync Orders”.
Click the “Submit Data” button to save your settings.

Step 2: Display “Sync from Google Sheet” Button
-
After submitting, scroll back up to the “2-Way Sync Orders” section.
-
You will now see a “Sync from Google Sheet” button.
After submitting, scroll back up to the “2-Way Sync Orders” section.
You will now see a “Sync from Google Sheet” button.
Step 3: Perform Initial Sync
-
Before syncing from the Google Sheet, go to the “Sync Orders” section.
-
Perform a full sync to ensure your WooCommerce order data is available and up to date in the connected Google Sheet.
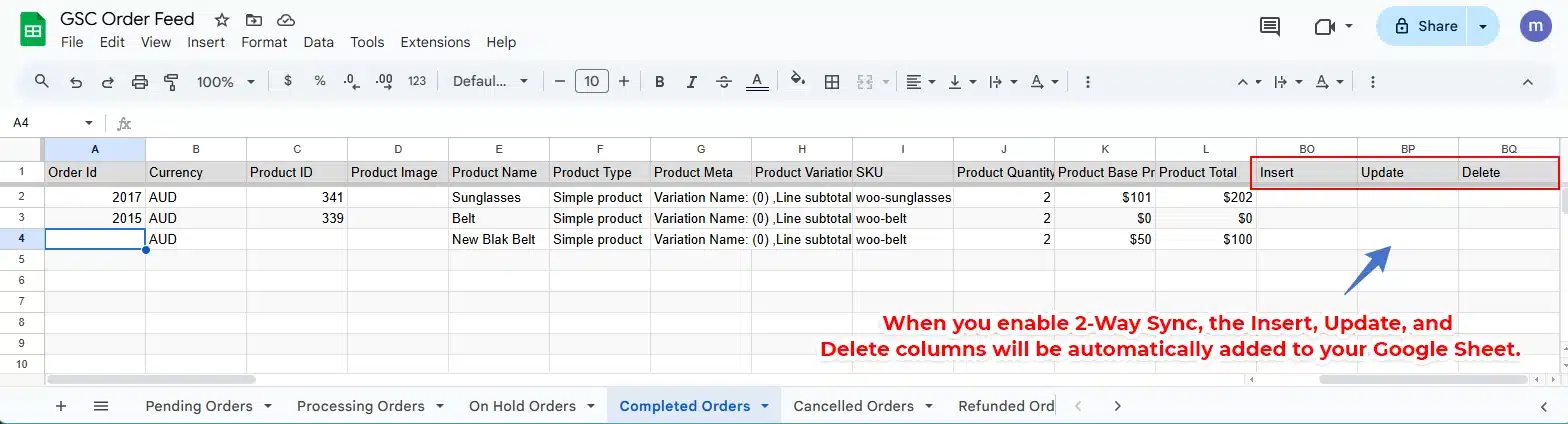
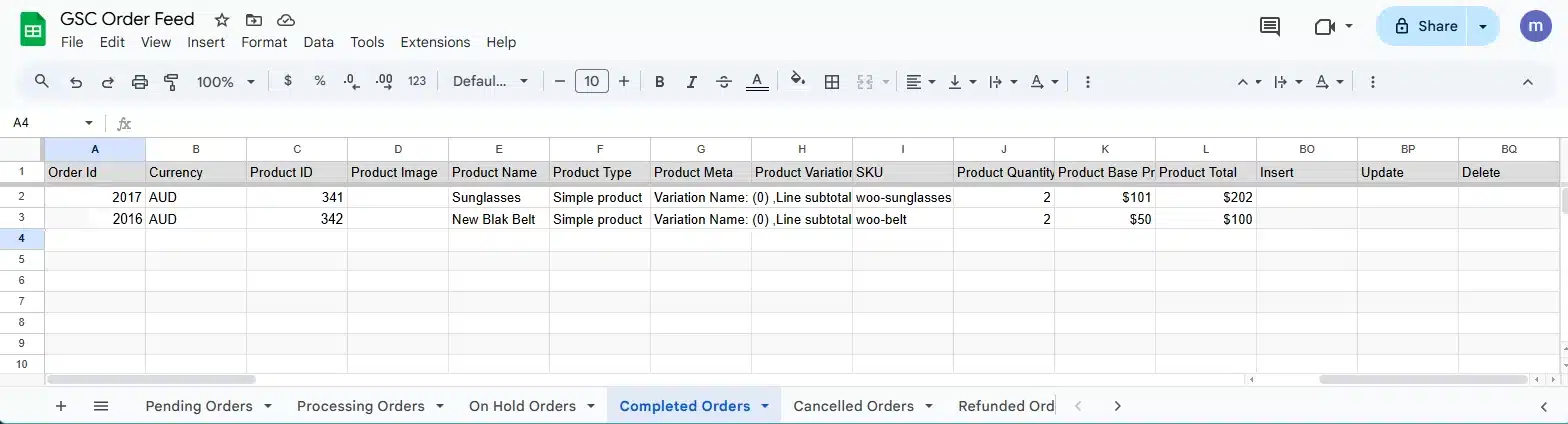
Step 4: Understanding Google Sheet Columns
Open the connected Google Sheet named ex.“GSC Orders Feed”. At the end of the sheet, you’ll see three special columns:
-
Insert -
Update -
Delete
These headers are also visible under the “Google Sheet Headers” section in the Order Feed settings.
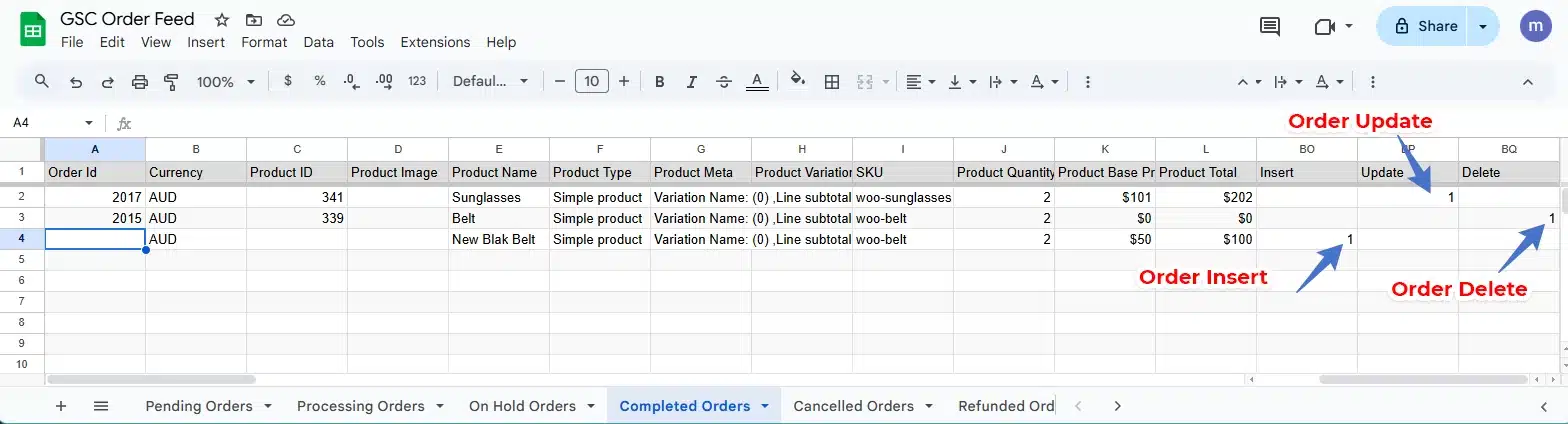
Step 5: Modify Order Data in Google Sheet
Depending on the action, do the following:
-
To Update an Order:
-
Enter
1in theUpdatecolumn of the desired row. -
Update the status or details as needed (e.g., Order Status, Billing Address, Shipping Address, Notes).
-
-
To Delete an Order:
-
Enter
1in theDeletecolumn of that order row.
-
-
To Insert a New Order:
-
Add a new row with all required order information (like customer details, product info, status).
-
Do not fill the Order ID column.
-
Enter
1in theInsertcolumn.
-
Step 6: Sync Changes Back to WooCommerce
-
Go back to Feed Settings > Order Feed > 2-Way Sync Orders.
-
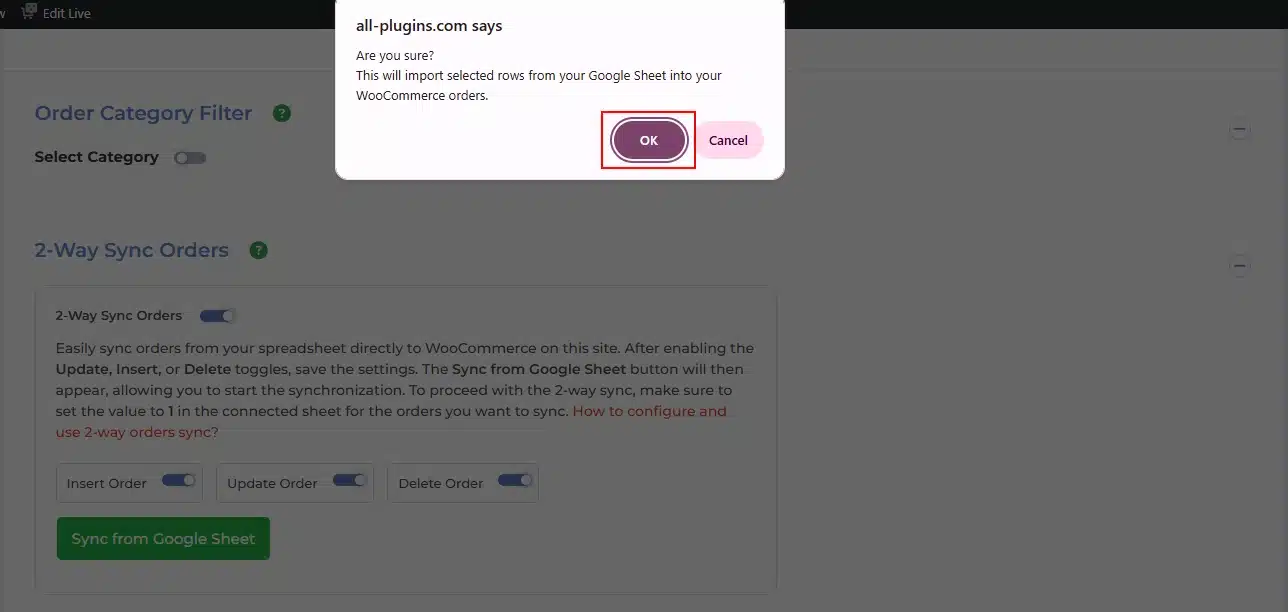
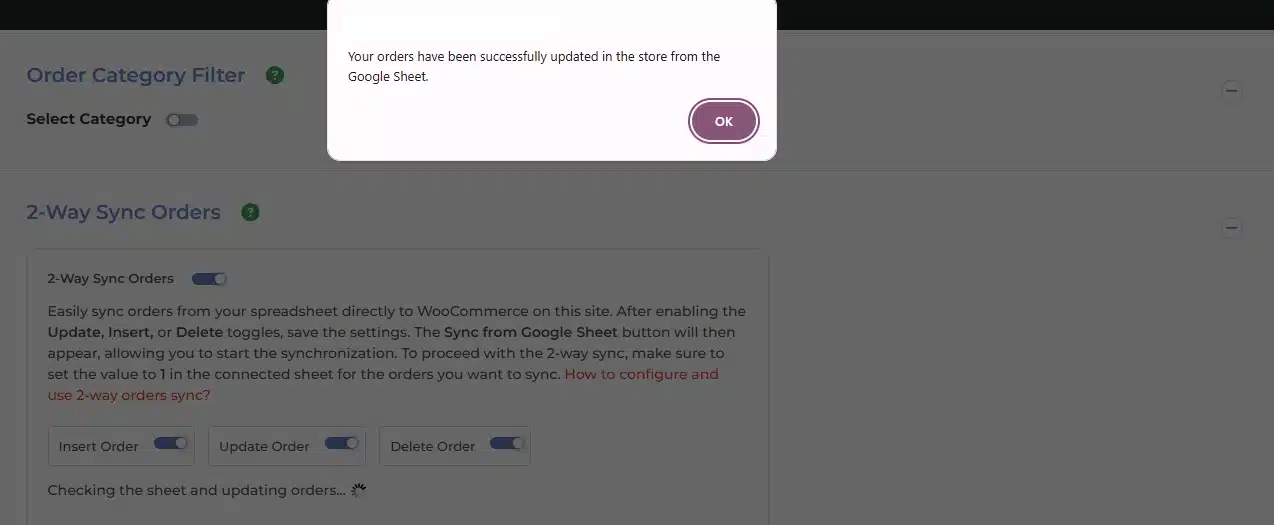
Click the “Sync from Google Sheet” button.
-
A popup will appear asking for confirmation.
-
Click OK to proceed.
Go back to Feed Settings > Order Feed > 2-Way Sync Orders.
Click the “Sync from Google Sheet” button.
A popup will appear asking for confirmation.
Click OK to proceed.
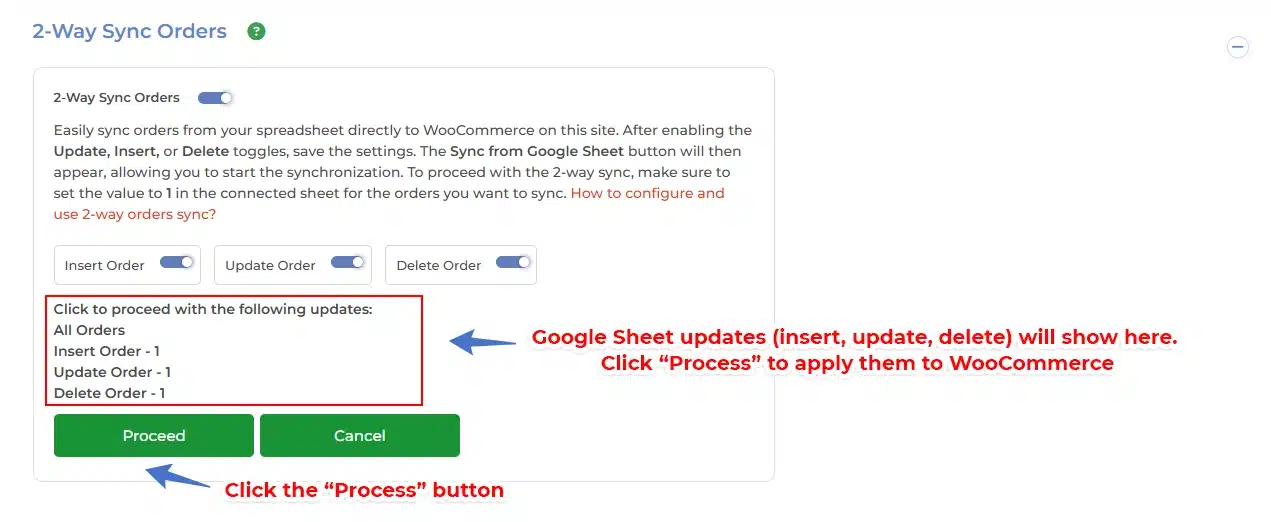
You’ll see a confirmation like:
-
1 Order Inserted -
1 Order Updated -
1 Order Deleted
-
Click the “Process” button to apply these changes to your WooCommerce store.
-
If you don’t want to proceed, click the “Cancel” button.
Now your WooCommerce Orders and Google Sheet are fully synced both ways using the WooCommerce GSheetConnector plugin.
2-Way Sync Customers Configuration: Sheet to WooCommerce
Step 1: Enable Customers Feed Settings
-
Go to GSheetConnector > Feed Settings in your WordPress dashboard.
-
Open the Customers Feed section.
-
Enable the option “2-Way Sync Customers”.
-
Click the “Submit Data” button to save your settings.
Go to GSheetConnector > Feed Settings in your WordPress dashboard.
Open the Customers Feed section.
Enable the option “2-Way Sync Customers”.
Click the “Submit Data” button to save your settings.
 – Google Sheet Connector")
Step 2: Display “Sync from Google Sheet” Button
-
After submitting, scroll back up to the “2-Way Sync Customers” section.
-
You will now see a “Sync from Google Sheet” button.
After submitting, scroll back up to the “2-Way Sync Customers” section.
You will now see a “Sync from Google Sheet” button.
 – Google Sheet Connector")
Step 3: Perform Initial Sync
 – Google Sheet Connector")
-
Before syncing from the Google Sheet, go to the “Sync Customers” section.
-
Perform a full sync to ensure your WooCommerce order data is available and up to date in the connected Google Sheet.
Step 4: Understanding Google Sheet Columns
Open the connected Google Sheet named ex.“GSC Customers Feed”. At the end of the sheet, you’ll see three special columns:
-
Insert -
Update -
Delete
These headers are also visible under the “Google Sheet Headers” section in the Customers Feed settings.
 – Google Sheet Connector")
Step 5: Modify Customers Data in Google Sheet
Depending on the action, do the following:
-
To Update an Customers :
-
Enter
1in theUpdatecolumn of the desired row. -
Update the status or details as needed (e.g., Customer ID, Custmer User name, Customer First Name, Customer Last Name, Shipping Country, Customer Email etc.).
-
-
To Delete an Customer :
-
Enter
1in theDeletecolumn of that customer row.
-
-
To Insert a New Customer :
-
Add a new row with all required order information (like customer details, product info, status).
-
Do not fill the Customer ID column.
-
Enter
1in theInsertcolumn.
-
 – Google Sheet Connector")
Step 6: Sync Changes Back to WooCommerce
-
Go back to Feed Settings > Customers Feed > 2-Way Sync Customers.
-
Click the “Sync from Google Sheet” button.
-
A popup will appear asking for confirmation.
-
Click OK to proceed.
Go back to Feed Settings > Customers Feed > 2-Way Sync Customers.
Click the “Sync from Google Sheet” button.
A popup will appear asking for confirmation.
Click OK to proceed.
 – Google Sheet Connector")
You’ll see a confirmation like:
-
1 Customer Inserted -
1 Customer Updated -
1 Customer Deleted
-
Click the “Process” button to apply these changes to your WooCommerce store.
-
If you don’t want to proceed, click the “Cancel” button.
 – Google Sheet Connector")
 – Google Sheet Connector")
Now your WooCommerce Customers and Google Sheet are fully synced both ways using the WooCommerce GSheetConnector plugin.
 – Google Sheet Connector")
2-Way Sync Coupons Configuration: Sheet to WooCommerce
Step 1: Enable Coupon Feed Settings
-
Go to GSheetConnector > Feed Settings in your WordPress dashboard.
-
Open the Coupon Feed section.
-
Enable the option “2-Way Sync Coupons”.
-
Click the “Submit Data” button to save your settings.
Go to GSheetConnector > Feed Settings in your WordPress dashboard.
Open the Coupon Feed section.
Enable the option “2-Way Sync Coupons”.
Click the “Submit Data” button to save your settings.
 – Google Sheet Connector")
Step 2: Display “Sync from Google Sheet” Button
-
After submitting, scroll back up to the “2-Way Sync Coupons” section.
-
You will now see a “Sync from Google Sheet” button.
After submitting, scroll back up to the “2-Way Sync Coupons” section.
You will now see a “Sync from Google Sheet” button.
 – Google Sheet Connector")
Step 3: Perform Initial Sync
 – Google Sheet Connector")
-
Before syncing from the Google Sheet, go to the “Sync Coupons” section.
-
Perform a full sync to ensure your WooCommerce Coupon data is available and up to date in the connected Google Sheet.
Step 4: Understanding Google Sheet Columns
Open the connected Google Sheet named ex.“GSC Coupons Feed”. At the end of the sheet, you’ll see three special columns:
-
Insert -
Update -
Delete
These headers are also visible under the “Google Sheet Headers” section in the Coupon Feed settings.
 – Google Sheet Connector")
Step 5: Modify Coupon Data in Google Sheet
Depending on the action, do the following:
-
To Update an Coupon:
-
Enter
1in theUpdatecolumn of the desired row. -
Update the status or details as needed (e.g., Coupon Status, Billing Address, Shipping Address, Notes).
-
-
To Delete an Coupon:
-
Enter
1in theDeletecolumn of that Coupon row.
-
-
To Insert a New Coupon:
-
Add a new row with all required Coupon information (like customer details, product info, status).
-
Do not fill the Coupon ID column.
-
Enter
1in theInsertcolumn.
-
 – Google Sheet Connector")
Step 6: Sync Changes Back to WooCommerce
-
Go back to Feed Settings > Coupon Feed > 2-Way Sync Coupons.
-
Click the “Sync from Google Sheet” button.
-
A popup will appear asking for confirmation.
-
Click OK to proceed.
Go back to Feed Settings > Coupon Feed > 2-Way Sync Coupons.
Click the “Sync from Google Sheet” button.
A popup will appear asking for confirmation.
Click OK to proceed.
 – Google Sheet Connector")
You’ll see a confirmation like:
-
1 Coupon Inserted -
1 Coupon Updated -
1 Coupon Deleted
-
Click the “Process” button to apply these changes to your WooCommerce store.
-
If you don’t want to proceed, click the “Cancel” button.
 – Google Sheet Connector")
 – Google Sheet Connector")
Now your WooCommerce Coupons and Google Sheet are fully synced both ways using the WooCommerce GSheetConnector plugin.
 – Google Sheet Connector")