How to Connect WPForms with Google Sheets (Free Version)
This guide shows you how to connect an individual WPForms Contact Form with Google Sheets using the free WPForms Google Sheet Connector plugin, so every new entry is saved automatically in your sheet. If you haven’t installed the plugin yet, start with the Installation Process – FREE Version guide.
In the free version, you connect your sheet using the Manual Google Sheets Configuration method. You enter the Spreadsheet Name, Spreadsheet ID, Tab Name and Tab ID, and the plugin sends each submission to that tab.
Step 1: Confirm the Google Integration Is Complete
Before editing any form, make sure you have already connected WPForms Google Sheet Connector with your Google account, using either method:
- Automatic Integration — a quick one-click Google login, or
- Manual Integration — using a Client ID and Client Secret from Google Cloud Console.
Without this step, the plugin cannot send data to any Google Sheet, so double-check it before moving on.
Step 2: Open the Contact Form You Want to Connect
- In your WordPress dashboard, go to WPForms → All Forms.
- Find the Contact Form you want to connect with Google Sheets and click Edit.

Step 3: Open the GSheetConnector Settings
- In the form builder, click Settings in the left sidebar.
- Select GSheetConnector (Existing) from the settings menu.
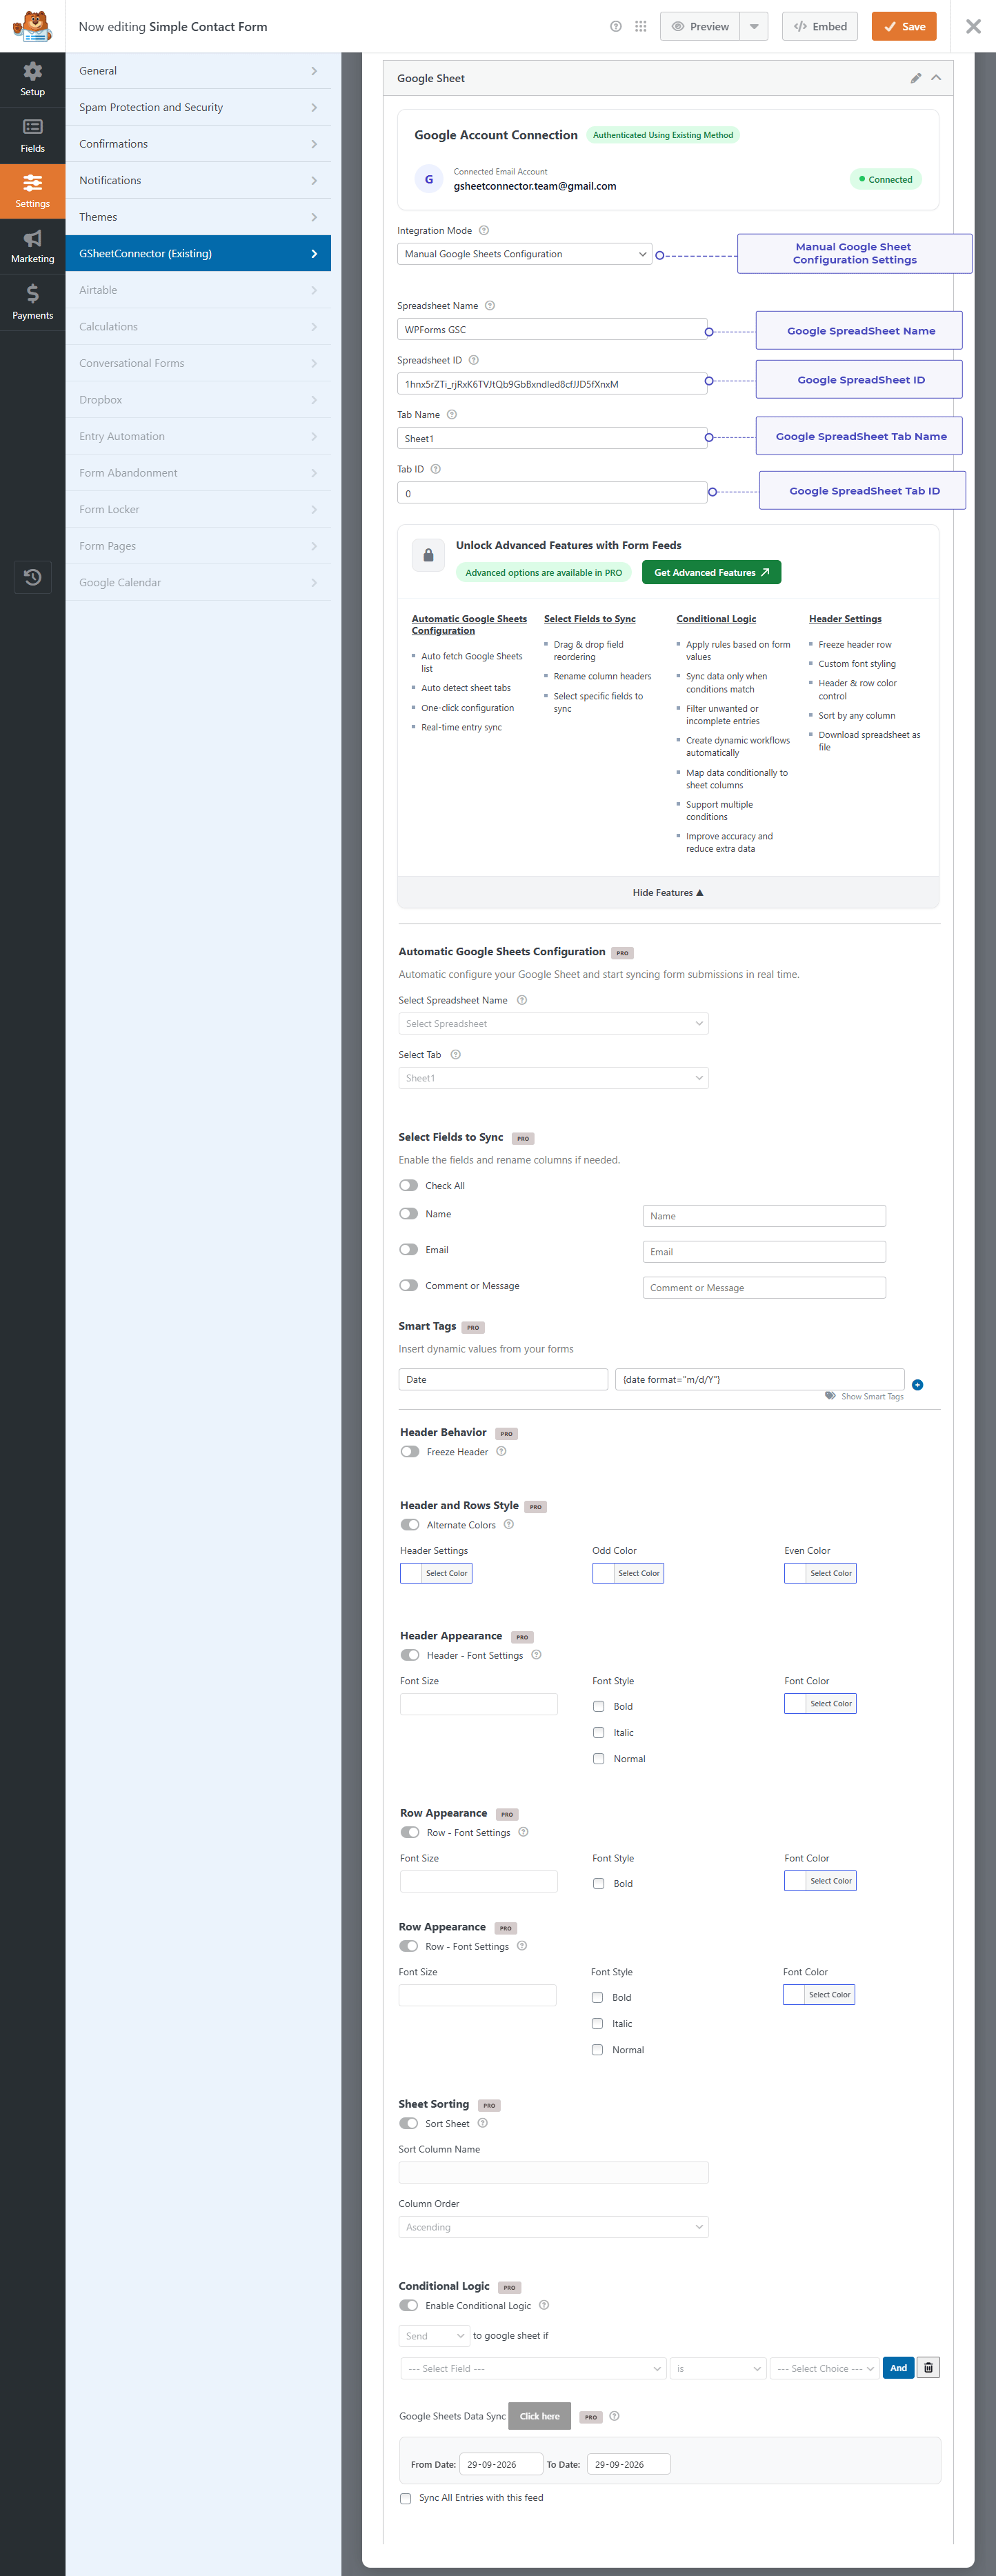
- Check the Google Account Connection box at the top. It should show your Google email and a green Connected badge. In the screenshot, the connection method shown is Authenticated Using Existing Method.
- Make sure Integration Mode is set to Manual Google Sheets Configuration.
Step 4: Find Your Google Sheet Details
Open the Google Sheet where you want to save the entries. You need four details, and all of them are easy to find:
- Spreadsheet Name – the file name at the top-left of Google Sheets (for example, WPForms GSC).
- Spreadsheet ID – the long code in the browser URL, between
/d/and/edit. - Tab Name – the name of the tab at the bottom of the sheet (for example, Sheet1).
- Tab ID – the number after
gid=in the URL. The first tab is usually0.

Step 5: Add the Sheet Details in the Plugin
Go back to the form’s GSheetConnector settings and paste the details into the matching fields:
- Spreadsheet Name – enter the name of your Google Sheet file.
- Spreadsheet ID – paste the ID copied from the URL.
- Tab Name – enter the tab name exactly as it appears (for example, Sheet1).
- Tab ID – enter the
gidnumber (for example,0).
Then click the orange Save button at the top of the WPForms builder.
Step 6: Copy the Field Label Names from Your Form
In the free version, the plugin matches your form data to Google Sheet columns using the Label Name of each field. So you need to copy these labels first.
- Go back to your Contact Form editor and open the Fields tab.

- Note down the Label Name of each field you want to send to Google Sheets (for example, Name, Email, Comment or Message).

Step 7: Paste the Label Names into Your Google Sheet
- Open the Google Sheet linked to this Contact Form.
- In the first row (header row), paste each Label Name into its own column, one by one.

Make sure the spelling and spacing of each header matches the form’s Label Name exactly. Even a small mismatch can cause that field to be skipped.
Optional: Track the Submission Date
If you also want to see when each entry was submitted, add one more column in your Google Sheet named “date”. The submission date will then be filled in automatically for every new entry, with no extra setup.
Step 8: Submit a Test Entry and Check Your Google Sheet
Now let’s confirm everything works. In the free version, entries are sent to Google Sheets automatically at the moment a form is submitted, so you do not need to click any sync button.
- Open your form on the front end of your website and submit a test entry.
- Open your Google Sheet and go to the tab you connected.
- Check the first empty row under your headers. Your new entry should appear there, with each answer placed in the column that matches its field label.

Each new submission is added as a new row, so your sheet keeps growing as visitors fill in your form. If you added the optional “date” column, the submission date is filled in for every entry too.
If the entry does not appear, check that the Spreadsheet ID, Tab Name and Tab ID are correct, that you clicked Save in the form builder, and that the column headers match your field labels exactly.
Step 9: Free vs PRO Feed Settings
The free version gives you a simple, reliable way to send form entries to Google Sheets. The advanced feed options are locked and marked with a PRO badge in the plugin until you upgrade. The screenshot below shows the free feed settings screen.
With the PRO version, you unlock:
- Automatic Google Sheets Configuration – auto fetch your Google Sheets list, auto detect tabs, one-click configuration and real-time entry sync.
- Select Fields to Sync – choose specific fields, rename column headers and reorder fields with drag and drop.
- Smart Tags – add dynamic values, such as the submission date with a custom format, as extra columns.
- Header Settings – freeze the header row, set alternate row colors, and customize font size, style and color for headers and rows.
- Sheet Sorting – sort your sheet by any column in ascending or descending order.
- Conditional Logic – send entries only when they match your rules, and filter out unwanted or incomplete entries.
- Google Sheets Data Sync – send past form entries (submitted before the connection was set up) to your sheet by date range, or sync all entries with one click. New submissions are sent automatically in both the free and PRO versions.
You can learn how to set up each option in our Plugin Feed Settings – PRO Version guide.
That’s it. Every new submission from your Contact Form will now be sent straight to your connected Google Sheet. If you would rather use a Service Account instead of your personal Google login, see the Service Account Setting guide. If a submission does not appear in your sheet as expected, check the System Status page to confirm your server meets all requirements.
Frequently Asked Questions
Why is my Contact Form not sending data to Google Sheets?
This is usually caused by one of these things: the Google integration is not completed, GSheetConnector is not enabled for that form, the Spreadsheet ID or Tab ID was entered incorrectly, or the column headers in your Google Sheet do not exactly match the field label names. Check each of these in order to find the issue.
Where do I find my Google Sheet ID and Tab ID?
Open your Google Sheet and look at the browser’s address bar. The Sheet ID is the long code between “/d/” and “/edit” in the URL. The Tab ID is the number after “gid=” once you click on the tab you want to use.
Do the Google Sheet column headers need to match the form's field labels exactly?
Yes. In the free version, the plugin matches your form data to the correct column using the exact Label Name from the form, so the header row in your Google Sheet must be spelled and spaced identically.
Is adding a date column required?
No, it is optional. Add a column named “date” only if you want the submission date recorded automatically with each entry.
What is the difference between Automatic and Manual Integration?
Automatic Integration connects your Google account with a simple one-click login, while Manual Integration uses a Client ID and Client Secret you create yourself in Google Cloud Console. Both connect your Google account. Choose whichever fits your setup.
Can I choose my Google Sheet from a dropdown in the free version?
No. The free version uses Manual Google Sheets Configuration, where you enter the Spreadsheet Name, Spreadsheet ID, Tab Name and Tab ID yourself. Automatic sheet and tab selection is available in the PRO version.
Will new form entries still reach Google Sheets if Data Sync is locked in the free version?
Yes. Google Sheets Data Sync is only used to send older entries by date range, and it is a PRO feature. In the free version, every new form submission is still sent to your Google Sheet automatically as soon as the form is submitted.
Can I send old WPForms entries to Google Sheets in the free version?
No. Past entries (submitted before the connection was set up) can be sent using the Google Sheets Data Sync option in the PRO version. In the free version, only new submissions are sent automatically.
Which features are only available in the PRO version?
Automatic Google Sheets configuration, field selection with drag and drop, Smart Tags, header and row styling, freeze header, sheet sorting, Conditional Logic and Google Sheets Data Sync are PRO features. The free version supports the basic manual connection.
Does the free version support Smart Tags?
No. Smart Tags are available in the PRO version, giving you more control over what data is sent to each Google Sheet column.