
WooCommerce Google Sheet Connector Pro provides developer-friendly hooks and filters that let you customize exactly what data gets exported to your Google Sheet. This guide walks you through adding extra headers, combining product data into a single column, creating a brand-new custom order status that syncs to its own sheet tab, and hooking in data from other plugins.
What Does get_external_headers Do?
-
This filter allows you (or a plugin) to modify or add extra headers (columns) to the data being exported to Google Sheets.
-
It’s commonly used in order-level export, not product-line-level.
-
These headers become the column titles in your Google Sheet (like “ExtraFieldWoo”, “Custom External Fields1”, etc.).
Step 1 – Hook into the get_external_headers Filter
This defines the extra columns that will appear in your Google Sheet export. Notice that the whole block is wrapped inside add_action( 'admin_init', function() { ... }, 20 ); — this is important, because it makes sure your custom headers are registered at the right time (after the plugin’s own admin hooks have loaded) and with the correct priority (20), so they’re not skipped or overwritten.
Where to Place This Code:
- Recommended: In a custom plugin or site-specific plugin for better management.
- Alternative: Inside the functions.php file of your child theme. (child theme recommended)
- Avoid: Modifying WooCommerce or GSheetConnector core files.
add_action( 'admin_init', function() {

    $new_headers = array(
        'custom_external_fields'   => 'ExtraFieldWoo',
        'custom_external_fields1'  => 'Custom External Fields1',
        'custom_external_fields2'  => 'Custom External Fields2',
        'custom_external_fields3'  => 'Custom External Fields3',
        'custom_external_fields4'  => 'Custom External Fields4'
    );

    apply_filters( "get_external_headers", $new_headers );

}, 20 );
Each array key (like custom_external_fields1) is just an internal reference name, and each value (like Custom External Fields1) is the actual column title that will show up in your Google Sheet. You can rename these values to anything you like, and add or remove as many lines as you need.
Step 2 – Save Your Changes
After adding the final code, go to your WooCommerce Google Sheet Connector Pro Data Setting page and click “Submit Data” to save it.

Step 3 – Test With a Product Order
Place or open a product order to confirm the custom field columns appear correctly in your Google Sheet.
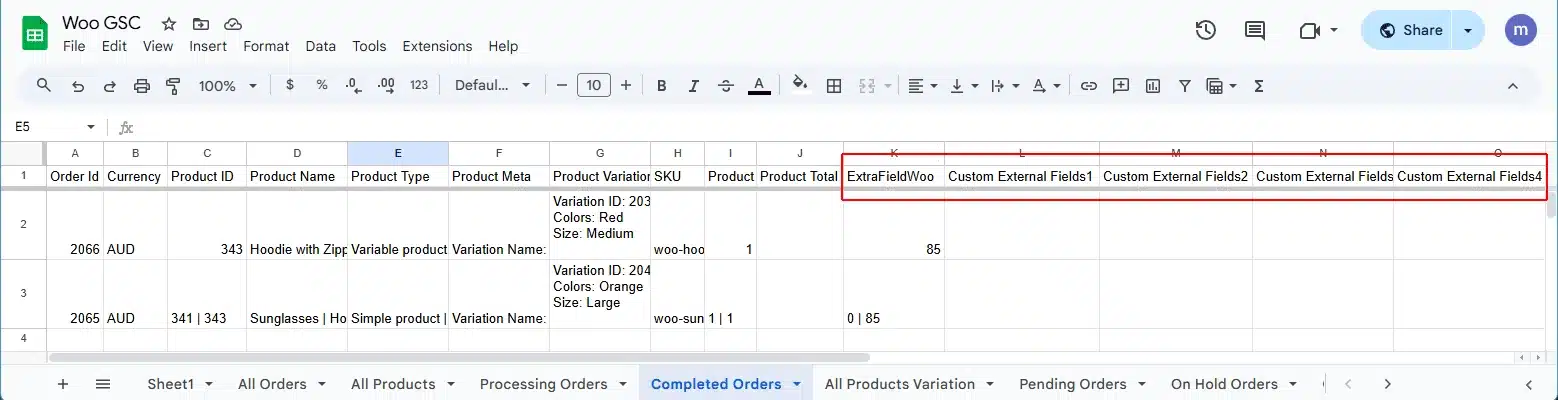
The custom field columns will then be added to the Google Sheet, and you can proceed to test with a product order. This makes sure these fields appear as columns in your Google Sheet.
Combine Product Details Into a Single Column
Want to add a custom column to your Google Sheet with the GSheetConnector WooCommerce plugin?
This code is used with the GSheetConnector WooCommerce plugin to add a custom column in your Google Sheet export that displays:
Product Name (QTY) (SKU) – for each line item in the WooCommerce order.
It works in two steps:
-
Adds a custom column header called
"Product Name (QTY) (SKU)" -
Fills in that column with combined product information for each order row.
Add a Custom Header and Return Its Value
Here is the complete, working version of the code. Just like Step 1 above, the header registration must be wrapped inside add_action( 'admin_init', function() { ... }, 20 ); so it loads at the correct time:
// STEP 1: Register the header (must run after admin_init, priority 20)
add_action( 'admin_init', function() {

    $new_headers = array(
        'custom_external_fields' => 'Product Name (QTY) (SKU)',
    );

    apply_filters( "get_ext_product_order_headers", $new_headers );

}, 20 );


// STEP 2: Provide the value for that column
add_filter( "gscwoo_row_values", "get_product_quantity_sku", 10, 4 );

function get_product_quantity_sku( $header_value, $header_col_name, $order, $custom_status ) {

    if ( $header_col_name === "Product Name (QTY) (SKU)" ) {

        // Example custom logic - replace with whatever you need
        $custom_value = "Your custom value here";

        return $custom_value;
    }

    return $header_value;
}
Why this matters: in the column-value function get_product_quantity_sku(), you must always return a defined variable. Returning an undefined variable (like an unset $values) will throw a PHP notice and leave the column blank. That’s why the working example above returns $custom_value — a variable that is actually defined inside the if block — and falls back to returning the original $header_value for every other column, so the rest of your sheet is left untouched.
What this does:
-
Checks if the current column being processed is
"Product Name (QTY) (SKU)". -
If yes, you can write logic inside this condition to fetch:
-
The product name
-
The quantity ordered
-
The SKU (stock keeping unit)
-
-
Then it returns the formatted string, such as:
T-Shirt (2) (TS-001)
You need to replace "Your custom value here" with your actual logic to fetch product details from the $order object and build the final string.
Where to Place This Code?
You should place this code in:
-
Your theme’s
functions.phpfile (child theme recommended) OR -
A custom plugin or code snippets manager like the Code Snippets plugin.
What Happens After Adding the Code?
-
A new column titled “Product Name (QTY) (SKU)” will be added to your connected Google Sheet.
-
When you click “Submit Data” or the order is automatically exported:
-
That column will contain combined info like
T-Shirt (2) (TS-001)
-
-
You can now easily view detailed product info in one column, which is helpful for reporting and analysis.

Adding External Fields Related to the Product Header
To add extra headers that are related specifically to a product’s order line (instead of the overall order), use the get_ext_product_order_headers filter — the same filter used in the “Combine Product Details Into a Single Column” example above. Wrap it in admin_init with priority 20, exactly like the order-level headers:
add_action( 'admin_init', function() {

    $new_headers = array(
        'custom_external_fields'   => 'ExtraFieldWoo',
        'custom_external_fields1'  => 'Custom External Fields1',
        'custom_external_fields2'  => 'Custom External Fields2',
        'custom_external_fields3'  => 'Custom External Fields3',
        'custom_external_fields4'  => 'Custom External Fields4'
    );

    apply_filters( "get_ext_product_order_headers", $new_headers );

}, 20 );
This looks almost identical to Step 1’s code, but notice the filter name is different — get_ext_product_order_headers instead of get_external_headers. That one difference is what tells the plugin these columns belong to each product line item inside an order, rather than to the order as a whole.
Adding a New Custom Order Status (“Query”)
Sometimes the default WooCommerce order statuses (Pending, Processing, Completed, etc.) aren’t enough — you may want a status like “Query” for orders that need a follow-up. Doing this properly takes three steps: registering the status in WordPress, adding it to the WooCommerce order status dropdown, and telling GSheetConnector to create a sheet tab for it.
Step 1 – Register the New Order Status
This registers wc-query as a real WordPress post status, with the label “Query” and a counter that shows how many orders have that status (visible in the WooCommerce Orders list).
add_action( 'init', 'register_query_order_status' );

function register_query_order_status() {
    register_post_status( 'wc-query', array(
        'label'                     => 'Query',
        'public'                    => true,
        'exclude_from_search'       => false,
        'show_in_admin_all_list'    => true,
        'show_in_admin_status_list' => true,
        // translators: %s: number of orders
        'label_count'               => _n_noop( 'Query <span class="count">(%s)</span>', 'Query <span class="count">(%s)</span>' ),
    ) );
}
Step 2 – Add “Query” to the Order Status Dropdown
Registering the status alone isn’t enough — WooCommerce also needs to know it should appear in the order status dropdown on the order edit screen. This code inserts “Query” right after “Processing” in that list (with a safe fallback that adds it at the end if “Processing” isn’t found):
add_filter( 'wc_order_statuses', 'add_query_to_order_statuses' );

function add_query_to_order_statuses( $order_statuses ) {
    $new_order_statuses = array();

    foreach ( $order_statuses as $key => $status ) {
        $new_order_statuses[ $key ] = $status;

        // Insert "Query" right after "Processing" status
        if ( 'wc-processing' === $key ) {
            $new_order_statuses['wc-query'] = 'Query';
        }
    }

    // Fallback: if it wasn't added above, add it at the end
    if ( ! isset( $new_order_statuses['wc-query'] ) ) {
        $new_order_statuses['wc-query'] = 'Query';
    }

    return $new_order_statuses;
}
Step 3 – Tell GSheetConnector to Create a Sheet Tab for “Query”
Without this final step, GSheetConnector won’t know that the “Query” status exists, and it won’t create a matching tab in your Google Sheet. Use the gscwoo_status_and_sheets filter to map the status key to the sheet tab name you want:
add_filter( 'gscwoo_status_and_sheets', 'add_query_status_and_sheets' );

function add_query_status_and_sheets( $status_and_sheets ) {
    $status_and_sheets['wc-query'] = 'Query Orders';
    return $status_and_sheets;
}
Here, wc-query must exactly match the status key you registered in Step 1, and 'Query Orders' is the name of the tab that will be created in your Google Sheet for orders with this status.
Once all three steps are added, “Query” will appear as a selectable order status in WooCommerce, and — after you enable it in the plugin’s Feed Setting (under Custom Order Sheet Tabs) — a “Query Orders” tab will be created automatically in your connected Google Sheet.
Create Custom Hooks for Other Plugins
1. Custom Order Numbers for WooCommerce
Plugin link: https://wordpress.org/plugins/custom-order-numbers-for-woocommerce/
This snippet exports the custom order number generated by that plugin as its own column in your Google Sheet. As with the earlier examples, it’s wrapped in admin_init with priority 20 — and here that priority matters even more, since it must run after the “Custom Order Numbers” plugin has registered its own hooks, so the field is available when GSheetConnector reads it:
add_action( 'admin_init', function() {

    $extra_headers = array(
        '_alg_wc_full_custom_order_number' => 'Custom Order Number',
    );

    apply_filters( "get_external_headers", $extra_headers );

}, 20 ); // priority 20 - must run AFTER the plugin registers its own filter
The key _alg_wc_full_custom_order_number is the exact meta field name used by the “Custom Order Numbers for WooCommerce” plugin to store its generated number — if you’re hooking into a different plugin, replace this with that plugin’s actual meta key.
Related Guides
If you haven’t completed these steps yet, or if you run into any issues while adding custom hooks and filters, check out the following related guides:
- Automatic Integration with Google – Connect WooCommerce with Google Sheets using the quick, one-click method.
- Manual Integration with Google (OAuth) – Connect using your own Google Cloud Project, Client ID, and Client Secret.
- Service Account Authentication Guide – Connect using a Google Service Account and JSON Key file instead of OAuth login.
- WooCommerce Data Setting Guide – Learn how to select your Google Sheet, enable tabs, and configure column headers.
- Feed Setting Guide – Create and manage separate Google Sheets for different order, product, or customer feeds.
- WooCommerce Google Sheet Connector Pro – View plugin features, pricing, and updates.
Frequently Asked Questions
What is the get_external_headers filter used for?
The get_external_headers filter lets you add extra custom columns (headers) to your order-level Google Sheet export, without modifying any core plugin or WooCommerce files.
Where should I add my custom hook code?
The recommended approach is to add it inside a custom or site-specific plugin. You can also add it to your child theme’s functions.php file. Avoid editing WooCommerce or GSheetConnector core files directly, since those changes will be lost on the next update.
What is the difference between get_external_headers and get_ext_product_order_headers?
get_external_headers is used to add extra columns at the order level, while get_ext_product_order_headers is used to add extra columns related specifically to a product line within an order.
How do I combine product name, quantity, and SKU into one column?
Use the get_ext_product_order_headers filter (wrapped in admin_init with priority 20) to add the custom column header, then use the gscwoo_row_values filter to return the combined value (for example, “T-Shirt (2) (TS-001)”) for that column on each row. Always return a defined variable from your function — never an undefined one — or the column will stay blank.
Do I need to click Submit Data every time after adding a hook?
Yes. After adding or updating your custom hook code, go to the Data Setting page and click Submit Data so the new headers are recognized and applied to your Google Sheet.
Can I add a custom order status using hooks?
Yes, but it takes three steps: register the new status with register_post_status() on the init hook, add it to the order status dropdown with the wc_order_statuses filter, and then map it to a Google Sheet tab name using the gscwoo_status_and_sheets filter. All three are required for the status to fully work and sync correctly.
Why do some of these hooks need to run at priority 20 on admin_init?
Priority 20 on admin_init makes sure your custom code runs after GSheetConnector (and, where relevant, other plugins like Custom Order Numbers for WooCommerce) have already registered their own hooks. If your code runs too early, the plugin may not pick up your custom headers at all.
Can I integrate data from other WooCommerce plugins using hooks?
Yes. For example, you can use the get_external_headers filter (wrapped in admin_init with priority 20) to pull in the custom order number field from the Custom Order Numbers for WooCommerce plugin, or similarly integrate fields from other compatible plugins by using their specific meta keys.
Is coding knowledge required to use these hooks and filters?
Yes, basic PHP knowledge is required since these hooks are added as custom code snippets. If you’re not comfortable editing code, consider using a code snippets manager plugin or consulting a developer.