How to Configure WPForms Google Sheet Connector PRO Feed Settings
This guide shows you how to create and configure a feed in the WPForms Google Sheet Connector PRO plugin. A feed is the connection between one WPForms form and one Google Sheet tab. By the end, you will know how to choose the sheet, select which form fields are sent, add Smart Tags, set the column order, style the header and rows, filter entries with Conditional Logic, and sync your older entries.
Step 1: Confirm the Google Integration
Before you configure a feed, make sure your Google account is already connected to the plugin. You can connect it using either of these methods:
- Automatic Integration — a quick one-click Google login, or
- Manual Integration — using a Client ID and Client Secret from Google Cloud Console.
Once the connection shows as Connected, you are ready to create a feed for any WPForms form.
Step 2: Open Your Form and Enable GSheetConnector Feed Settings
- Go to WPForms → All Forms and click Edit on the form you want to connect.
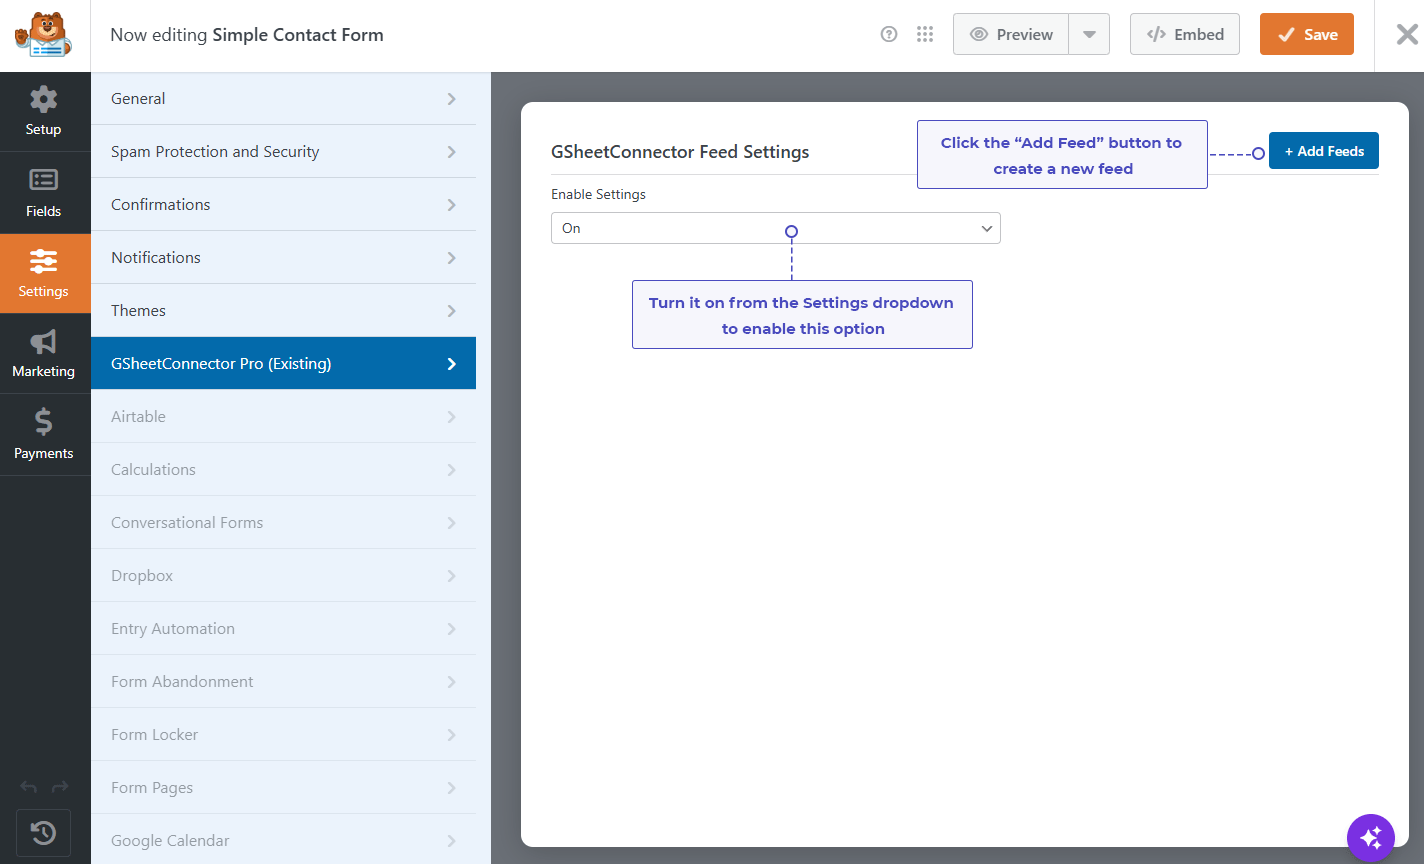
- In the form builder, click Settings in the left sidebar.
- Select GSheetConnector Pro (Existing) from the settings menu.
- Under GSheetConnector Feed Settings, set the Enable Settings dropdown to On.
Step 3: Create a New Feed and Name It
Click the + Add Feeds button in the top-right corner of the feed settings box. A popup titled Enter Column Name will open. Type a clear name for your feed (for example, Contact Form Leads) and click OK.
A good feed name helps you recognize each feed later, especially when one form sends data to more than one Google Sheet. You can add as many feeds as you need, and each feed has its own sheet, field mapping and settings. To rename a feed, click the pencil icon. To remove it, click the red cross icon.

Step 4: Understand the Feed Settings Screen
After you create the feed, click the arrow icon to expand it. At the top of the feed you will see the Google Account Connection box. It shows the connection method (for example, Existing Client / Secret Key (Auto Setup)), the connected Google email account, and a green Connected badge.
Below that, the feed is divided into these sections, which we explain one by one in the next steps:
- Integration Mode – choose how the Google Sheet is selected (Automatic or Manual).
- Select Fields to Sync – choose and rename the columns.
- Smart Tags – add dynamic values such as the submission date.
- Columns Manager – set the column order.
- Header Settings – freeze the header, colors and fonts.
- Sheet Sorting – sort the sheet in ascending or descending order.
- Conditional Logic – send only the entries you want.
- Google Sheets Data Sync – sync past entries by date.

Step 5: Choose the Integration Mode (Automatic or Manual)
Use the Integration Mode dropdown to decide how you want to pick your Google Sheet:
- Automatic – the plugin loads your Google Sheets and tabs into dropdown lists. Select the spreadsheet and tab you want. If your sheets do not appear, click “Click Here” under Fetch Google Sheet to load them.
- Manual Google Sheets Configuration – you type the Spreadsheet Name, Sheet ID, Tab Name and Tab ID yourself. This is the better choice if your account has a large number of sheets and the dropdown loads slowly.
Step 6: Add Your Google Sheet Details Manually
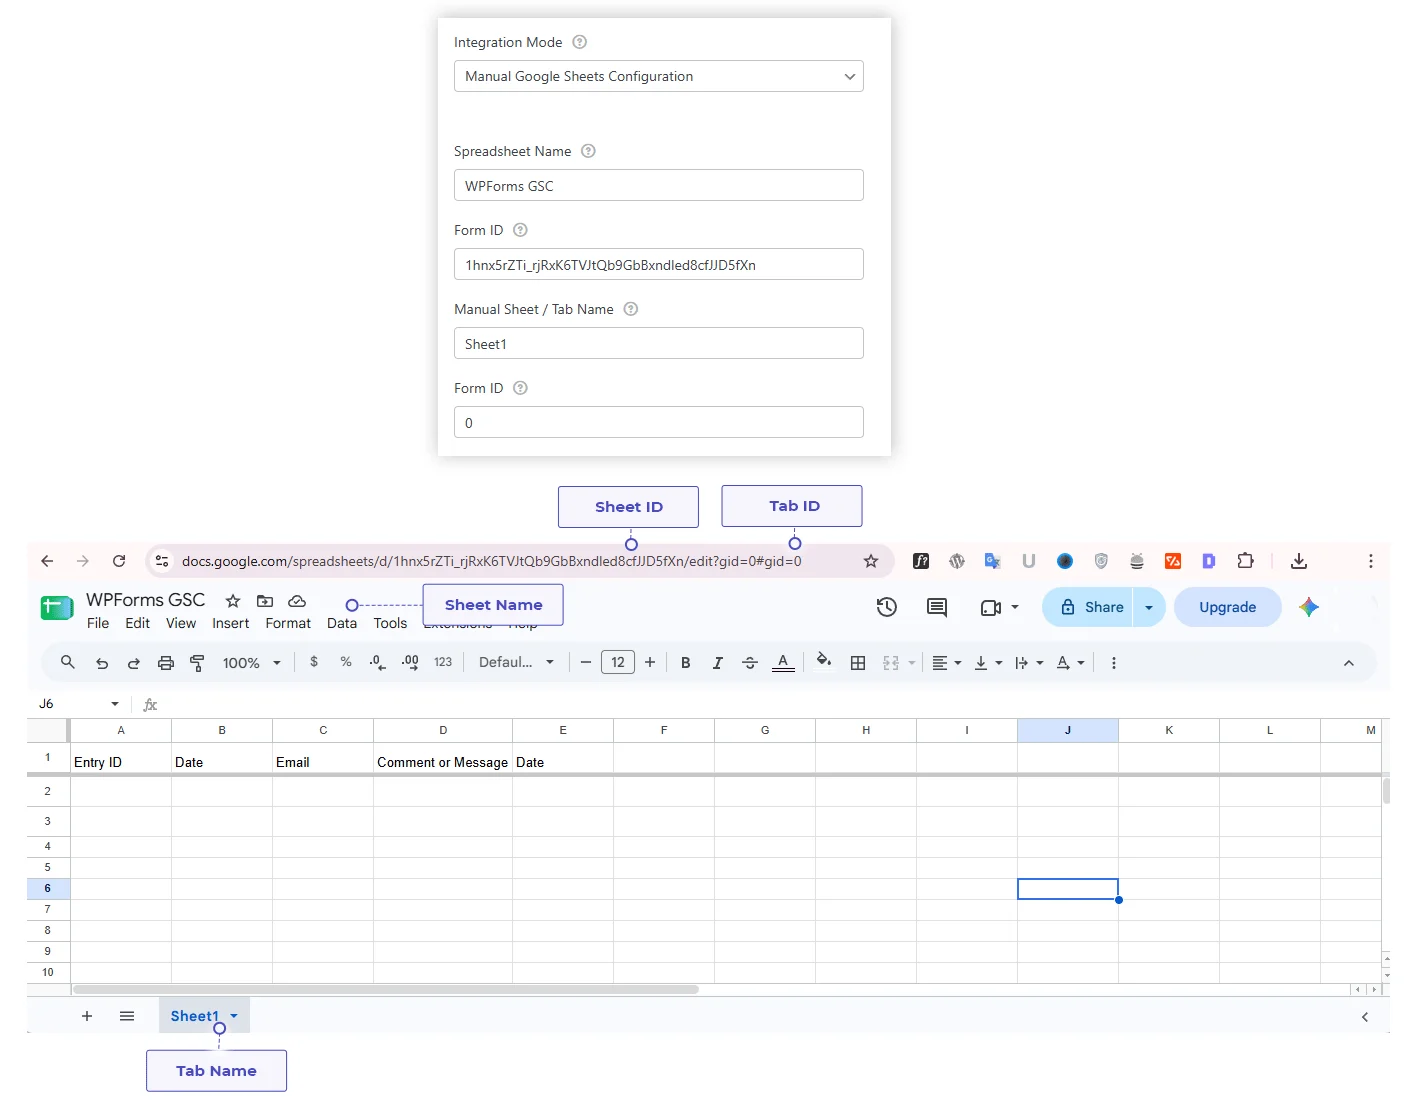
When you select Manual Google Sheets Configuration, fill in the four details below. All of them come from your Google Sheet, as shown in the screenshot.
- Spreadsheet Name – the name of your file at the top-left of Google Sheets (for example, WPForms GSC).
- Spreadsheet ID – the long code in the browser URL between
/d/and/edit. In the plugin, this field may appear with the label Form ID. - Tab Name – the name of the tab at the bottom of the sheet (for example, Sheet1).
- Tab ID – the number after
gid=in the URL. The first tab is usually0.

Then paste these values into the matching fields of your feed:
Step 7: Select the Fields to Sync
In the Select Fields to Sync section, you control exactly which form fields go to Google Sheets.
- Turn on the toggle next to each field you want to send (for example, Name, Email, Comment or Message).
- Use Check All to select every field at once.
- Entry ID can also be synced, so every row in your sheet is linked to its WPForms entry.
- Type a new name in the text box next to a field to rename its column header in Google Sheets.
Step 8: Add Smart Tags as Extra Columns
Smart Tags insert dynamic values, such as the submission date, into your sheet without adding extra fields to your form.
- In the Smart Tags section, type the column name in the first box (for example, Date).
- Click Show Smart Tags and pick a tag. It will fill the second box (for example,
{date format="m/d/Y"}). - Click the blue + icon to add another Smart Tag if you need more.
You can change the date format inside the tag to match your region, for example d/m/Y or Y-m-d.
Step 9: Set the Column Order with Columns Manager
The Columns Manager controls the order of the columns in your Google Sheet. Drag and drop the fields up or down to arrange them. The column letter (Column B, Column C and so on) is updated next to each field, so you can see the final result.
- Entry ID always stays in the first column and cannot be moved.
- Click the blue minus icon beside a field to remove it from the sheet columns.
- Smart Tag columns, such as Date, can be placed anywhere in the order.
Step 10: Style the Header and Rows
The Header Settings section helps you make your sheet clean and easy to read.
- Freeze Header
-
Turn on Freeze Header to keep the header row visible while scrolling down.
-
Turn on Freeze Column to keep the first column fixed while scrolling to the right. This is helpful when your sheet has many columns and you want to keep key details (like name or entry ID) always visible.
-
- Alternate Colors – turn it on, then choose the Header Color, Odd Color and Even Color using the Select Color buttons.
- Header – Font Settings – set the font size, font style (Bold, Italic or Normal) and font color for the header row.
- Row – Font Settings – set the font size, font style and font color for the data rows.
Step 11: Sort Your Google Sheet
Turn on Sort Sheet under Sheet Sorting to keep your data organized automatically.
- Enter the column name you want to sort by (for example, Date).
- Choose Ascending (A to Z, oldest first) or Descending (Z to A, newest first) from the dropdown.
Step 12: Use Conditional Logic to Filter Entries
Conditional Logic lets you send an entry to Google Sheets only when it meets your rules. This keeps your sheet free from unwanted or incomplete entries.
- Turn on Enable Conditional Logic.
- Choose Send in the first dropdown, which completes the sentence “Send to google sheet if…”
- Select a form field, choose an operator (such as is), and select the value.
- Click And to add more rules that must all match, or click Add New Group for an or condition.
- Click the red delete icon to remove a rule.
Example: send the entry only if Email is @gmail.com and Interested in Pro is Yes.
To learn more about how conditions work, see the WPForms guide on Conditional Logic.
Cron Settings
The Cron Settings option allows you to sync your form entries with Google Sheets automatically, on a schedule that you choose. Once it is set up, you do not need to click any sync button manually. The plugin runs the sync by itself at the time you have selected.
In this guide, you will learn how to enable Cron Sync and how to set a schedule using the Repeat Weekly or Run Once option.
When Should You Use Cron Settings?
- You want your Google Sheet to stay updated automatically, without syncing manually every time.
- You want the sync to run at regular intervals, for example every ten minutes.
- You want to run a one-time sync at a specific time, such as after a campaign ends or at the end of the day.
- You want full control over when the sync runs, or you want to stop automatic sync completely.
How to Enable Cron Sync
Follow the steps below to turn on automatic sync:
- Go to your WordPress Dashboard and open the GSheetConnector settings for your form plugin.
- Scroll down to the Cron Settings section.
- Turn on the Enable Cron Sync toggle. This turns on automatic scheduling.
- The schedule options will appear below the toggle.
- Choose your schedule (explained in the next section).
- Click on the Save button to apply your settings.

Understanding the Schedule Options
1. Set Schedule / No Schedule
After enabling Cron Sync, you first decide whether you want a schedule or not.
- Set Schedule: Choose this option if you want the sync to run automatically at the time you define.
- No Schedule: Choose this option if you do not want any automatic schedule to run.
2. Choose Schedule Type
When Set Schedule is selected, you can choose how the schedule should run:
- Repeat Weekly: The sync runs again and again on a regular basis. Use this when you want your Google Sheet to be updated continuously without any manual work.
- Run Once: The sync runs only one time. Use this when you need a single sync at a particular time and do not want it to repeat.
3. How Often
The How Often dropdown decides how frequently the sync should run. Click on the dropdown and select the interval you prefer, for example Every Ten Minutes.
- Choose a shorter interval if you want your sheet to update quickly after every new form submission.
- Choose a longer interval if you do not need instant updates and want to reduce the load on your website.
Step-by-Step Examples
Example 1: Keep Your Sheet Updated Regularly
Suppose you want your Google Sheet to be updated automatically all the time.
- Turn on Enable Cron Sync.
- Click on Set Schedule.
- Select Repeat Weekly as the schedule type.
- In the How Often dropdown, select Every Ten Minutes.
- Click Save.
Result: The plugin syncs your form entries to Google Sheets automatically at the interval you selected. You do not need to sync manually.
Example 2: Run a One-Time Sync
Suppose you want to run the sync only one time and do not want it to repeat.
- Turn on Enable Cron Sync.
- Click on Set Schedule.
- Select Run Once as the schedule type.
- Click Save.
Result: The sync runs one time only. It will not repeat after that.
Example 3: Stop Automatic Sync
Suppose you no longer want the sync to run automatically.
- Click on No Schedule, or turn off the Enable Cron Sync toggle.
- Click Save.
Result: The automatic sync stops. Your existing Google Sheet data stays as it is.
- You must click Save after changing any Cron Setting, otherwise your schedule will not be applied.
- Cron Sync works through the WordPress cron system, which runs when someone visits your website. On a website with very low traffic, the sync may run slightly later than the selected time.
- Choose a sensible interval. Very short intervals on a website that receives a large number of form entries can increase the load on your website.
Verify That Cron Sync Is Working
- Save your Cron Settings with a short interval, for example Every Ten Minutes.
- Submit a test entry on your form.
- Wait for the selected interval to pass.
- Open your connected Google Sheet.
Step 13: Sync Past Entries with Google Sheets Data Sync
If your form already has older entries, you can send them to your sheet without asking users to submit the form again.
- Scroll to Google Sheets Data Sync.
- Choose the From Date and To Date.
- Click the Click Here button next to Sync to Google Sheet.
- Wait for the success message, then open your Google Sheet and check the entries.
Once the sync is complete, open your Google Sheet. Your entries will appear row by row under the headers you set, with the Entry ID, the selected form fields and any Smart Tag columns (such as the submission date), in the same order you arranged in the Columns Manager.

To send every old entry, tick Sync All Entries with this feed instead of choosing a date range.
Finally, click the orange Save button at the top of the WPForms builder to store your feed settings.
That’s it. Your feed is now fully configured, and every new submission will be sent to Google Sheets using your field mapping, column order, styling and conditions. If you only need a basic setup, see our Plugin Feed Settings – FREE Version guide. For production sites, you can also use a Service Account instead of your personal Google login, as explained in the Service Account Setting guide.
Frequently Asked Questions
What is a feed in WPForms Google Sheet Connector PRO?
A feed is the connection between one WPForms form and one Google Sheet tab. It stores the sheet details, selected fields, column order, styling and conditions for that connection.
Can one WPForms form send data to multiple Google Sheets?
Yes. Click + Add Feeds to create more feeds. Each feed can point to a different Google Sheet or tab and has its own settings.
Should I use Automatic or Manual Google Sheets Configuration?
Automatic mode is quicker for most users. Choose Manual mode if you have many Google Sheets and the dropdown loads slowly, or if your sheet does not appear in the list.
Where do I find the Google Sheet ID and Tab ID?
Open your Google Sheet and look at the URL. The Sheet ID is the long code between /d/ and /edit. The Tab ID is the number after gid=, and it is 0 for the first tab.
What are Smart Tags used for?
Smart Tags add dynamic values, such as the submission date, as extra columns in your Google Sheet without adding them as fields on your form.
How do I change the order of columns in my Google Sheet?
Use the Columns Manager in the feed settings and drag the fields up or down. Entry ID always stays in the first column.
How does Conditional Logic work with Google Sheets?
Conditional Logic sends an entry to Google Sheets only when it matches the rules you set. Entries that do not match are not added to the sheet.
Can I sync old WPForms entries to Google Sheets?
Yes. Use Google Sheets Data Sync, select a From Date and To Date (or tick Sync All Entries with this feed), and click the sync button.
Why did new entries stop appearing after 1,000 rows?
Google Sheets gives a limited number of rows by default. Once your sheet passes 1,000 rows, add more rows manually so new submissions have space to be added.