How to Create and Connect an Elementor Atomic Form with Elementor Forms Google Sheet Connector (Free Version)
Important Note Before You Start
Atomic Form is Elementor’s newer, modular form element. Instead of one form widget with a field list in the sidebar, every field (Label, Input, Textarea, Checkbox, Radio, Select, Date Picker, File Upload and Submit Button) is a separate element placed inside a Form container. This gives you more layout flexibility and cleaner design control.
Elementor Forms Google Sheet Connector (Free Version) works with Atomic Form and sends every new submission to your Google Sheet in real time.
Step 1: Create a Form Using the Atomic Form Element
- Navigate to Pages → Add New, or open an existing page.
- Click Edit with Elementor.
- Search for the Atomic Form element in the widget panel.
- Drag and drop it onto your page.
- Add or arrange the field elements you need, such as:
- Name
- Phone Number
- Message
- Any custom fields you need
- Add a Submit Button at the end of the form.
For more details about the element, see the Elementor Atomic Form help page.
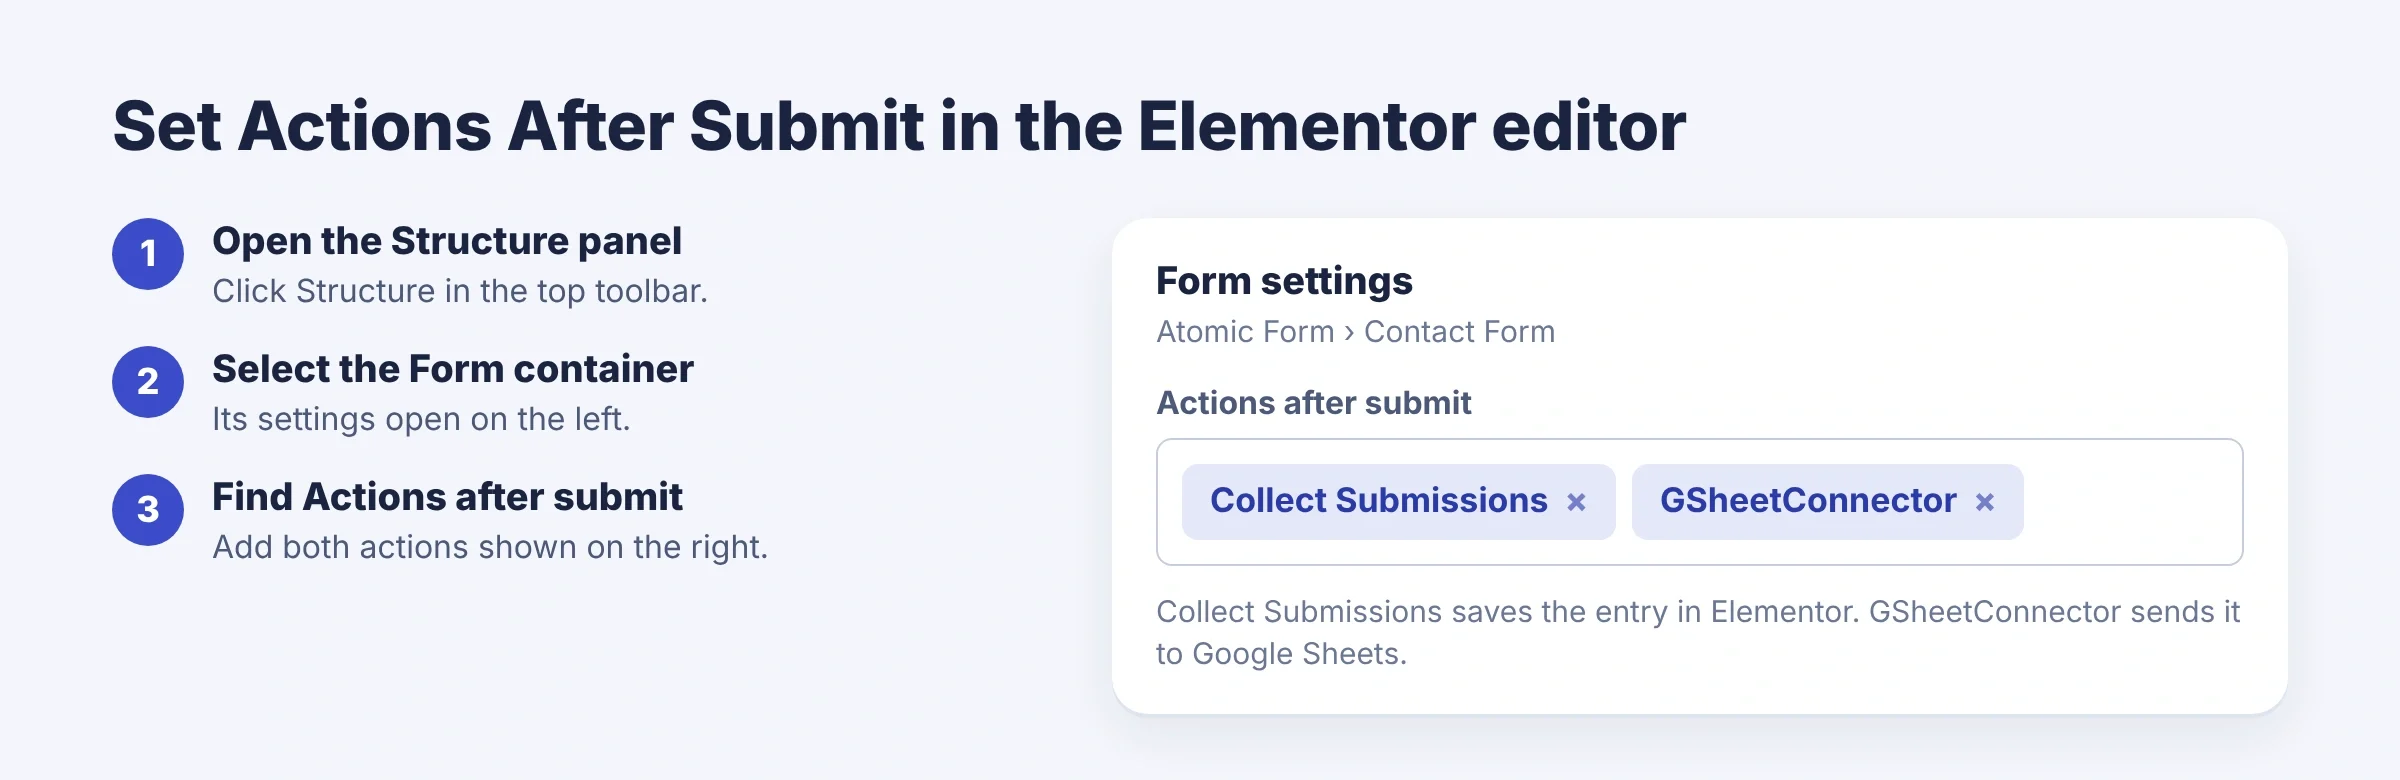
Step 2: Set Actions After Submit
For the Google Sheet integration to work, you need to add the correct actions to your form.
- In the Elementor editor, click the Structure icon in the top toolbar.
- Select the Form container from the Structure panel.
- The Edit Form settings will open on the left side.
- Scroll down to Actions After Submit.
- Add both of these actions:
- Collect Submissions
- GSheetConnector
- Click Publish or Update.
Your Atomic Form is now live and ready to accept submissions.
Step 3: Create a Form Feed in Elementor Forms Google Sheet Connector
After creating your form, you need to connect it with GSheetConnector.
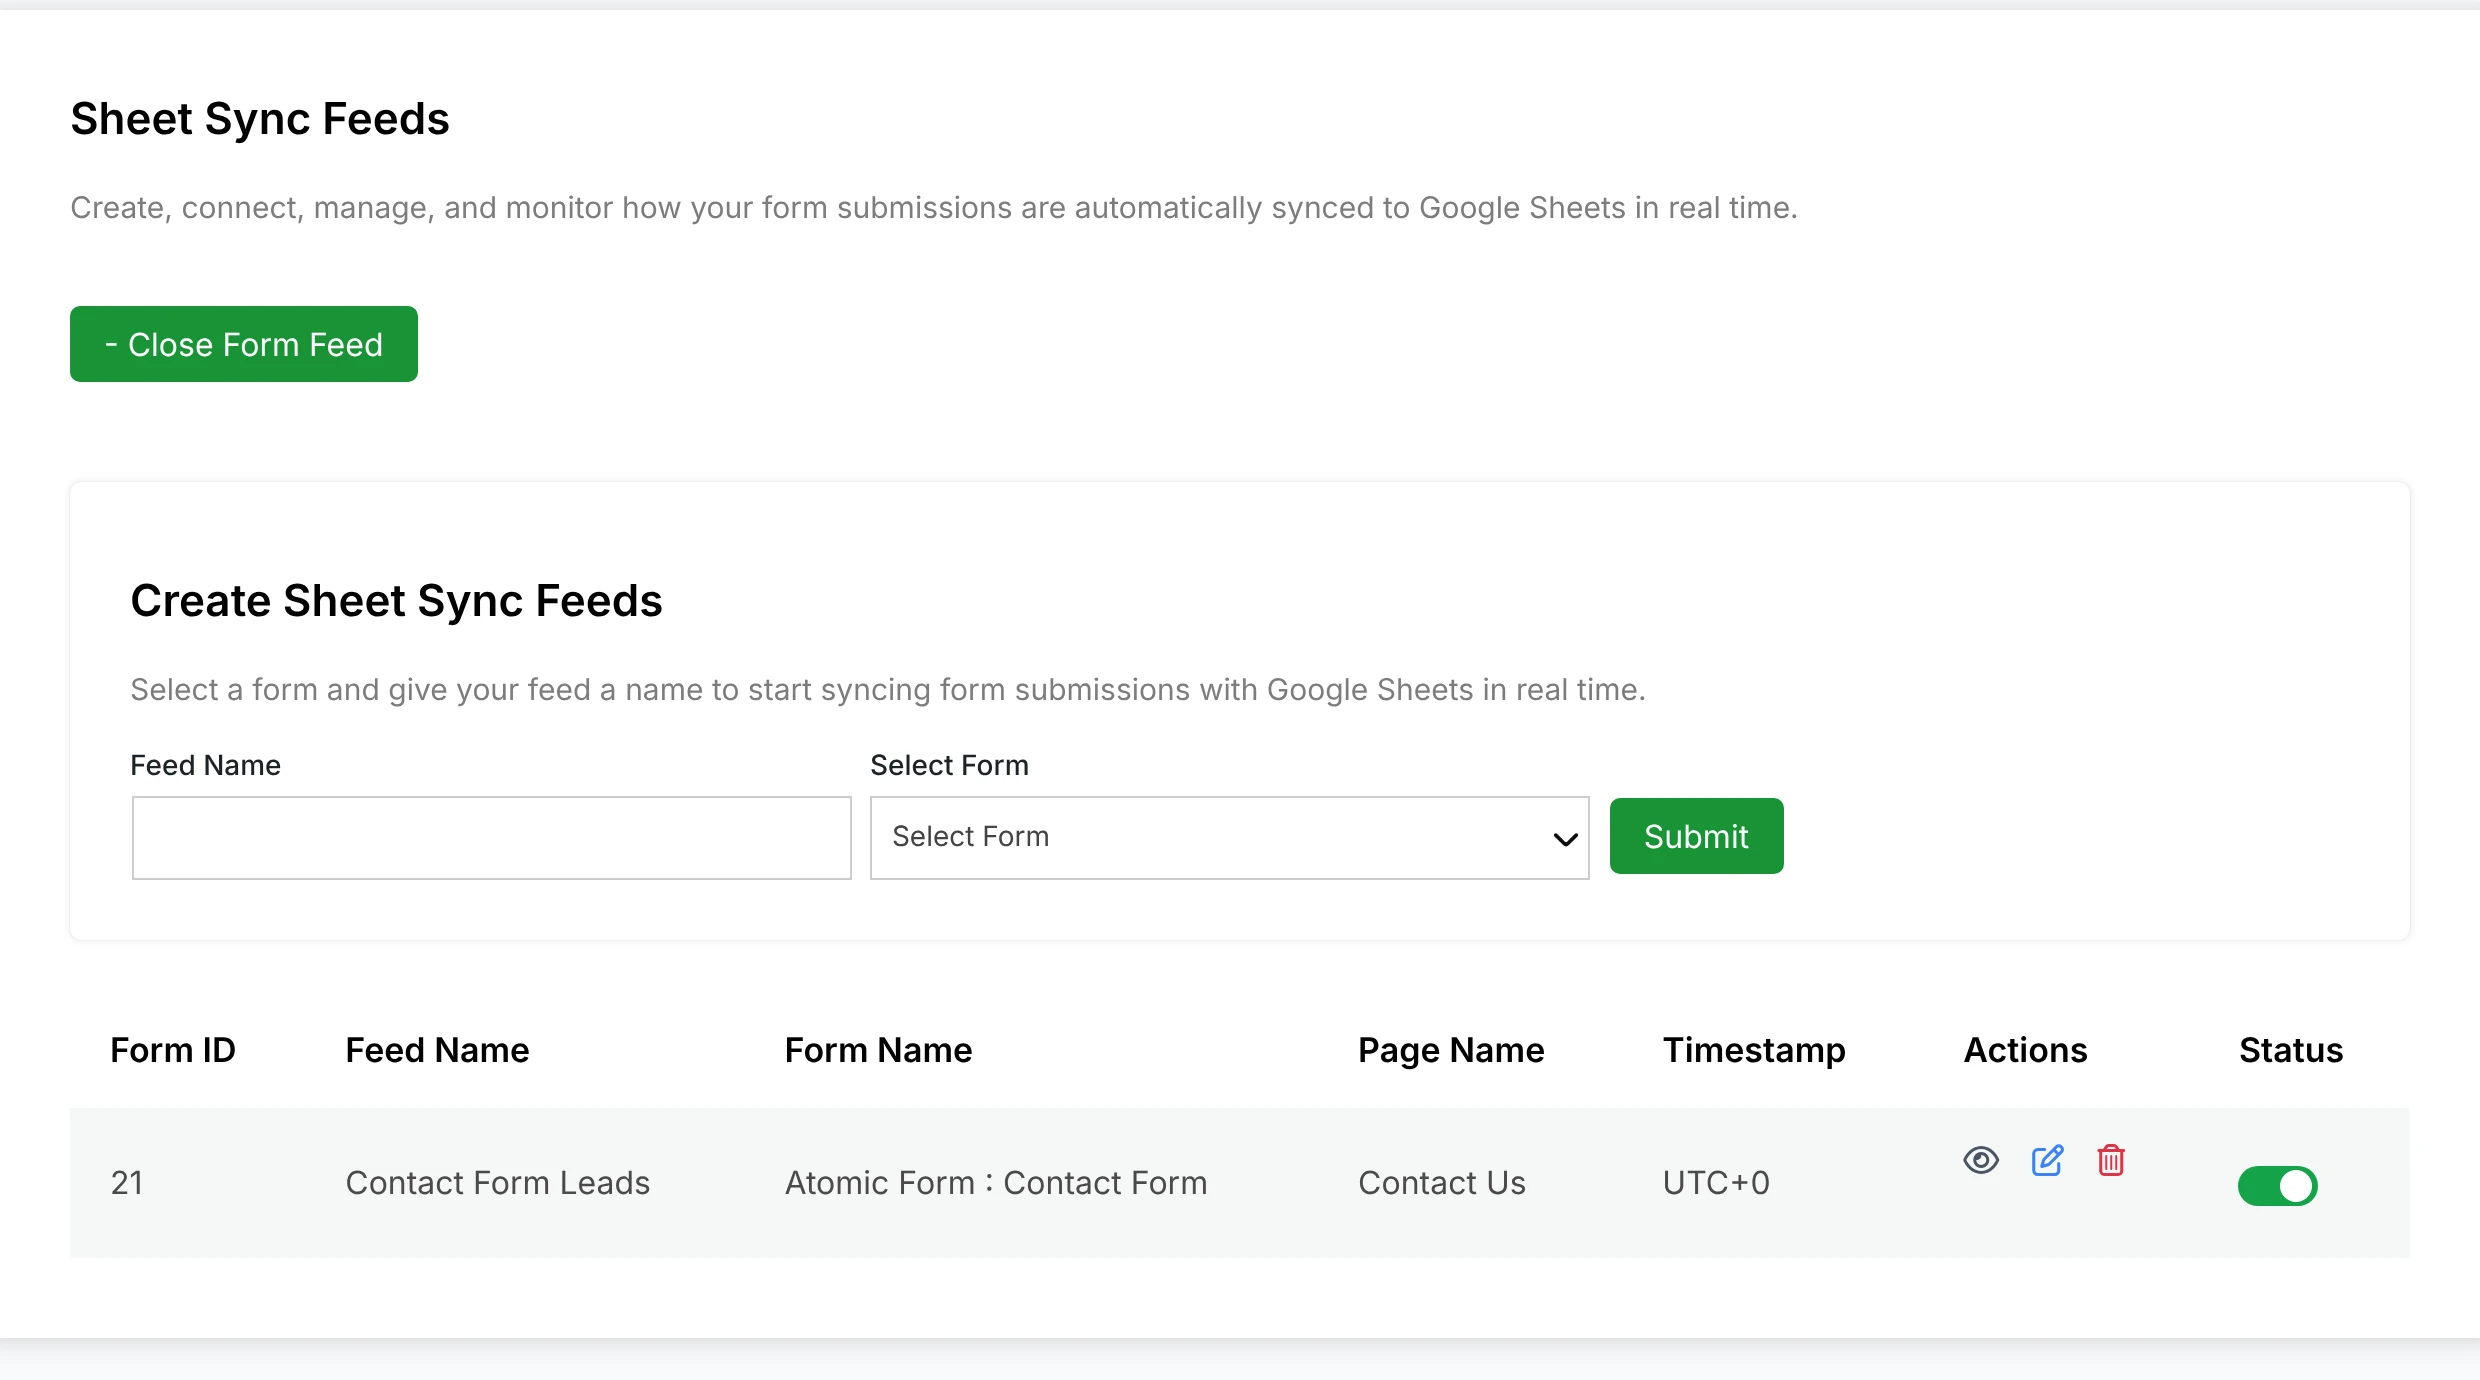
- Navigate to Elementor → Google Sheet from the WordPress Dashboard.
- Open the Form Feeds tab.
- Click the + Add Form Feed button.
You will now see the feed creation form.
Configure the Feed
- Enter a name in the Feed Name field.
- From the Select Form dropdown, choose your form. Atomic Forms are shown as Atomic Form : your form name.
- Click the Submit button.
Step 4: View the Feed List
After creating a feed, it will appear in the Sheet Sync Feed List Table. The feed table helps you manage all created feeds from a single location.
Feed Table Overview
In the feed table, you can view the following details:
- Feed Name: Displays the name of your feed.
- Page Name: Shows the page where your Atomic Form is added.
- Time: Displays the feed creation date and time.
- Status: Shows whether the feed is enabled or disabled.
Understanding Feed Actions
Inside the feed list table, you will see an Action column containing several icons.
View Feed
The Eye Icon allows you to view the feed details and check which form is connected to the feed.
Edit Feed
The Edit Icon allows you to open the feed and update its Google Sheet settings at any time.
Delete Feed
The Delete Icon permanently removes the feed from the system.
Feed Status Toggle (Very Important)
The Status switch controls whether form entries will be sent to Google Sheets.
When Status is Enabled
- Form submissions will be processed.
- Entries will be automatically sent to the connected Google Sheet.
When Status is Disabled
- Form submissions will still be received on your website.
- No data will be sent to Google Sheets.
- The feed remains connected but inactive.
Feed Detail Settings
Click the Edit Icon to open the feed settings.
Feed Information
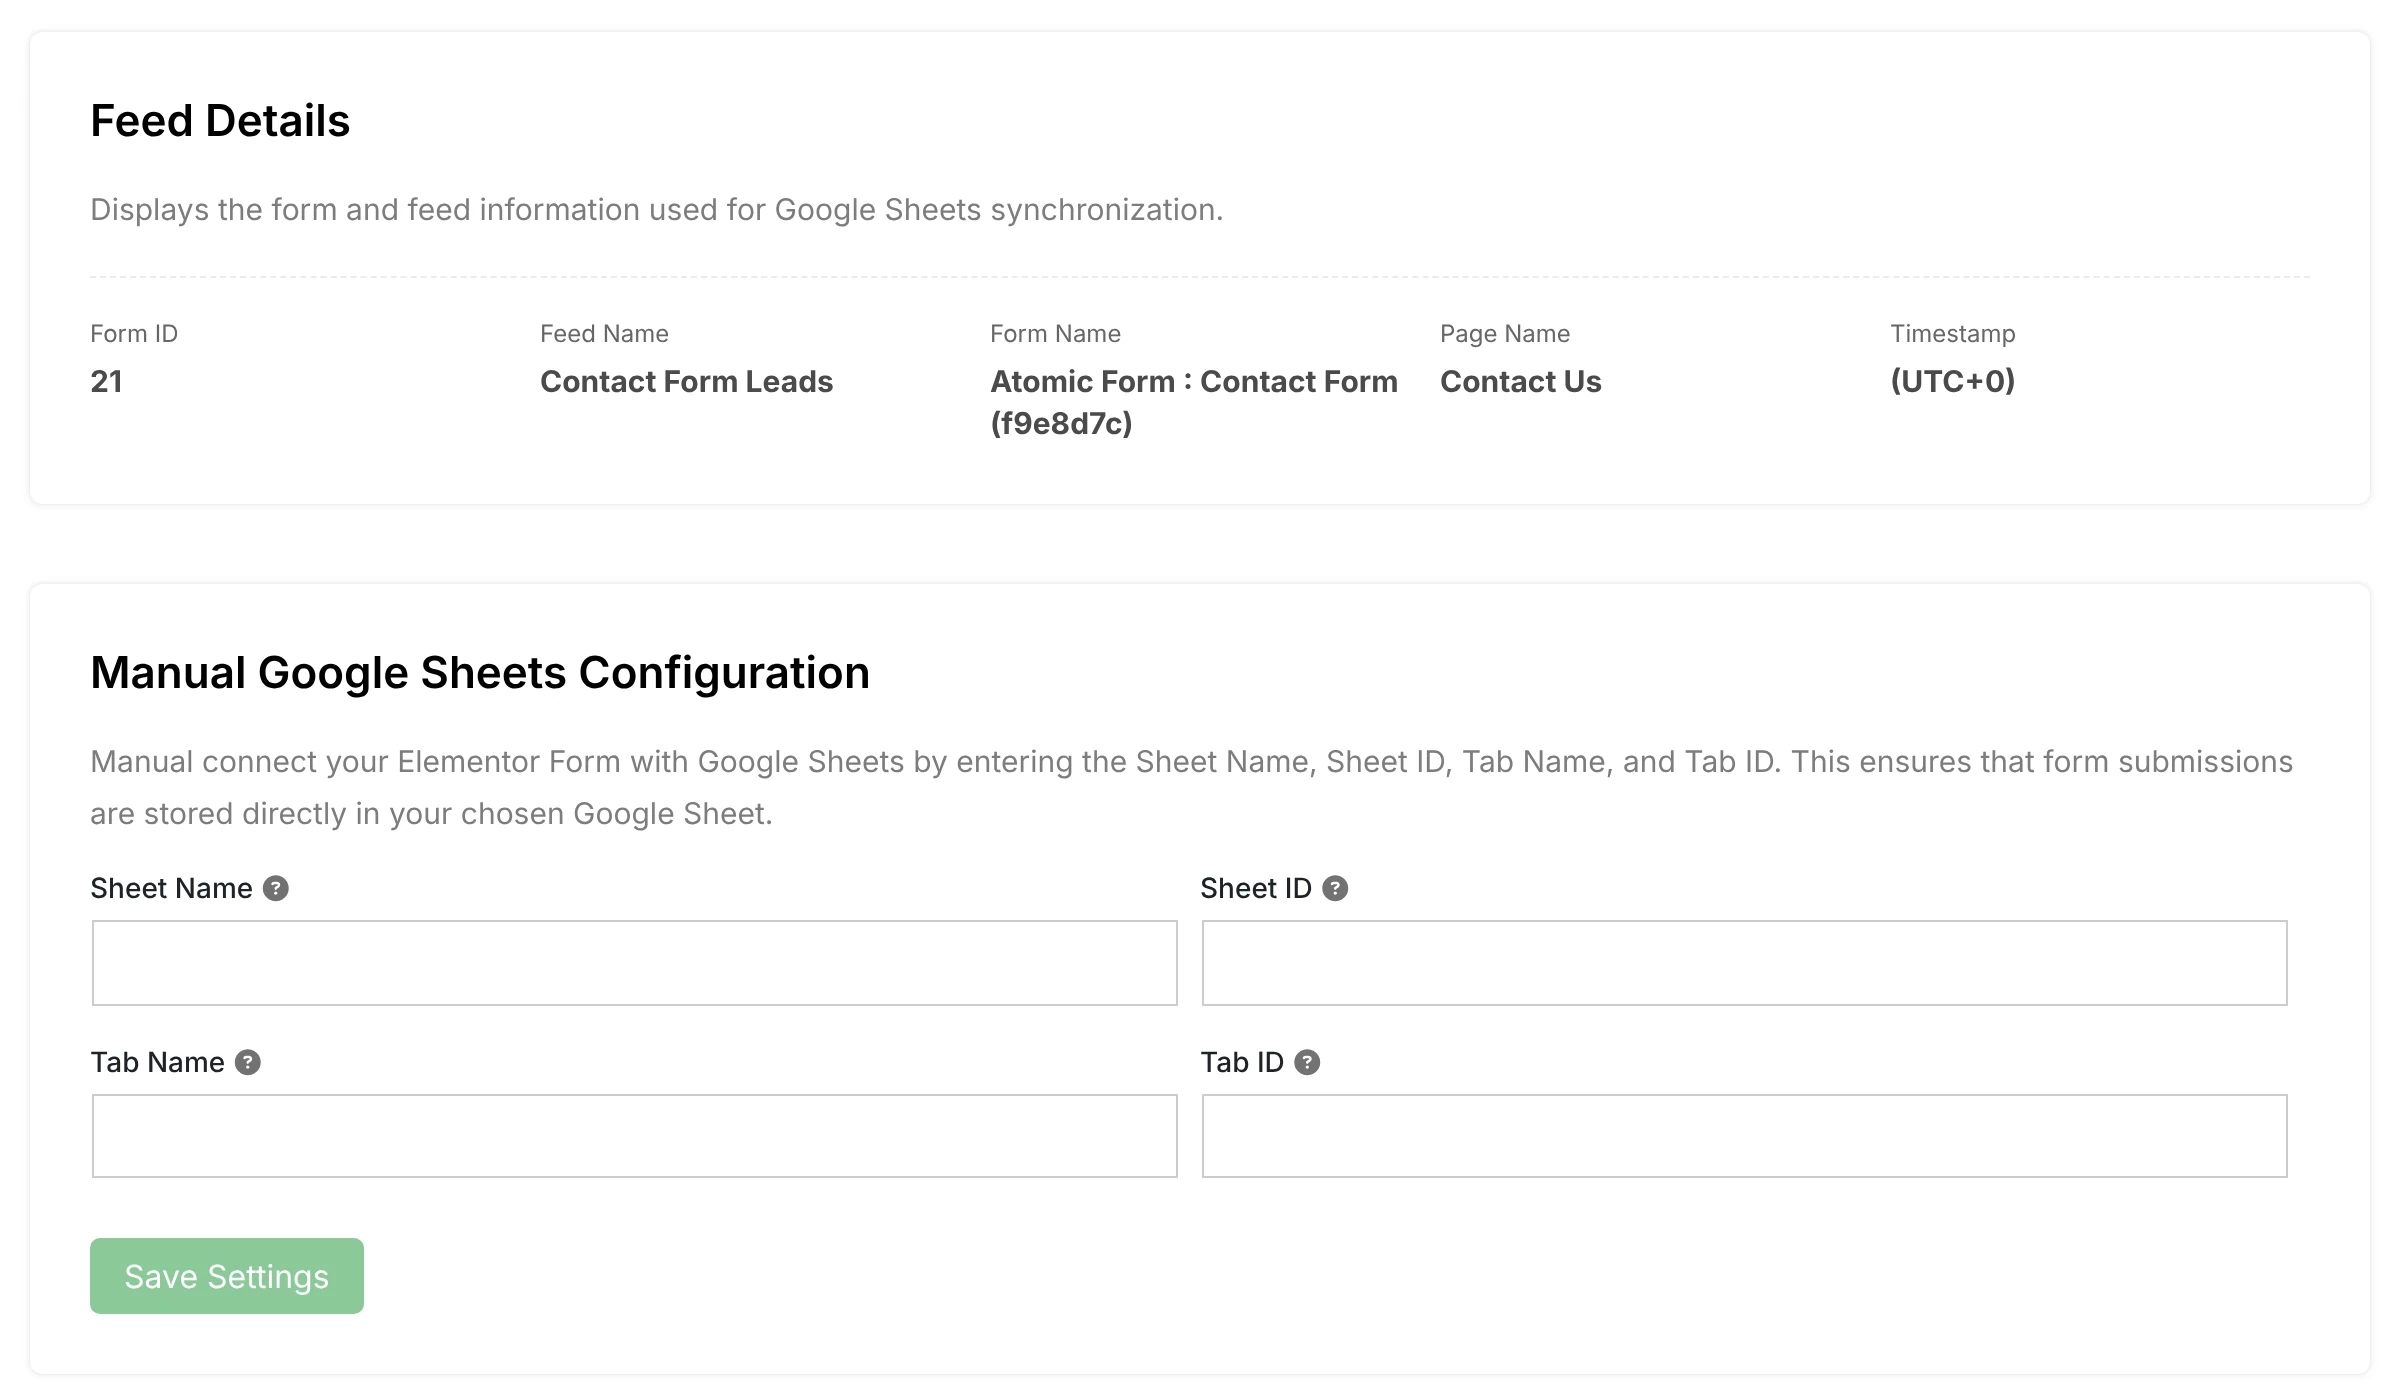
At the top of the feed detail page, the Feed Details box shows the connected form, feed name and page name. Use it to confirm that you are editing the correct feed.
Manual Google Sheets Configuration
In the Free Version, you connect your Google Sheet by entering its details manually. For more information about feed settings, see our Free Version feed settings guide.
Enable the Manual Google Sheets Configuration option to display the required settings:
- Sheet Name: The name of your Google Sheet.
- Sheet ID: The long code in your sheet’s URL, between
/d/and/edit. - Tab Name: The name of the tab where entries will be added.
- Tab ID: The number after
gid=in your sheet’s URL.
To get this information:
- Create or open your Google Sheet.
- Copy the Sheet Name, Sheet ID, Tab Name and Tab ID.
- Enter the information in the respective fields as shown in the screenshot.
- Click View Spreadsheet to confirm that the correct sheet is selected.
- Click Save Settings.
Add Headers to Your Google Sheet (Very Important)
In the Free Version, Google Sheet headers are not created automatically. You need to add them yourself before submitting the form.
- Open your connected Google Sheet and the correct tab.
- In row 1, type a column header for each form field.
- Make sure each header exactly matches the label of the field in your Atomic Form.
Example: If your Atomic Form has the fields Name, Email and Message, add these headers in row 1:
| A1 | B1 | C1 |
|---|---|---|
| Name | Message |
Test Form Submission
After saving the feed settings and adding the headers, test the integration.
- Open the page where your Atomic Form is published.
- Fill out the form with sample information.
- Click on the Submit button.
- Open your connected Google Sheet.
This confirms that your Atomic Form and Google Sheet integration is working correctly.

Frequently Asked Questions
Do I need Elementor Pro to use Atomic Form?
Yes. Atomic Form is available in Elementor Pro. If you are using Elementor Free, you can create your forms with the MetForm plugin and connect them with GSheetConnector instead.
Can I use GSheetConnector for Elementor Free with Atomic Form?
Yes. The Free Version supports Atomic Form. You enter the Sheet Name, Sheet ID, Tab Name and Tab ID manually, and add headers in row 1 of your Google Sheet that match your Atomic Form field labels.
Which actions do I need to add to my Atomic Form?
Open the Form container in the Structure panel and add both Collect Submissions and GSheetConnector under Actions After Submit.
Do I need to create Google Sheet headers manually in the Free Version?
Yes. In the Free Version, automatic Google Sheet header creation is not available. Before submitting the form, add your Atomic Form field labels as column headers in row 1 of your Google Sheet.
Why are my Atomic Form submissions not appearing in Google Sheets?
If your entries are not showing in Google Sheets, check the following:
Make sure GSheetConnector is added under Actions After Submit in your form.
Make sure the feed status is enabled.
Verify that your Google account connection is completed correctly.
Check that the correct Sheet and Tab details are entered.
Submit a new test entry after saving all settings.
Why is my Google Sheet receiving empty or incorrect data?
If your Google Sheet contains empty or incorrect values:
Check that the Google Sheet headers in row 1 match your Atomic Form field labels exactly.
Confirm that the correct Google Sheet and Tab are selected.
Submit a new test entry after updating settings.
Can I select which Atomic Form fields are sent to Google Sheets?
Field selection is available in the Pro Version. In the Free Version, the data is sent to the columns that match the headers you added in row 1.
Can I connect multiple Atomic Forms with Google Sheets?
Yes. Create a separate feed for each form under the Form Feeds tab. Each form can have its own Google Sheet connection.
The Free Version syncs new submissions after the connection is configured. Syncing older entries by date range is available in the Pro Version.Can I sync previous Atomic Form entries to Google Sheets in the Free Version?