Integration with Google – Existing Method
The Existing Method is the easiest way to connect GSheetConnector for Forminator Forms (PRO) with Google Sheets. With this method, you authenticate directly with your Google account, without creating a Google Cloud Project or configuring API credentials manually.
Once connected, form submissions from Forminator Forms are automatically sent to your selected Google Spreadsheet.
How the Existing Method Works
The Existing Method uses Google’s secure authentication process to connect your website with Google Sheets.
- No Google Cloud Project required.
- No Client ID configuration required.
- No Client Secret configuration required.
- Secure Google authentication.
- Quick setup process.
- Beginner-friendly configuration.
Step 1: Select Existing Method
Go to the Google API Settings page and select the Existing Client / Secret Key (Auto Setup) option from the authentication method dropdown.
- Open your WordPress Dashboard.
- Navigate to GSheetConnector for Forminator Forms.
- Open the Integration tab.
- Select Existing Client / Secret Key (Auto Setup).
- Click Save.

Step 2: Connect Your Google Account
After saving the authentication method, scroll down to the Google account connection section and click the Sign in with Google button to start the authentication process.
- Find the Connect Your Google Account section.
- Click Sign in with Google.
- Choose the Google account that owns your spreadsheets.
- Continue to Google’s authentication screen.


Step 3: Authorize Google Permissions
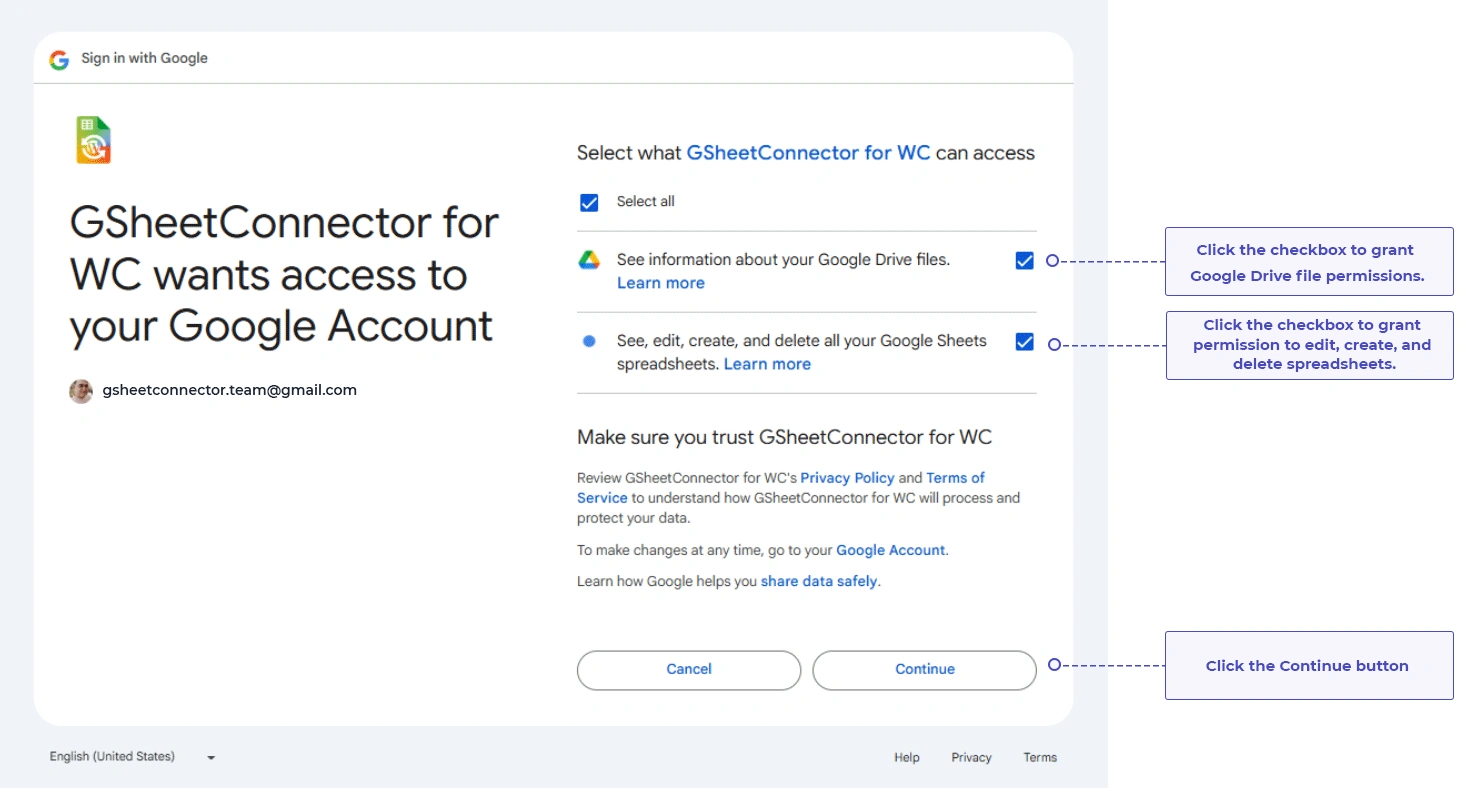
Google will show a permission screen asking for access to your Google account. These permissions allow the plugin to create, read, and update spreadsheet data generated from your Forminator form submissions.
- Select your Google account.
- Review the requested permissions.
- Click Continue.
- Allow access to Google Sheets and Google Drive.
Step 4: Verify Google Account Connection
After successful authentication, your Google account is connected automatically. The plugin will show:
- Connected Google account information.
- Authentication status.
- A successful connection message.
- Authorized Google account details.


Troubleshooting
If the integration is not working correctly, check the following:
- Make sure the Google Sheets API is enabled.
- Make sure the Google Drive API is enabled.
- Make sure Forminator Forms is installed, active, and updated to a supported version.
- Turn on the Debug Log in the plugin to see detailed error information.
What’s Next?
With your Google account connected, you’re ready to link your Forminator form to a Google Sheet and start sending submissions. Create a test submission to confirm that the new row appears in your sheet.
Frequently Asked Questions
What should I do if I see the error: "The site is experiencing technical difficulties. Please check your site admin email inbox for instructions"?
This error usually happens when there is an issue with Google authentication or API configuration.
To resolve this issue:
- Go to the Google API Settings page.
- Revoke the existing Google authentication token.
- Reconnect your Google account.
- Make sure the Google Drive API is enabled.
- Check your WordPress admin email inbox for more error details.
What should I do if the Google Sheets API limit has been reached?
Google sets API quotas to prevent excessive usage. If your website exceeds the allowed quota, synchronization may stop working for a while.
Review your Google API usage and quota settings. If needed, wait for the quota to reset or request a quota increase through the Google Cloud Console.
Please visit: Google Sheets API Usage Limits
What should I do if I see the message: "This app is not verified"?
Google may show a warning saying: “This app isn’t verified. This app hasn’t been verified by Google yet.”
This message is common and does not necessarily mean there is a security problem.
To continue:
- Click Advanced.
- Click Proceed.
- Continue the Google authentication process.
What should I do if I receive a 403 Error during authentication?
A 403 error usually means Google denied access during authentication.
Common reasons include:
- The required permissions were not granted.
- The OAuth consent screen is not configured correctly.
- The application is still in testing mode.
- The application has not been published.
To resolve this issue:
- Make sure all requested permissions are allowed.
- Check the OAuth consent screen settings.
- Publish the Google application if required.
- Reconnect your Google account and try again.
How do I fix the error: Range exceeds grid limits?
You may see an error similar to: Range (‘Entries’!A2302) exceeds grid limits. Max rows: 2301, max columns: 45.
This error happens when your Google Spreadsheet has reached its current row limit.
To resolve this issue:
- Open the affected Google Spreadsheet.
- Scroll to the bottom of the worksheet.
- Add more rows. We recommend adding at least 2,000 new rows.
- Save the spreadsheet and test another Forminator form submission.
Do I need a Google Cloud Project to use the Existing Method?
No. The Existing Method uses our pre-configured Google API credentials, so you don’t need to create a Google Cloud Project or set up your own Client ID and Secret Key.
Which Google permissions does the plugin request?
The plugin only requests access to Google Sheets and Google Drive. These are needed to create, read, and update spreadsheet data from your Forminator form submissions.
First, confirm that your Google account shows as connected in the Integration tab. Then check that the Google Sheets API and Google Drive API are enabled, and that the Sheet Name and Tab Name are correct. If the problem continues, turn on the Debug Log and check for errors.Why is my form data not appearing in Google Sheets?