How to Create a Google Service Account for CF7 Google Sheet Connector
To connect CF7 Google Sheet Connector with Google Sheets using the Service Account authentication method, you need to create a Google Service Account from the Google Cloud Console.
A Google Service Account works as a secure connection between your website and Google services. It allows CF7 Google Sheet Connector to send Contact Form 7 submission data directly to Google Sheets without requiring users to log in with their personal Google account every time.
Before creating a Service Account, make sure you have completed the required Google Cloud setup and enabled the necessary APIs.
Important Notes Before Creating a Service Account
Before creating a Service Account, please check the following requirements:
1. Google Cloud Project Required
You must have a Google Cloud project available. If you do not have an existing project, create a new project from the Google Cloud Console.
2. Enable Required Google APIs
Make sure the following APIs are enabled in your Google Cloud project:
- Google Sheets API
- Google Drive API
These APIs allow GSheetConnector to create, access, and manage Google Sheets for syncing Contact Form 7 submissions.
3. Keep Service Account Details Safe
The Service Account credentials are sensitive information. Do not share your Service Account JSON file publicly because it contains authentication details that provide access to your Google services.
4. Share Your Google Sheet With Service Account Email
After creating the Service Account, Google will provide a unique Service Account email address. You need to share your Google Sheet with this email address and provide the required access permission so GSheetConnector can store form submission data.

Step 1: Open Google Cloud Console
First, open the Google Cloud Console and sign in with your Google account.
After logging in, select the Google Cloud project that you want to use for your CF7 Google Sheet Connector integration.
If you do not have a project, create a new Google Cloud project before continuing with the Service Account setup.
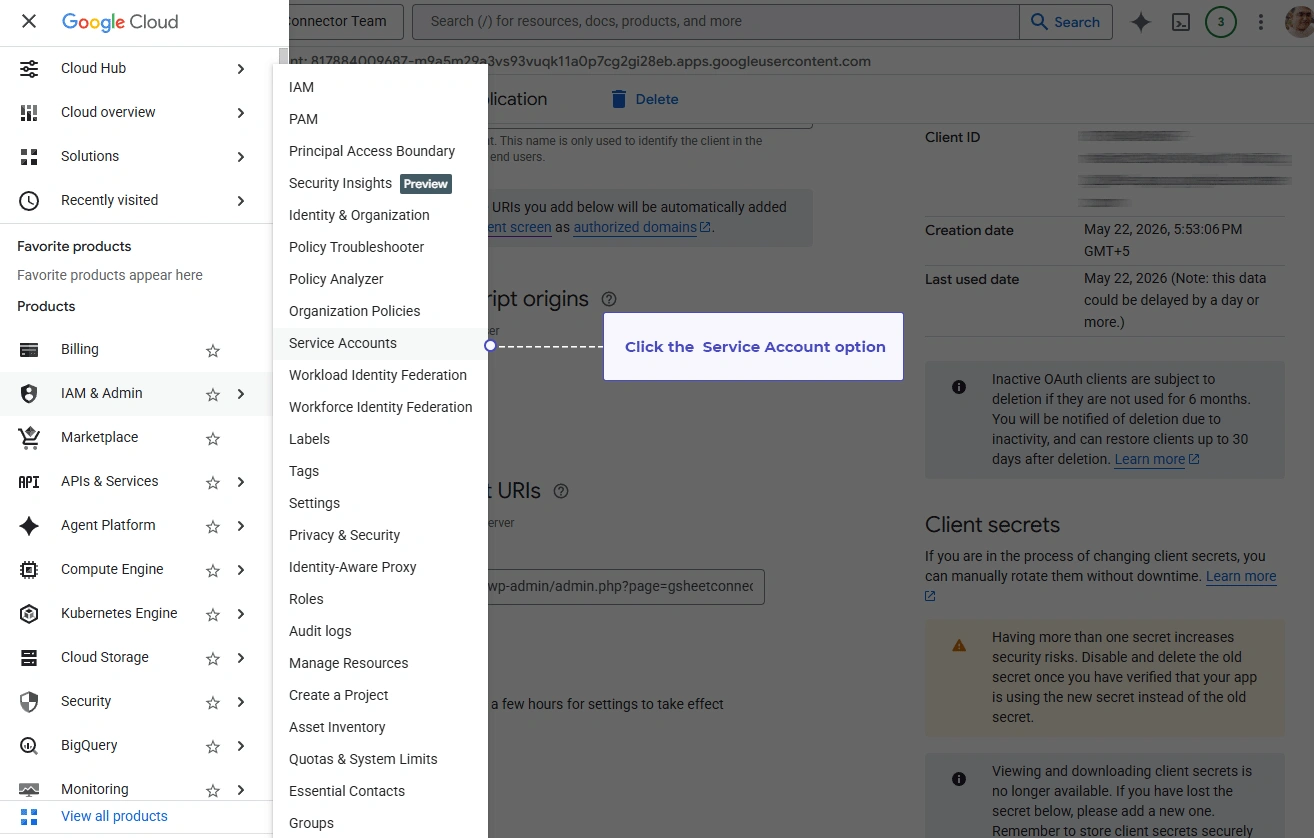
Step 2: Navigate to Service Accounts
From the Google Cloud Console dashboard, open the left-side navigation menu.
Go to: IAM & Admin → Service Accounts
The Service Accounts page allows you to create and manage Service Accounts for your selected Google Cloud project.
A Service Account is required because GSheetConnector uses it to securely communicate with Google Sheets.
Step 3: Create a New Service Account
On the Service Accounts page, click the Create Service Account button.
Google will open the Service Account creation form where you need to provide basic information about your Service Account.

Step 4: Enter Service Account Information
In the Service Account creation form, enter the required details.
Service Account Name
Enter a meaningful name that helps you identify this Service Account.
For example: CF7 GSheetConnector Integration
Using a clear name makes it easier to manage your Service Accounts if you have multiple projects.
Service Account ID
Google automatically creates a Service Account ID based on the Service Account name.
You can keep the automatically generated ID or update it if required.
Service Account Description
Add a short description explaining the purpose of this Service Account.
Example: This Service Account is used to connect CF7 Google Sheet Connector with Google Sheets.
After entering all required details, click the Create and Continue button.

Step 5: Configure Permissions and Access
After creating the Service Account details, Google will ask you to assign permissions.
These permissions control what actions the Service Account can perform within your Google Cloud project.
Select the required access level according to your Google Cloud setup.
The correct permissions help GSheetConnector communicate properly with Google services and sync your Contact Form 7 data with Google Sheets.
After configuring the permissions, click the Continue button.
Step 6: Complete Service Account Creation
After reviewing all details and permissions, click the Done button.
Google will complete the process and create your Service Account successfully.


Step 7: Create Service Account JSON Key
On the Service Account details page, go to the Keys tab.
You will find the Keys option at the top navigation menu.
Click on the Keys tab to create a new JSON Key file.
You can also create a key by clicking Add Key → Create new key.

Step 8: Select JSON Key Type
After clicking Create new key, a popup window will appear.
In the Key Type section:
- Select the JSON option
- Click the Create button
Google will automatically generate a new Service Account JSON Key file.

Step 9: Download the JSON Key File
After clicking the Create button, your Service Account JSON Key file will be generated and automatically downloaded to your local computer.
This JSON file contains the required credentials for connecting CF7 Google Sheet Connector with Google Sheets.

Step 10: Enable Google Sheets API and Google Drive API
Before connecting the JSON Key file with GSheetConnector, make sure the required APIs are enabled.
Go to Google Cloud Console → APIs & Services → Library
Search and enable the following APIs:
- Google Sheets API
- Google Drive API
These APIs are required to allow CF7 Google Sheet Connector to create, access, and sync data with Google Sheets.


Step 11: Upload the JSON Key File in CF7 Google Sheet Connector
Now log in to your WordPress dashboard and go to GSheetConnector → Integration.
Open the CF7 Google Sheet Connector integration settings.
Select the Service Account Method option.
Now click on Upload JSON File and select the JSON Key file that you downloaded from Google Cloud Console.


Step 12: Verify JSON Key Details
After uploading the JSON file successfully:
- The JSON key information will be displayed inside the top textarea field.
- Verify that the uploaded JSON data is displayed correctly.
After confirming the JSON details, click the Save button.

Step 13: Connect Service Account with Google Sheet
After saving the JSON Key file, CF7 Google Sheet Connector will verify the Service Account connection.
Once the connection is successful, your Service Account Email ID will be displayed with a successful connection message.

Step 14: Share Your Google Sheet with the Service Account Email
Now open the Google Sheet where you want to store Contact Form 7 submission data.
Click the Share button and add the Service Account Email ID that was displayed in the GSheetConnector integration page.
Give the required permission: Editor Access
This permission allows the Service Account to add and update data inside your Google Sheet.
Complete Service Account Integration Setup
After completing all the above steps:
- ✅ Service Account created successfully
- ✅ JSON Key file generated
- ✅ JSON Key uploaded in CF7 Google Sheet Connector
- ✅ Google APIs enabled
- ✅ Service Account connected successfully
- ✅ Google Sheet shared with Service Account email
Your CF7 Google Sheet Connector Service Account method setup is now complete.
Your Contact Form 7 submissions will now be automatically synced with your selected Google Sheet securely.

What’s Next?
With your Service Account connected and your Google Sheet shared, head over to the Plugin Settings – PRO Version guide to map your Contact Form 7 fields and start syncing submissions.
Prefer a simpler, no-setup connection instead? See the Integration with Google (Existing Method) or Integration with Google (Manual Method) guide.
Frequently Asked Questions
What is a Google Service Account?
A Service Account is a special Google account used by applications and servers instead of individual users. It enables secure server-to-server communication without requiring Google OAuth login.
Do I need a Client ID and Client Secret for the Service Account Method?
No. Service Account authentication uses a JSON Key File instead of OAuth Client ID and Client Secret credentials.
Why is my Google Sheet not receiving entries?
Ensure that Google Sheets API and Google Drive API are enabled, the JSON file is uploaded correctly, and the spreadsheet is shared with the Service Account email address.
Where can I find the Service Account email address?
Open your JSON Key File and locate the client_email value. This email address must be added to the Google Sheet sharing settings.
Can I use the same Service Account on multiple websites?
Yes. However, all websites using the same Service Account will share the same Google Cloud Project permissions and API quota.
What should I do if I receive a permission denied error?
Verify that the Google Sheet has been shared with the Service Account email address and that Editor access has been granted.
Can I regenerate the JSON Key File?
Yes. You can create a new key from the Service Account Keys section. After generating a new file, upload the new JSON file in the plugin settings and save again.
Is the Service Account Method more secure?
Yes. Since it uses server-to-server authentication and does not require manual Google account authorization, it is commonly used for production environments and automated integrations.
Is the Service Account Method available in the Free version?
No. Service Account authentication is a PRO feature. To use this method, you’ll need CF7 Google Sheet Connector PRO.
Which method should I choose: Existing, Manual, or Service Account?
The Existing Method is fastest for most users. The Manual Method suits those who want their own Google API credentials. The Service Account Method is ideal for agencies, multisite setups, or automated environments that need server-to-server authentication without repeated Google logins.
 CF7 Google Sheet Connector
 WPForms Google Sheet Connector
 Ninja Forms Google Sheet Connector
 Gravity Forms Google Sheet Connector
 Formidable Forms Google Sheet Connector
 Forminator Forms Google Sheet Connector
 Fluent Forms Google Sheet Connector
 JetFormBuilder Google Sheet Connector
 Elementor Forms Google Sheet Connector
 Avada Forms Google Sheet Connector
 Divi Forms Google Sheet Connector
 WooCommerce Google Sheet Connector
 Easy Digital Downloads Google Sheet Connector
 WordPress Core Google Sheet Connector