Hooks to Use Custom Mail Tags
CF7 Google Sheet Connector comes with a set of built-in Special Mail Tags like date and time. But sometimes you need to sync data that isn’t part of your form at all — the page URL a visitor submitted from, a UTM source, a formatted date-time stamp, or data pulled in from a third-party plugin.
That’s exactly what Custom Mail Tags are for. Using a couple of simple PHP hooks, you can register your own custom tag, feed it a value, and have it appear as a column in your connected Google Sheet — right alongside your regular form fields.
functions.php file or a custom/site-specific plugin). Basic familiarity with WordPress hooks and PHP is recommended. Always test changes on a staging site first.How Custom Mail Tags Work
Creating a custom mail tag is a two-step process:
- Register the tag using the
gscf7_special_mail_tagsfilter, which is specific to CF7 Google Sheet Connector. This tells the plugin your custom tag exists. - Supply the value using Contact Form 7’s own
wpcf7_special_mail_tagsfilter, which returns the actual data that should be stored against that tag.
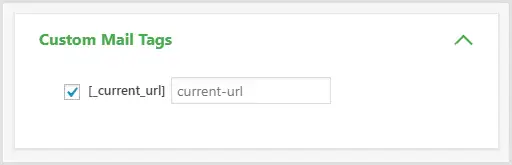
Once both are in place, your new tag becomes available to enable inside the Custom Mail Tags tab in your form’s Google Sheet Pro settings.
Example 1: Adding a Custom URL Mail Tag
This example creates a custom tag called _current_url that captures the exact page URL a visitor submitted the form from.
Step 1: Hook into the gscf7_special_mail_tags Filter
Register your custom tag name using the plugin’s filter:
add_filter( "gscf7_special_mail_tags", "add_custom_mail_tag", 10, 2 );
Step 2: Define the add_custom_mail_tag Function
Create a function to handle the addition of your custom tag. It accepts two parameters:
- $custom_mail_tags: An array where you specify the names of the custom tags you want to create (for example,
_current_url). - $form_id: The Contact Form 7 form ID the tag should be added to.
function add_custom_mail_tag( $custom_mail_tags, $form_id ) {
$custom_mail_tags[] = "_current_url";
return $custom_mail_tags;
}
Step 3: Pass the Value to the Google Sheet
Next, use Contact Form 7’s own wpcf7_special_mail_tags filter to intercept the tag and return its actual value:
add_filter("wpcf7_special_mail_tags", function( $output, $name, $html ) {
if ( $name === "_current_url" ) {
return "http://$_SERVER[HTTP_HOST]$_SERVER[REQUEST_URI]";
}
return $output;
}, 10, 3 );
In this example, whenever the _current_url tag is encountered, the code dynamically generates and returns the URL of the page the form was submitted from.
Output
If you include the [_current_url] tag inside your CF7 form’s email template like this:
Your submission was received from the following URL: [_current_url]
The processed output will look like this:
Your submission was received from the following URL: http://demo.www.gsheetconnector.com/wp-json/contact-form-7/v1/contact-forms/137/feedback
This lets you dynamically capture relevant, context-specific information alongside your regular form data.
Example 2: Merging Date & Time into a Single Custom Tag
If you’d rather have a single combined date-and-time column instead of two separate ones, you can create a _datetime custom tag.
Defining the Custom Tag
add_filter( "gscf7_special_mail_tags", "add_custom_mail_tag", 10, 2 );
function add_custom_mail_tag( $custom_mail_tags, $form_id ) {
$custom_mail_tags[] = "_datetime";
return $custom_mail_tags;
}
Passing the Value to the Google Sheet
add_filter( "wpcf7_special_mail_tags", function( $output, $name, $html ) {
if ( $name === "_datetime" ) {
 $submission = WPCF7_Submission::get_instance();
 if ( $timestamp = $submission->get_meta( 'timestamp' ) ) {
    $date = date_i18n( get_option( 'date_format' ), $timestamp );
    $time = date_i18n( get_option( 'time_format' ), $timestamp );
    $date_time = $date . " " . $time;
    return $date_time;
   }
  }
  return $output;
 }, 10, 3 );
This tag pulls the submission timestamp, formats it according to your WordPress date and time settings, and combines both into a single readable value.
Working with UTM Parameters
Want to track which campaign or source a lead came from? You can sync UTM parameters (like utm_source) to your Google Sheet as well.
To capture UTM data, you’ll need a UTM tracking plugin installed alongside Contact Form 7, such as Easy UTM Tracking with Contact Form 7. Once that’s active, you can pull the UTM value into a mail tag like this:
add_filter( "wpcf7_special_mail_tags", function( $output, $name, $html ) {
$submission = WPCF7_Submission::get_instance();
$posted_data = $submission->get_posted_data();
if ( $name === "_utm_source" ) {
  $output = $posted_data['utm_source'];
  return $output;
  }
 return $output;
}, 10, 3 );
Modifying Data Submitted by CF7 Before It’s Processed
Sometimes you need to transform or clean up form data before it’s synced — for example, renaming a field key or converting a checkbox value into something more readable. You can do this using Contact Form 7’s wpcf7_posted_data filter.
Example 1: Renaming a Field Key
This example takes a field called “Serial Number” and remaps it to a cleaner key before it’s processed:
add_filter( 'wpcf7_posted_data', 'unset_serial_number_to_posted_data', 10, 1 );

function unset_serial_number_to_posted_data( $posted_data ) {
$serial_number = $posted_data['Serial Number'];
unset( $posted_data['Serial Number'] );
$posted_data = array_merge($posted_data, array( 'cf7-serial-number-5' => $serial_number ) );
return $posted_data;
}
Example 2: Converting Checkbox Values to Readable Text
By default, checkbox values can be difficult to read in a spreadsheet. This example converts a checkbox field into a simple “checked” or “unchecked” value:
add_filter( 'wpcf7_posted_data', 'replace_checkbox_values', 10, 1 );

function replace_checkbox_values( $posted_data ) {
$checkbox_value = $posted_data['checkbox-500'];
unset( $posted_data['checkbox-500'] );
if( $checkbox_value[0] === "Checked" ) {
$posted_data = array_merge($posted_data, array( 'checkbox-500' => 'checked' ) );
}
else {
$posted_data = array_merge($posted_data, array( 'checkbox-500' => 'unchecked' ) );
}
return $posted_data;
}
Example 3: Reading Posted Data Inside a Custom Mail Tag
You can also access the full posted data array from within a custom mail tag callback, which is useful when the value you need depends on another field:
add_filter( "wpcf7_special_mail_tags", function( $output, $name, $html ) {
      if ( $name === "_cf7_serial_number" ) {
         $submission = WPCF7_Submission::get_instance();
         $posted_data = $submission->get_posted_data();
         $serial_number = $posted_data['serial-number'];
         return $serial_number;
         }
      return $output;
   }, 10, 3 );
$posted_data exactly matches the field name in your Contact Form 7 form — mismatched keys are the most common reason custom tags return empty values.What’s Next?
Once your custom tags are registered, head over to the Plugin Settings – PRO Version guide to enable them from the Custom Mail Tags tab and start syncing them to your Google Sheet.
Looking for the built-in fields instead of custom code? Check out the Special Mail Tags documentation.
Frequently Asked Questions
What is the gscf7_special_mail_tags filter used for?
This filter is specific to CF7 Google Sheet Connector and is used to register a new custom mail tag name. It doesn’t supply the tag’s value — that’s handled separately by Contact Form 7’s wpcf7_special_mail_tags filter.
Do I need coding knowledge to use custom mail tags?
Yes, basic PHP knowledge is required since custom mail tags are created by adding code hooks to your site, typically through a child theme’s functions.php file or a custom site-specific plugin.
Where should I add this custom code?
We recommend adding it to your child theme’s functions.php file, or better, a dedicated site-specific plugin, so your changes aren’t lost when your theme updates.
Is the Custom Mail Tags feature available in the Free version?
No. Custom Mail Tags are a PRO feature. However, UTM parameter tracking is an exception and works in the Free version as well, as long as you have a UTM tracking plugin installed.
After adding the code, why don't I see my custom tag in the plugin settings?
Make sure both filters (gscf7_special_mail_tags and wpcf7_special_mail_tags) are added correctly, the code has no syntax errors, and you’ve refreshed the Google Sheet Pro tab on your form. If it still doesn’t appear, verify the code was saved to a file that’s actually loading on your site.
Why is my custom mail tag showing an empty value?
This usually happens when the field name referenced in your code doesn’t exactly match the field name in your Contact Form 7 form, or when the submission data hasn’t been retrieved correctly using WPCF7_Submission::get_instance().
Can I use custom mail tags to pull in data from another plugin?
Yes. As long as the other plugin exposes its data through a PHP function, global variable, or hook, you can retrieve that data inside your wpcf7_special_mail_tags callback and return it as your custom tag’s value.
Do I need a separate plugin to track UTM parameters?
Yes. You’ll need a UTM tracking plugin for Contact Form 7, such as Easy UTM Tracking with Contact Form 7, installed and active before you can pull UTM values into a custom mail tag.
Can I modify or clean up form data before it gets synced to Google Sheets?
Yes. Use Contact Form 7’s wpcf7_posted_data filter to rename field keys or transform values, such as converting checkbox selections into more readable text, before the data is processed.